6.
Loosen the oil drain plug(A) and drain the fluid.
Replace the oil every 100,000km(62,137miles) in a general condition and every 40,000km(24,854miles) in severe usage conditions.
1. Severe usage (marked '*') is defined as
Frequent driving on rough road (Bumpy road, gravel road, snowy road, unpaved road . Etc.)
Frequent driving on mountain road, ascent/descent.
Police, taxi, commercial type operation or trailer towing. Etc.)
2. Transfer&diff carrier lubricants should be changed anytime transfer&diff carrier have been submerged in water
Remove the battery (-) terminal.
Lift up the vehicle.
Remove the propellar shaft (see 'DS' group-'PROPELLAR SHAFT')
Remove the front muffler(see EM group).
Remove the RH driveshaft (see 'DS' group-'DRIVESHAFT').
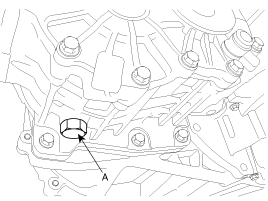
Loosen the oil drain plug(A) and drain the fluid.
After draining, re-tighten the oil drain plug.
TORQUE :
40~60 Nm (4~6 kgf.m, 28.9~43.4 lb-ft)
Remove the bracket mounting bolts(A-4ea).
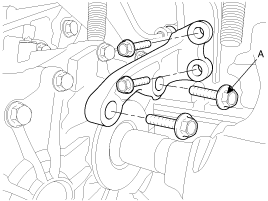
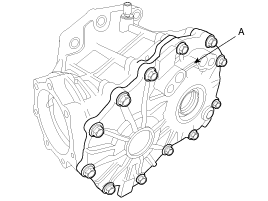
Remove the transfer case assembly by removing the mounting bolts(A-6ea).
The repair of the transfer assembly requires a special skill and furthermore an improper adjustment of the spacers may cause a severe noise and durability issue.
Hypoid gear set is manufactured and controlled as a pair. Any replacement of the part is to be done as a pair, hypoid gear shaft assembly (47308-39200) and pinion shaft (47311-39000).
Remove the battery negative (-) cable.
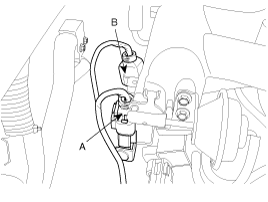
Disconnect the oxygen sensor connector(A,B) and remove the oxygen sensor connector wire clamp from a bracket. (Engine room right side).
Remove the wheel and tire (Right side).
Remove the engine side cover(A) (Right side).
Remove the drive shaft(A) from the transfer(see DS group).
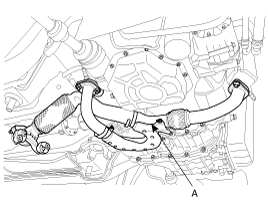
Remove the front exhaust pipe assembly(A).
Drain the transfer oil through drain plug hole.
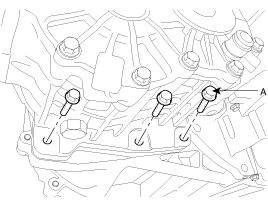
Remove the pinion case mounting bolts(A-4ea).

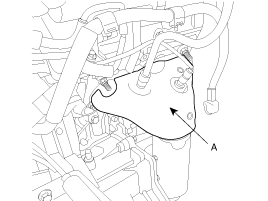
Remove the heat protector(A) using a hexagonal socket.
To remove the heat protector mounting bolt easily, before removing the heat protector mounting bolts(3EA), apply the mounting bolt with "WD-40 stops squeaks".
Lift up the vehicle.
Remove the exhaust manifold mounting nuts(7EA).
To remove the exhaust manifold mounting nut easily, before removing the exhaust manifold mounting nuts(7EA), apply the mounting nuts with "WD-40 stops squeaks".
Remove the transfer mounting bracket(A).
Remove the transfer mounting bolts(4EA).
Using a flat head screw driver, remove the transfer from the transaxle by moving the driver to left and right directions.
Installation is in reverse order of removal.
Must use a new O-ring(47354-39300) which is placed between the transaxle and the transfer case.
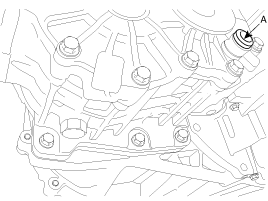
Remove the filler plug(A).
Refill the specification to the specified quantity.
Specification : API GL-5, SAE 75w/90
Quantity : Approx 0.8L
Install the transfer assembly to the transaxle.
To install the transfer easily, install it by moving the pinion left and right directions, and slightly rotating the inner drive shaft of transfer assembly.
Install the transfer mounting bolts(4EA).
TORQUE:
62~67 Nm(6.2~6.7 kgf.m, 44.8~48.5 lb-ft)
Install the transfer mounting bracket.
TORQUE:
47~51 Nm(4.7~5.1 kgf.m, 34.0~36.9 lb-ft) - 2EA
24~28 Nm(2.4~2.8 kgf.m, 17.4~20.3 lb-ft) - 2EA
Tighten the exhaust manifold mounting nuts(7EA).
TORQUE:
30~35 Nm(3.0~3.5 kgf.m, 21.7~25.3 lb-ft)
Tighten the heat protector(A) mounting nuts(3EA).
TORQUE:
11.8~14.7 Nm(1.2~1.5 kgf.m, 8.7~10.8 lb-ft)
Tighten the pinion case mounting bolts(6EA).
TORQUE:
37~40 Nm(3.7~4.0 kgf.m, 14.5~21.7 lb-ft)
Refill the transfer oil through the filler plug.
Install the front exhaust pipe assembly(A).
Install the drive shaft(RH) to the transfer assembly, lower arm ball joint mounting and steering bar tie rod ball joint.
Lower the vehicle down.
Install the engine side cover (RH) and the wheel and tire(RH).
Install the oxygen sensor connector bracket and connect the oxygen sensor connector(A,B). (Engine room right side).
Install the air intake hose and air cleaner cover and then connect the oxygen sensor connector.(A-Engine room left side).
Connect the battery negative (-) cable.
Drain the transfer oil through drain plug hole.
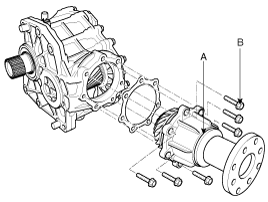
Remove the pinion assembly mounting bolts (7EA) and then remove the pinion assembly(A).
This assembly can be removed with a propella shaft assembly in 'REMOVAL' step.
Remove the dust cover(A).
Remove the transfer cover(A).
Remove the transfer drive gear assembly(A) and the hypoid gear shaft assembly(B) from the trasfer housing.

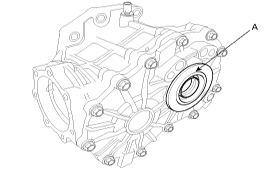
Remove the oil seal(A)(47452-39000, transfer drive gear left hand side).
When reassembling the transfer, be sure to always replace the oil seal(47452-39000) with new part.

Remove the oil seal(47352-39300) inside the transfer cover.
Using a sliding hammer, remove the taper roller bearing outer races(C) from the transfer cover(A) and housing(B).
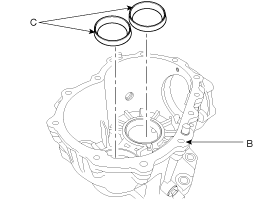
Remove the oil seal(A) from the transfer cover.
When reassembling the transfer, be sure to always replace the oil seal(47350-39300) with new part.

Check and replenish the transfer oil every 40,000km(24,855 miles).
Clean all parts except the taper roller bearings. Be careful about the direction of seals.
Oil bearings with hypoid gear oil API GL5.
Smear involute splines all covering with high pressure grease "Klueber microlube GNY202".
Measuring temperature: 20°±5°C.
O-ring has to be dipped into hypoid gear oil API GL5. Allow excess oil to drain.
Contact surface of the transfer housing to be coated with "SEALANT 732" or equivalent (silicon type sealing agent) prior to mounting. Coating thickness: 0.1mm MIN. Prior to coating, mating surfaces must be clean and free from oil and grease.
Transfer oil specification : Hypoid gear oil "API GL5, SAE 75W/90 SHELL SPIRAX EQUIVALENT". Filled up to lower filler plug thread level( Approx. 0.8L)
The hypoid gear set must be managed as a pair. Whenever installing or replacing a hypoid gear shaft assembly(47339-39300) or a pinion shaft(47311-39300). Make sure to install or replace as a pair.
In reassembling, refer to the two figures below.
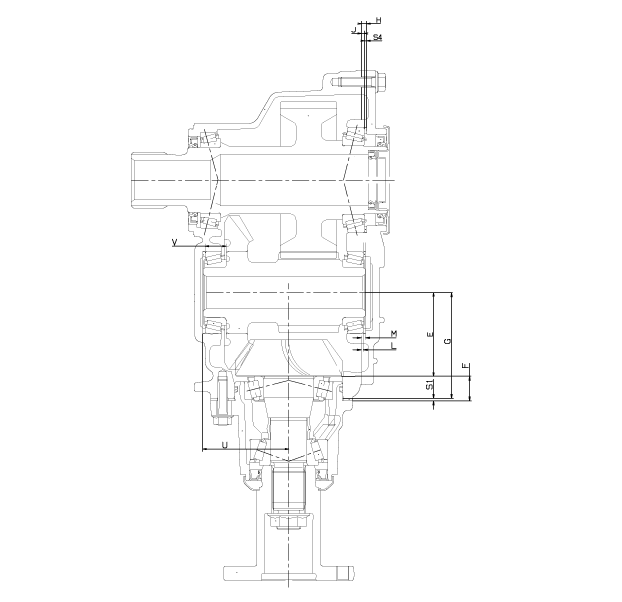
Install the transfer drive gear with the taper roller bearings(47366-39000 and 47465-39000) into transfer housing.
Applying the preload(100 to 200N) to bearings, measure the dimension J.
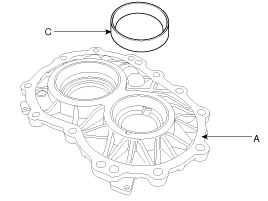
Measure the dimension H on transfer cover(47314-39200).
Select the spacer thickness from the chart below. Thickness S4= H-J+K. (K: Bearing preload = 0.07 to 0.11mm. )
Corresponding preload torque(measured without seals) : 120 to 180Ncm.
PART NUMBER | SPACER THICKNESS (mm) |
47383-39152 | 1.520-1.539 |
47383-39154 | 1.540-1.559 |
47383-39156 | 1.560-1.579 |
47383-39158 | 1.580-1.599 |
47383-39160 | 1.600-1.619 |
47383-39162 | 1.620-1.639 |
47383-39164 | 1.640-1.659 |
47383-39166 | 1.660-1.679 |
47383-39168 | 1.680-1.699 |
47383-39170 | 1.700-1.719 |
47383-39172 | 1.720-1.739 |
47383-39174 | 1.740-1.759 |
47383-39176 | 1.760-1.779 |
47383-39178 | 1.780-1.779 |
47383-39180 | 1.800-1.819 |
47383-39182 | 1.820-1.839 |
47383-39185 | 1.85-1.88 |
47383-39189 | 1.89-1.92 |
47383-39193 | 1.93-1.96 |
47383-39197 | 1.97-2.00 |
47383-39201 | 2.01-2.04 |
47383-39205 | 2.05-2.08 |
47383-39209 | 2.09-2.12 |
47383-39213 | 2.13-2.16 |
47383-39217 | 2.17-2.20 |
47383-39221 | 2.21-2.24 |
47383-39225 | 2.25-2.28 |
47383-39229 | 2.29-2.32 |
47383-39233 | 2.33-2.36 |
Reassemble the selected spacer above.
Measure the dimension U and V.
U…. Finished dimension of transfer housing.
V…. Distance from back of the hypoid gear to bearing measured under 100 to 200N preload.
Select the spacer thickness from the chart below. Thickness S2=U-(V + mounting distance 52.0 mm).
PART NUMBER | SPACER THICKNESS(mm) |
47384-39130 | 1.300-1.319 |
47384-39132 | 1.320-1.339 |
47384-39134 | 1.340-1.359 |
47384-39136 | 1.360-1.379 |
47384-39138 | 1.380-1.399 |
47384-39140 | 1.400-1.419 |
47384-39142 | 1.420-1.439 |
47384-39144 | 1.440-1.459 |
47384-39146 | 1.460-1.479 |
47384-39148 | 1.480-1.499 |
47384-39150 | 1.500-1.519 |
47384-39152 | 1.520-1.539 |
47384-39154 | 1.540-1.559 |
47384-39156 | 1.560-1.579 |
47384-39158 | 1.580-1.599 |
47384-39160 | 1.600-1.619 |
47384-39162 | 1.620-1.639 |
47384-39164 | 1.640-1.659 |
47384-39166 | 1.660-1.679 |
47384-39168 | 1.680-1.699 |
47384-39170 | 1.700-1.719 |
47384-39172 | 1.720-1.739 |
47384-39174 | 1.740-1.759 |
47384-39176 | 1.760-1.779 |
47384-39178 | 1.780-1.799 |
47384-39180 | 1.800-1.819 |
47384-39182 | 1.820-1.839 |
47384-39184 | 1.840-1.859 |
47384-39186 | 1.860-1.879 |
47384-39188 | 1.880-1.899 |
47384-39190 | 1.900-1.919 |
47384-39192 | 1.920-1.939 |
47384-39194 | 1.940-1.959 |
47384-39196 | 1.960-1.979 |
47384-39198 | 1.980-1.999 |
47384-39200 | 2.000-2.019 |
47384-39202 | 2.020-2.039 |
47384-39204 | 2.040-2.059 |
47384-39206 | 2.060-2.079 |
47384-39208 | 2.080-2.099 |
47384-39210 | 2.100-2.119 |
47384-39212 | 2.120-2.139 |
47384-39214 | 2.140-2.159 |
47384-39216 | 2.160-2.179 |
47384-39218 | 2.180-2.199 |
47384-39220 | 2.200-2.219 |
47384-39222 | 2.220-2.239 |
47384-39224 | 2.240-2.259 |
47384-39226 | 2.260-2.279 |
47384-39228 | 2.280-2.299 |
47384-39230 | 2.300-2.319 |
47384-39232 | 2.320-2.339 |
47384-39234 | 2.34-2.37 |
47384-39238 | 2.38-2.41 |
47384-39242 | 2.42-2.45 |
47384-39246 | 2.46-2.49 |
47384-39250 | 2.50-2.53 |
Install the spacer selected above, the taper roller bearings and the hypoid gear shaft assembly (47339-39300). And preload the assembly without the spacer(Hypoid gear shaft assembly-Transfer cover side) with 100 to 200N.
Measure the dimension L after 10 rotations.
Measure the dimension M on transfer cover (47314-39300).
Select the spacer thickness from the chart above in the step 7. Thickness S3=M-L+(0.09 to 0.12mm) preload.
Install the spacer selected above.
Install the taper roller bearing outer races to the transfer housing and cover.
Install a new oil seal(A) in the transfer housing.
Install the hypoid gear shaft assembly(A) and the transfer drive gear assembly(B) in the transfer housing.
Measure the dimension F.
F…. Assembled dimension of pinion assembly.
G…. Finished dimension of transfer housing.(=88.0mm)
E…. Mounting distance(=69.500 ± deviation).
Select the spacer thickness from the chart below. Thickness S1=E+F-G
If it is not possible to reach the exact mounting distance, select the next thinner spacer S1.
PART NUMBER | SPACER THICKNESS(mm) |
47385-39125 | 1.25-1.28 |
47385-39129 | 1.29-1.32 |
47385-39133 | 1.33-1.36 |
47385-39137 | 1.37-1.40 |
47385-39141 | 1.41-1.44 |
47385-39145 | 1.45-1.48 |
47385-39149 | 1.49-1.52 |
47385-39153 | 1.53-1.56 |
47385-39157 | 1.57-1.60 |
47385-39161 | 1.61-1.64 |
47385-39165 | 1.65-1.68 |
47385-39169 | 1.69-1.72 |
47385-39172 | 1.720-1.739 |
47385-39174 | 1.740-1.759 |
47385-39176 | 1.760-1.779 |
47385-39178 | 1.780-1.799 |
47385-39180 | 1.800-1.819 |
47385-39182 | 1.820-1.839 |
47385-39184 | 1.840-1.859 |
47385-39186 | 1.860-1.879 |
47385-39188 | 1.880-1.899 |
47385-39190 | 1.900-1.919 |
47385-39192 | 1.920-1.939 |
47385-39194 | 1.940-1.959 |
47385-39196 | 1.960-1.979 |
47385-39198 | 1.980-1.999 |
47385-39200 | 2.000-2.019 |
47385-39202 | 2.020-2.039 |
47385-39204 | 2.040-2.059 |
47385-39206 | 2.060-2.079 |
47385-39208 | 2.080-2.099 |
47385-39210 | 2.100-2.119 |
47385-39213 | 2.13-2.16 |
47385-39217 | 2.17-2.20 |
47385-39221 | 2.21-2.24 |
47385-39225 | 2.25-2.28 |
47385-39229 | 2.29-2.32 |
47385-39233 | 2.33-2.36 |
Install the pinion assembly with the selected spacer above and measure the circumference backlash on pinion.
(Measuring diameter, backlash and permissible deviations for measurement on pinion, see table below).
If the result is out of permissible range, change the spacer thickness S2, then start again with the step 8~12).
ITEM | SYMPTOM | REMEDY |
Backlash | When more than the standard value (0.16 ~ 0.21mm) | Adjust backlash by installing the spacer S1 using a thinner one and gradually installing a thicker one. |
When less than the standard value (0.16 ~0.21mm) | Adjust backlash by installing the spacer S1 using a thicker one and gradually installing a thinner one. |
ITEM | SYMPTOM | REMEDY | |
Hypoid gear tooth contacy pattern | 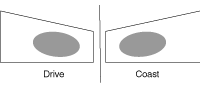 | ● Normal state ● Standard tooth pattern
● If the pattern deviates from the standard, adjust it by following procedure | |
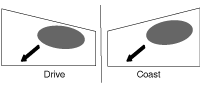 | ● Abnormal state ● The dirve surface inclines to TOE and TOP and the coast surface inclines to HEEL and TOP The tooth contact pattern can be moved to the arrow direction by installing the spacer S2 using a thinner one and gradually installing a thicker one. |
Remove the pinion assembly. With the spacer S3 and transfer cover mounted, combined preload torque for the hypoid gear shaft assembly and transfer gear (measured on transfer gear) should be 2.7 to 3.8Nm. The spacer S3 has to be changed, if the preload torque is not within the permissible range.
Tighten the pinion assembly mounting bolts (B-7EA) to install the pinion assembly(A).
TORQUE:
37~40 Nm(3.7~4.0 kgf.m, 14.5~21.7 lb-ft)
Before installing the pinion assembly, check the pinion O-ring and apply the oil to the O-ring.
To make the installation of the pinion to the transfer easier, tap the pinion using a plastic hammer after aligning the bolt holes.
