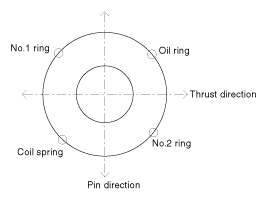
Thoroughly clean all parts to assembled.
Before installing the parts, apply fresh engine oil to all sliding and rotating surfaces.
Replace all gaskets, O-rings and oil seals with new parts.
Assemble the piston and the connecting rod.
Install the snap ring in one side of the piston pin hole.
Align the piston front mark and the connecting rod front mark.
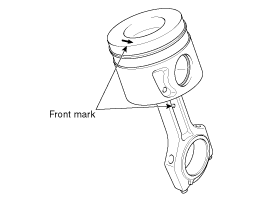
Insert the piston pin into the piston pin hole and the small end bore of connecting rod.
Install the snap ring in the other side after inserting the piston pin.
Apply a sufficient amount of engine oil to outer surface of the piston, inner surface of piston pin hole and small end bore of the connecting rod before inserting the piston pin.
Be careful not to damage and scratch the small end bore, piston pin hole and piston pin when insering the piston pin.
Set the snap ring firmly so that the snap ring can contact with the whole groove of the piston pin hole.
Install the piston rings.
Install the oil ring with the coil spring by hand.
Using a piston ring expander, install the 2 compression rings with the maker mark facing upward.
Position the piston rings so that the ring ends are as shown. (The No.1 ring should be on the opposite side of the No.2 ring and the oil ring should be on the opposite side of the coil spring.)
Install the connecting rod bearings.
Align the bearing claw with the groove of the connecting rod or connecting rod cap and install the bearings (A) in the connecting rod and connecting rod cap (B).
Apply a coat of engine oil after assembling the bearings.
Install the crankshaft main bearings.
Upper bearings have an oil groove of oil holes ; Lower bearings do not.
Align the bearing claw with the claw groove of the cylinder block, and push in the 5 upper bearings (A).
Align the bearing claw with the claw groove of the main bearing cap (B), and push in the 5 lower bearings (A).
Apply a coat of engine oil after assembling the main bearings.
Install the thrust bearings (No.4 journal).
Install the 2 thrust bearings (B) on both sides of the No.4 journal of the cylinder block with the oil groove (A) facing out.
Install the oil jet (A).
Tightening torque :
8.8 ~ 12.7N.m (0.9 ~ 1.3kgf.m, 6.5 ~ 9.4lb-ft)
Place the crankshaft (A) on the cylinder block.
Apply a coat of engine oil to the pin and main journals after assembling the crankshaft.
Install the main bearing caps (B) and tighten the cap bolts.
Do not reuse the bearing cap bolts.
Be sure to assemble the main bearing caps in correct order.
Install the main bearing cap with the arrow facing the front of the engine.
Tighten all the main bearing cap bolts with the specified torque first, and then retighten all the bolts with the specified angle.
Apply a light coat of engine oil on the threads of the bolts.
Tighten all the bolts with the specified torque in numerical order.
Tighten all the bolts with the specified angle in numerical order.
Tightening torque :
49.0N.m (5.0kgf.m, 36.2lb-ft) + 120°
Using the SST (09221-4A000), tighten the bolts.
Check that the crankshaft turns smoothly.
Check the crankshaft end play.
Install the piston and connecting rod assemblies.
Before installing the piston, apply a coat of engine oil to the ring grooves and cylinder bores.
Install the pistion and connecting rod assembly with the front marks facing the front of the engine.
Install the ring compressor, check that the rings are securely in place, then position the piston in the cylinder, and tap it in using the wooden handle of a hammer.
Stop after the ring compressor pops free, and check the connecting rod-to-crank journal alignment before pushing the piston into place.
Apply engine oil to the bolt threads. Install the rod caps with bearings, and tighten the bolts.
Tightening torque :
27.5~31.4N.m (2.8~3.2kgf.m, 20.3~33.1lb-ft) + 88°~92°
Using the SST (09221-4A000), tighten the bolts.
Do not reuse the connecting rod cap bolts.
Maintain downward force on the ring compressor to prevent the rings from expending before entering the cylinder bore.
Check the end play between piston and connecting rod.
Install the balance shaft & oil pump medule. (Refer to Lubrication system in this group)
Install new rear oil seal case assembly and the encorder.
Install the SST (09231-1M200, 09231-H110)(A) on the crankshaft.
Push in the rear oil seal case assembly (B) by hand and then tighten the bolts.
Tightening torque :
9.8 ~ 11.8N.m (1.0 ~ 1.2kgf.m, 7.2 ~ 8.7lb-ft)
Install the encorder (A).
Apply a coat of engine oil around PTFE seal before installing the rear oil seal assembly.
Be careful not to damage and twist the PTFE seal.
Remove harmful materials on the crankshaft flenge and use the SST to prevent the PTFE seal from being damaged and twisted.
Insert the dust cover completely into the slot of the cylinder block and then confirm the assembly with the sensor cable.
Do not reuse the rear oil seal case assembly.
When keeping the SST, keep away from foreign sub stances and be careful not tobe scratched.
When installing the rear oil seal case assembly, do not hold the lip portion.
AT : Install the drive plate (B) and adapter plate (A).
MT : Install the flywheel.
Tightening torque :
117.7 ~ 127.5N.m (12.0 ~ 13.0kgf.m, 86.8 ~ 94.0lb-ft)
Do not reuse the drive plate bolts and flywheel bolts.
Install the water pump assembly. (Refer to Cooling system in this group)
Install the high pressure pump. (Refer to FL group)
Install the cylinder head. (Refer to Cylinder head in this group)
Install the timing chain. (Refer to Timing chain in this group)
Install the intake manifold and exhaust manifold. (Refer to Intake and exhaust system in this group)
Remove the engine from a engine stand.
Install the engine assembly in the vehicle. (Refer to Engine and transaxle assembly in this group)