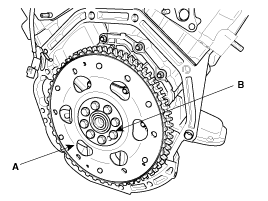
Remove the drive plate (A) and adapter plate (B).
Use fender covers to avoid damaging painted surfaces.
To avoid damage, unplug the wiring connectors carefully while holding the connector portion.
Mark all wiring and hoses to avoid misconnection.
Inspect the timing chain before removing the cylinder head.
Turn the crankshaft pulley so that the No.1 piston is at top dead center.
Engine removal is required for this procedure.
Remove the engine assembly from the vehicle. (Refer to Engine and transaxle assembly in this group)
Install the engine to engine stand for disassembly.
Remove the intake manifold and exhaust manifold. (Refer to Intake and exhaust system in this group)
Remove the timing chain. (Refer to Timing system in this group)
Remove the water temperature control assembly. (Refer to Cooling system in this group)
Remove the cylinder head. (Refer to Cylinder head in this group)
Remove the oil pump. (Refer to Lubrication system in this group)
Remove the oil filter assembly. (Refer to Lubrication system in this group)
Remove the drive plate (A) and adapter plate (B).

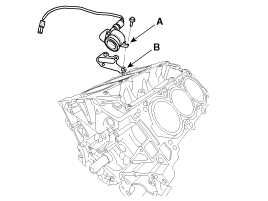
Remove the oil cover (A) and gasket (B).
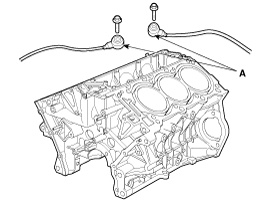
Remove the knock sensor (A).
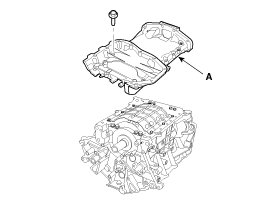
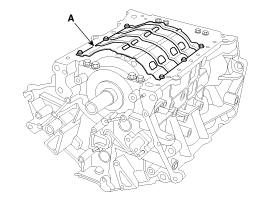
Remove the upper oil pan (A).
Remove the baffle plate (A).
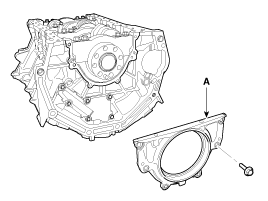
Remove the rear oil seal case (A).
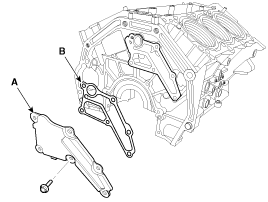
Remove the oil drain cover (A) and gasket (B).
Check the connecting rod end play.
Check the connecting rod cap oil clearance.
Remove the piston and connecting rod assemblies.
Using a ridge reamer, remove all the carbon from the top of the cylinder.
Push the piston, connecting rod assembly and upper bearing through the top of the cylinder block.
Keep the bearings, connecting rod and cap together.
Arrange the piston and connecting rod assemblies in the correct order.
Remove the crankshaft main bearing cap and check oil clearance.
Check the crankshaft end play.
Lift the crankshaft (A) out of engine, being careful not to damage journals.
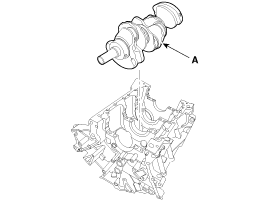
Arrange the main bearings and thrust bearings in the correct order.
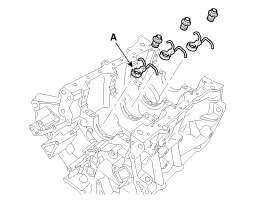
Remove the oil jets (A).
Remove the piston rings.
Using a piston ring expander, remove the 2 compression rings.
Remove 2 side rails and the spacer by hand.
Arrange the piston rings in the correct order only.
Disconnect the connecting rod from the piston.
Remove the snap ring at both ends of piston pin. And push the piston pin to seperate and connecting rod.
Check the connecting rod end play.
Using a feeler gauge, measure the end play while moving the connecting rod back and forth.
Standard end play : 0.1~ 0.25mm(0.004 ~ 0.010in.)
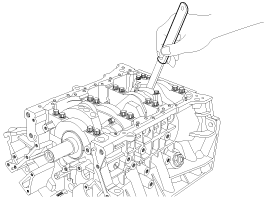
If out-of-tolerance, install a new connecting rod.
If still out-of-tolerance, replace the crankshaft.
Check the connecting rod bearing oil clearance.
Check the matchmarks on the connecting rod and cap are aligned to ensure correct reassembly.
Remove 2 connecting rod cap bolts.
Remove the connecting rod cap and bearing half.
Clean the crank pin and bearing.
Place plastigage across the crank pin.
Reinstall the bearing half and cap, and torque the bolts.
Tightening torque
17.7~21.6N.m (1.8~2.2kgf.m, 13.0~15.9lb-ft) + (88~92°)
Do not turn the crankshaft.
Remove 2 bolts, connecting rod cap and bearinghalf.
Measure the plastigage at its widest point.
Standard oil clearance
0.038 ~ 0.056mm(0.0015 ~ 0.0022in.)
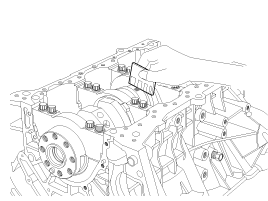
If the plastigage measures too wide or too narrow, remove the upper half of the bearing, install a new, complete bearing with the same color mark (select the color as shown in the next column), and recheck the clearance.
Do not file, shim, or scrape the bearings or the caps to adjust clearance.
If the plastigage shows the clearance is still incorrect, try the next larger or smaller bearing (the color listed above or below that one), and check clearance again.
If the proper clearance cannot be obtained by using the appropriate larger or smaller bearings, replace the crankshaft and start over.
If the marks are indecipherable because of an accumulation of dirt and dust, do not scrub them with a wire brush or scraper. Clean them only with solvent or detergent.
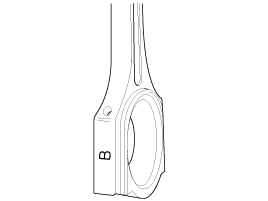
Class | Mark | Inside Diameter |
0 | a | 58.000 ~ 58.006mm (2.2834 ~ 2.2837in.) |
1 | b | 58.006 ~ 58.012mm (2.2837 ~ 2.2839in.) |
2 | c | 58.012 ~ 58.018mm (2.2839 ~ 2.2842in.) |
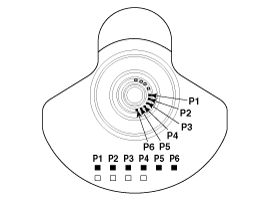
Class | Mark | Outside Diameter Of Pin |
I | 1 or A | 54.966 ~ 54.972mm (2.1640 ~ 2.1642in.) |
II | 2 or B | 54.960 ~ 54.966mm (2.1638 ~ 2.1640in.) |
III | 3 or C | 54.954 ~ 54.960mm (2.1635 ~ 2.1638in.) |
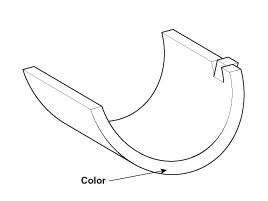
Class | Mark | Thickness Of Bearing |
E | Blue | 1.514 ~ 1.517mm (0.0596 ~ 0.0597in.) |
D | Black | 1.511 ~ 1.514mm (0.0595 ~ 0.0596in.) |
C | Brown | 1.508 ~ 1.511mm (0.0594 ~ 0.0595in.) |
B | Green | 1.505 ~ 1.508mm (0.0593 ~ 0.0594in.) |
A | Yellow | 1.502 ~ 1.505mm (0.0591 ~ 0.0593in) |
Selection
Connecting Rod Identification Mark | ||||
0(a) | 1(b) | 2(c) | ||
Crankshaft Indentification Mark | 1 or A | A (Yellow) | B (Green) | C (Brown) |
2 or B | B (Green) | C (Brown) | D (Black) | |
3 or C | C (Brown) | D (Black) | E (Blue) | |
Check the connecting rod.
When reinstalling, check the cylinder numbers on the connecting rods and the caps. When installing a new connecting rod, the notches for bearing fixing on the connecting rods and caps should face the same direction.
If one or both edge of the connecting rod thrust surface is damaged, replace the rod. If the inner surface of the rod is damaged or rough, also replace it.
Using a connecting rod aligner, measure the bent or torsion of the rod. If the measurement is near the specification, adjust the rod with a press. If the rod is bent or twisted excessily, replace it.
Allowable bend of connecting rod
0.05mm/100mm (0.0020in./3.9370in.)
Allowable twist of connecting rod
0.1mm/100mm (0.0039in./3.9370in.)
When assembling the rod without a bearing, there should be no differance.
Check the crankshaft bearing oil clearance.
To check main bearing-to-journal oil clearance, remove the main bearing caps and bearing halves.
Clean each main journal and bearing half with a clean shop tower.
Place one strip of plastigage across each main journal.
Reinstall the bearings and caps, then torque the bolts.
Tightening torque
49.0Nm(5.0 kgf.m, 36.2lb-ft) + 90°
19.6Nm(2.0 kgf.m, 14.5lb-ft)+ 120°
29.4 ~ 31.4Nm(3.0 ~ 3.2 kgf.m, 21.7 ~ 23.1lb-ft)
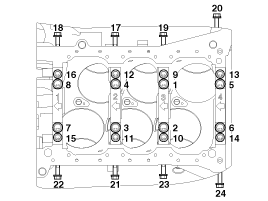
Do not turn the crankshaft.
Remove the cap and bearing again, and measure the widest part of the plastigage.
Standard oil clearance
0.022 ~ 0.040mm (0.0009 ~ 0.0016in.)
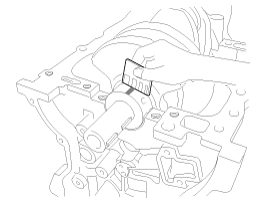
If the plastigage measures too wide or too narrow, remove the upper half of the bearing, install a new, complete bearing with the same color mark (select the color as shown in the next column), and recheck the clearance.
Do not file, shim, or scrape the bearings or the caps to adjust clearance.
If the plastigage shows the clearance is still incorrect, try the next larger or smaller bearing (the color listed above or below that one), and check clearance again.
If the proper clearance cannot be obtained by using the appropriate larger or smaller bearings, replace the crankshaft and start over.
If the marks are indecipherable because of an accumulation of dirt and dust, do not scrub them with a wire brush or scraper. Clean them only with solvent or detergent.
Crankshaft bore mark location
Letters have been stamped on the block as a mark for the size of each of the 4 main journal bores.
Use them, and the numbers or bar stamped on the crank (marks for main journal size), to choose the correct bearings.
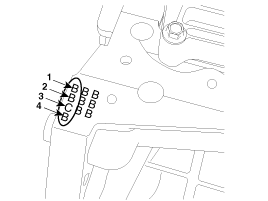
Class | Mark | Inside Diameter |
a | A | 73.500 ~ 73.506mm (2.8937 ~ 2.8939in.) |
b | B | 73.506 ~ 73.512mm (2.8939 ~ 2.8942in.) |
c | C | 73.512 ~ 73.518mm (2.8942 ~ 2.8944in.) |
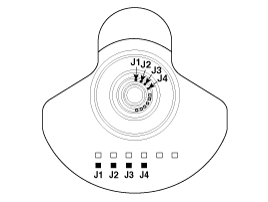
Class | Mark | Outside Diameter Of Journal |
I | 1 or A | 68.954 ~ 68.960mm (2.7147 ~ 2.7150in.) |
II | 2 or B | 68.948 ~ 68.954mm (2.7145 ~ 2.7147in.) |
III | 3 or C | 68.942 ~ 68.948mm (2.7142 ~ 2.7145in.) |
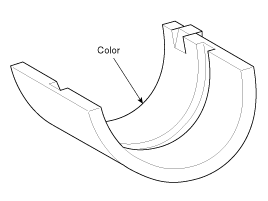
Class | Mark | Thickness Of Bearing |
E | Blue | 2.277 ~ 2.280mm (0.0896 ~ 0.0897in.) |
D | Black | 2.274 ~ 2.277mm (0.0895 ~ 0.0896in.) |
C | Brown | 2.271 ~ 2.274mm (0.0894 ~ 0.0895in.) |
B | Green | 2.268 ~ 2.271mm (0.0893 ~ 0.0894in.) |
A | Yellow | 2.265 ~ 2.268mm (0.0892 ~ 0.0893in.) |
Crankshaft Bore Identification Mark | ||||
a(A) | b(B) | c(C) | ||
Crankshaft Identification Mark | 1 or A | A (Yellow) | B (Green) | C (Brown) |
2 or B | B (Green) | C (Brown) | D (Black) | |
3 or C | C (Brown) | D (Black) | E (Blue) | |
Check crankshaft end play.
Using a dial indicator, measure the thrust clearance while prying the crankshaft back and forth with a screwdriver.
Standard end play
0.10 ~ 0.28mm (0.0039 ~ 0.0110in.)
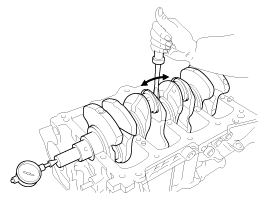
If the end play is greater than maximum, replace the thrust bearings as a set.
Thrust bearing thickness
2.41 ~ 2.45mm(0.0949 ~ 0.0964in.)
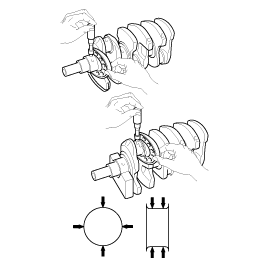
Inspect main journals and crank pins
Using a micrometer, measure the diameter of each main journal and crank pin.
Main journal diameter :
68.942 ~ 68.960mm (2.7142 ~ 2.7149in.)
Crank pin diameter :
54.954 ~ 54.972mm (2.1635 ~ 2.1642in.)
Remove the gasket material.
Using a gasket scraper, remove all the gasket material from the top surface of the cylinder block.
Clean the cylinder block
Using a soft brush and solvent, thoroughly clean the cylinder block.
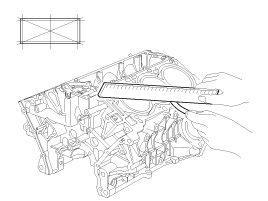
Inspect the top surface of the cylinder block for flatness.
Using a precision straight edge and feeler gauge, measure the surface contacting the cylinder head gasket for warpage.
Flatness of cylinder block gasket surface
Standard : Less than 0.05mm(0.0020 in.),
Less than 0.02mm(0.0008in.) / 150 x 150
Inspect cylinder bore diameter
Visually check the cylinder for vertical scratchs.
If deep scratches are present, replace the cylinder block.
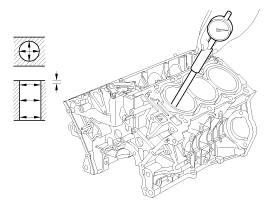
Inspect cylinder bore diameter
Using a cylinder bore gauge, measure the cylinder bore diameter at position in the thrust and axial directions.
Standard diameter
92.00 ~ 92.03mm (3.6220 ~ 3.6232in.)
Check the cylinder bore size code on the cylinder block.
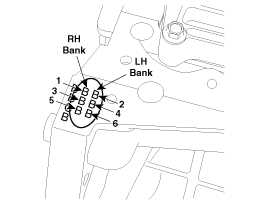
Class | Size code | Cylinder bore inner diameter |
A | A | 92.00 ~ 92.01mm (3.6220 ~ 3.6224in.) |
B | B | 92.01 ~ 92.02mm (3.6224 ~ 3.6228in.) |
C | C | 92.02 ~ 92.03mm (3.6228 ~ 3.6232in.) |
Check the piston size code(A) and the front mark(B) on the piston top face.
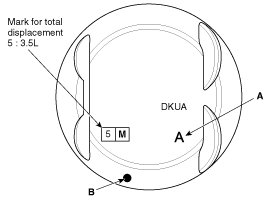
Class | Size code | Piston outer diameter |
A | A | 91.96 ~ 91.97mm (3.6204 ~ 3.6208in.) |
B | B | 91.97 ~ 91.98mm (3.6208 ~ 3.6212in.) |
C | C | 91.98 ~ 91.99mm (3.6212 ~ 3.6216in.) |
Select the piston related to cylinder bore class.
Clearance : 0.03 ~ 0.05mm(0.0012 ~ 0.0020in.)
Oversize pistons should be selected according to the largest bore cylinder.
Identification Mark | Size |
0.1 | 0.1 mm (0.004 in) |
0.25 | 0.25 mm (0.010 in) |
The size of piston is stamped on top of the piston.
Measure the outside diameter of the piston to be used.
According to the measured O.D(Outer Diameter), calculate the new bore size.
New bore size = piston O.D + 0.03 to 0.05mm (0.0012 to 0.0020in) (clearance between piston and cylinder) - 0.01mm (0.0004in) (honing margin.)
Bore each of the cylinders to the calculated size.
To prevent distortion that may result from temperature rise during honing, bore the cylinder holes in the firing order.
Hone the cylinders, finishing them to the proper dimension (piston outside diameter + gap with cylinder).
Check the clearance between the piston and cylinder.
Standard : 0.03 ~ 0.05mm (0.0012 ~ 0.0020in)
When boring the cylinders, finish all of the cylinders to the same oversize. Do not bore only one cylinder to the oversize.
Clean piston
Using a gasket scraper, remove the carbon from the piston top.
Using a groove cleaning tool, clean the piston ring grooves.
Using solvent and a brush, thoroughly clean the piston.
Do not use a wire brush.
The standard measurement of the piston outside diameter is taken 12 mm (0.4724 in.) from the bottom of the piston.
Standard diameter
91.96 ~ 91.99mm (3.6204 ~ 3.6216in.)
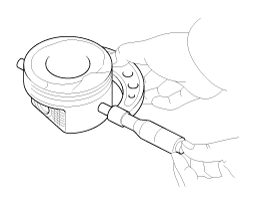
Calculate the difference between the cylinder bore diameter and the piston diameter.
Piston-to-cylinder clearance
0.03 ~ 0.05mm (0.0012 ~ 0.0020in.)
Inspect the piston ring side clearance.
Using a feeler gauge, measure the clearance between new piston ring and the wall of the ring groove.
Piston ring side clearance
Standard
No.1 : 0.04 ~ 0.08mm (0.0015 ~ 0.0031in.)
No.2 : 0.04 ~ 0.08mm (0.0015 ~ 0.0031in.)
Oil ring : 0.06 ~ 0.15mm (0.0024 ~ 0.0059in.)
Limit
No.1 : 0.1mm (0.004in.)
No.2 : 0.1mm (0.004in.)
Oil ring : 0.2mm (0.008in.)
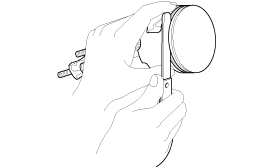
If the clearance is greater than maximum, replace the piston.
Inspect piston ring end gap.
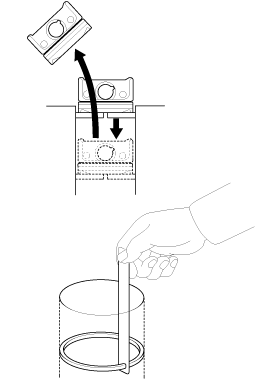
To measure the piston ring end gap, insert a piston ring into the cylinder bore. Position the ring at right angles to the cylinder wall by gently pressing it down with a piston. Measure the gap with a feeler gauge. If the gap exceeds the service limit, replace the piston ring. If the gap is too large, recheck the cylinder bore diameter against the wear limits. If the bore is over the service limit, the cylinder block must be replaced.
Piston ring end gap
Standard
No.1 : 0.17 ~ 0.32mm (0.0067 ~ 0.0126in.)
No.2 : 0.37 ~ 0.52mm (0.0145 ~ 0.0204in.)
Oil ring : 0.20 ~ 0.50mm (0.0078 ~ 0.0196in.)
Limit
No.1 : 0.6mm (0.0236in.)
No.2 : 0.7mm (0.0275in.)
Oil ring : 0.8mm (0.0315in.)
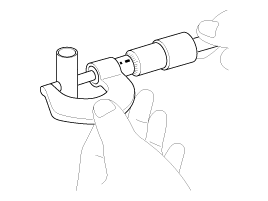
Measure the diameter of the piston pin.
Piston pin diameter
21.097 ~ 22.000mm (0.8305 ~ 0.8661in.)
Measure the piston pin-to-piston clearance.
Piston pin-to-piston clearance
0.004 ~ 0.013mm (0.00015~ 0.00051in.)
Check the difference between the piston pin diameter and the connecting rod small end diameter.
Piston pin-to-connecting rod interference
0.005 ~ 0.019mm (0.00019 ~ 0.00074in.)
Thoroughly clean all parts to be assembled.
Before installing the parts, apply fresh engine oil to all sliding and rotating surfaces.
Replace all gaskets, O-rings and oil seals with new parts.
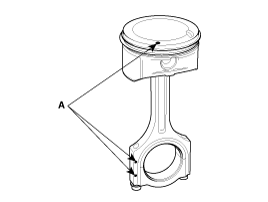
Assemble the piston and the connecting rod.
Install the piston pin with snap ring 2EA and check the snap ring assembly thoroughly.
The piston front mark and the connecting rod front mark must face the timing belt side of the engine.
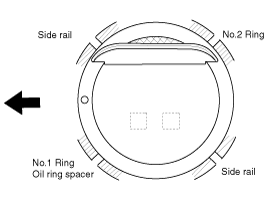
Install the piston rings.
Install the oil ring spacer and 2 side rails by hand.
Using a piston ring expander, install the 2 compression rings with the code mark facing upward.
Position the piston rings so that the ring ends are as shown.
Install the connecting rod bearings.
Align the bearing claw with the groove of the connecting rod or connecting rod cap.
Install the bearings(A) in the connecting rod and connecting rod cap(B).
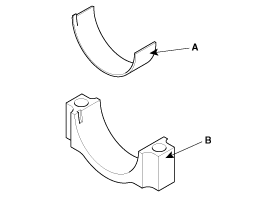
When reassembling the connecting rods and the caps, ensure te front marks on then and the number of cylinder.
Install the oil jets (A).
Tightening torque
27.5 ~ 31.3 N.m (2.8 ~ 3.2kgf.m, 20.2 ~ 23.1lb-ft)

Install the main bearings.
Upper bearings have an oil groove of oil holes; Lower bearings do not.
Align the bearing claw with the claw groove of the cylinder block, push in the 4 upper bearings(A).
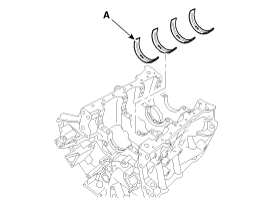
Align the bearing claw with the claw groove of the main bearing cap, and push in the 4 lower bearings.
Install the thrust bearings.
Install the 2 thrust bearings(A) under the No.3 journal position of the cylinder block with the oil grooves facing outward.
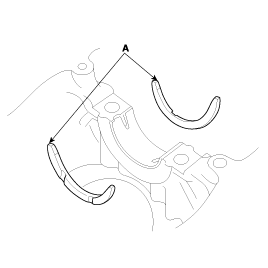
Place the crankshaft(A) on the cylinder block.

Place the main bearing caps on cylinder block.
Install the main bearing cap bolts.
Install and uniformly tighten the bearing cap bolts, in several passes, in the sequence shown.
Tightening torque
Main bearing cap bolt
49.0N.m (5.0 kgf.m, 36.2lb-ft) + 90° (1 ~ 8)
19.6N.m (2.0 kgf.m, 14.5lb-ft) + 120° (9 ~ 16)
29.4 ~ 31.4N.m (3.0 ~ 3.2 kgf.m, 21.7 ~ 23.1lb-ft) (17 ~ 24)
Always use new main bearing cap bolts.
If any of the bearing cap bolts are broken or deformed, replace it.

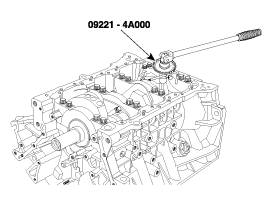
Use the SST( 09221-4A000 ), install main bearing cap bolts.
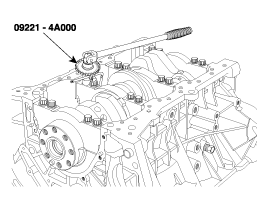
Check that the crankshaft turns smoothly.
Check crankshaft end play.
Install the piston and connecting rod assemblies.
Before installing the pistons, apply a coat of engine oil to the ring grooves and cylinder bores.
Install the ring compressor, check that the bearing is securely in place, then position the piston in the cylinder, and tap it in using the wooden handle of a hammer.
Stop after the ring compressor pops free, and check the connecting rod-to-check journal alignment before pushing the piston into place.
Apply engine oil to the bolt threads. Install the rod caps with bearings, and torque the bolts.
Tightening torque
17.7~21.6N.m (1.8~2.2kgf.m, 13.0~15.9lb-ft) + (88~92°)
Always use new connecting rod bearing cap bolts.
Maintain downward force on the ring compressor to prevent the rings from expanding before entering the cylinder bore.
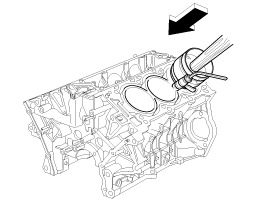
Use SST(09221-4A000), install connecting rod bearing cap bolts.

Check the connecting rod end play.
Install the oil drain cover(A) with a new gasket (B).
Tightening torque
9.8 ~ 11.8Nm (1.0 ~ 1.2kgf.m, 7.2 ~ 8.7lb-ft)

Install the rear oil seal case(A).
Tightening torque
9.8 ~ 11.8Nm (1.0 ~ 1.2kgf.m, 7.2 ~ 8.7lb-ft)

Clean the sealing face before assembling two parts.
Remove harmful foreign materials on the sealing face before applying sealant
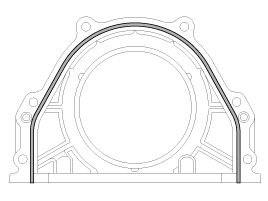
Before assembling rear oil seal case, the liquid sealant TB1217H should be applied to the rear oil seal case.
The part must be assembled within 5 minutes after sealant was applied.
Apply sealant to the inner threads of the bolt holes.
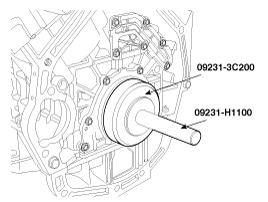
Using the SST(09231-3C200, 09231-H1100), install rear oil seal.
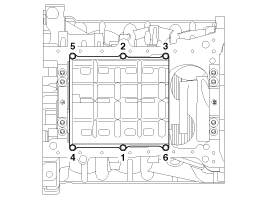
Install the baffle plate.
Install and uniformly tighten the baffle plate bolts, in several passes, in the sequence shown.
Tightening torque
9.8 ~ 11.8Nm (1.0 ~ 1.2kgf.m, 7.2 ~ 8.7lb-ft)
Install the upper oil pan.
Using a gasket scraper, remove all the old packing material from the gasket surfaces.
Before assembling the oil pan, the liquid sealant TB1217H should be applied on upper oil pan.
The part must be assembled within 5 minutes after the sealant was applied.
Bead width : 2.5mm (0.1in.)
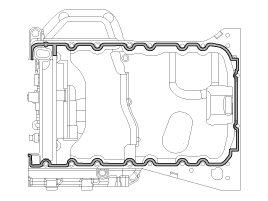
Clean the sealing face before assembling two parts.
Remove harmful foreign materials on the sealing face before applying sealant
When applying sealant gasket, sealant must not protrude into the inside of oil pan.
To prevent leakage of oil, apply sealant gasket to the inner threads of the bolt holes.
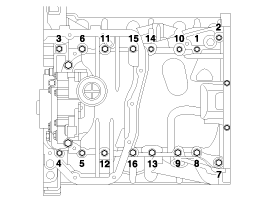
Install the upper oil pan.
Uniformly tighten the bolts in several passes.
Tightening torque
9.8 ~ 11.8Nm (1.0 ~ 1.2kgf.m, 7.2 ~ 8.7lb-ft)
Install the oil cover (A) and gasket (B).
Tightening torque
9.8 ~ 11.8Nm (1.0 ~ 1.2kgf.m, 7.2 ~ 8.7lb-ft)

Install the knock sensor (A).
Tightening torque
15.7 ~ 23.5Nm (1.6 ~ 2.4kgf.m, 11.6 ~ 17.3lb-ft)

Install the drive plate (A) and adapter plate (B).
Tightening torque :
71.6 ~ 75.5N.m (7.3 ~ 7.7kgf.m, 52.8 ~ 55.7lb-ft)

Install the oil filter assembly. (Refer to Lubrication system in this group)
Install the oil pump. (Refer to Lubrication system in this group)
Install the cylinder head. (Refer to Cylinder head in this group)
Install the water temperature control assembly. (Refer to Cooling system in this group)
Install the timing chain. (Refer to Timing system in this group)
Install the intake manifold and exhaust manifold. (Refer to Intake and exhaust system in this group)
Install the engine assembly to the vehicle. (Refer to Engine and transaxle assembly in this group)