3.
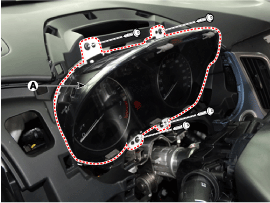
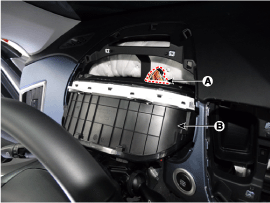
Remove the cluster (A) from the housing after removing 4 screws.
Disconnect the negative (-) battery terminal.
Remove the cluster fascia panel.
(Refer to Body - "Cluster Fascia Panel")
Remove the cluster (A) from the housing after removing 4 screws.
Disconnect the cluster connecter (A) and then remove the cluster (B).
Connect the cluster connector.
Install the cluster assembly.
Install the cluster facia panel.
Connect the negative (-) battery terminal.
Check point (Warning indicator)
Fault conditions and normal operating conditions, refer to the owner's manual.
NO | Ref Symbol | Name | Color | Signal input | Signal Control (Unit / Sensor) | Check point |
1 |  | Turnsignal Lamp (Left) | Green | B-CAN | BCM | 1. Multifunction switch 2. BCM 3. CAN failure |
2 |  | Turnsignal Lamp (Right) | Green | B-CAN | BCM | 1. Multifunction switch 2. BCM 3. CAN failure |
3 |  | Front Fog Lamp | Green | B-CAN | SJB | 1. Multifunction switch 2. SJB 3. CAN failure |
4 |  | Tail Lamp | Green | B-CAN | BCM | 1. Multifunction switch 2. BCM 3. CAN failure |
5 |  | High Beam | Blue | B-CAN | SJB | 1. Multifunction switch 2. SJB 3. CAN failure |
6 |  | Rear Fog lamp | Yellow | B-CAN | SJB | 1. Multifunction switch 2. SJB 3. CAN failure |
7 |  | Tail gate open | Yellow | B-CAN | SJB | 1. SJB 2. CAN failure |
8 |  | Immobilizer | Yellow | CAN | Immobilizer Unit | 1. Immobilizer system 2. Wiring failure 3. CAN failure |
9 |  | ABS | Yellow | C-CAN | ABS TCS | 1. ABS system 2. TCS system 3. CAN failure |
10 |  | ESC | Yellow | C-CAN | TCS | 1. TCS system 2. CAN failure |
11 |  | ESC OFF | Yellow | C-CAN | TCS | 1. TCS system 2. CAN failure |
12 |  | Check Engine | Yellow | C-CAN | ECM | 1. ECM 2. CAN failure |
13 |  | Fuel Low | Yellow | Hard-wired | Fuel sender | 1. Fuel sender 2. Wiring failure |
14 | 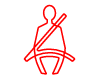 | Seat belt | Red | B-CAN | BCM | 1. Seat belt switch 2. BCM 3. CAN failure |
15 |  | Door Open | Red | B-CAN | BCM | 1. Door switch 2. BCM 3. CAN failure |
16 |  | ABS Parking Brake Brake Fluid | Red | C-CAN | EVP ABS TCS | 1. ABS system 2. TCS system 3. EVP system 4. CAN failure |
B-CAN | SJB (Park brake switch,Brake Fluid switch) | 1. Brake fluid switch 2. Parking brake switch 3. SJB 4. CAN failure | ||||
17 |  | Air Bag | Red | C-CAN | SRSCM | 1. SRSCM system 2. CAN failure |
18 | 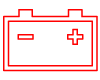 | Alternator (Battery Charge) | Red | Hard-wired | Alternator | 1. Alternator 2. Wiring failure |
19 | 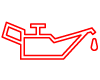 | Oil Pressure | Red | Hard-wired | Oil Pressure switch | 1. Oil Pressure switch 2. Wiring failure |
20 |  | EPS (MDPS) | Red | C-CAN | MDPS | 1. MDPS unit 2. MDPS motor 3. CAN failure |
21 |  | KEY OUT | Red | B-CAN | SMK | 1. SMK system 2. CAN failure |
22 |  | Low Beam | Green | B-CAN | BCM | 1. Multifunction Switch 2. BCM 3. CAN failure |
23 |  | GLOW | Yellow | C-CAN | ECM | 1. ECM 2. CAN failure |
24 |  | Water seperator | Red | Hard-wired | Water seperator sensor | 1. Water seperator sensor 2. Wiring failure |
25 |  | Over speed | Yellow | C-CAN | ECM | 1. ECM 2. CAN failure |
Check the gauge functionality refer to below information when gauge has a problem
NO | Gauge | Input type | Input source | Check point |
1 | Speed gauge | CAN | MT : Speed sensor (Pulse) AT : TCU | CAN failure |
2 | Tacho gauge | CAN | EMS | EMS CAN failure |
3 | Coolant temp gauge | CAN | EMS | EMS CAN failure |
4 | Fuel gauge | Hardwire | Fuel sender | Fuel sender (Wiring failue) |
The body electrical system can be quickly diagnosed failed parts with vehicle diagnostic system (GDS)
The diagnostic system (GDS) provides the following information.
Self diagnosis : Checking the failure code (DTC) and display
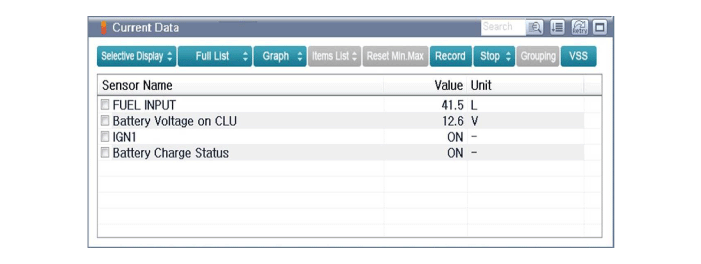
Current data : Checking the system input/output data state
Actuator test : Checking the system operation condition
Additional function : Other controlling such as the system option and zero point adjustment
Select the "Car model" and the system to be checked in order to check the vehicle with the tester.
Select the "Body Control Module (BCM)" to check the "Cluster Module (CLU)".
Select the "Current Data" menu to search the current state of the input/output data.
The input/output data for the sensors corresponding to the cluster module (CLU) can be checked.
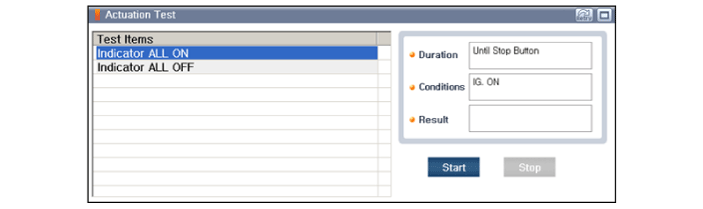
To check the input value of cluster illumination, select option "Actuation test".
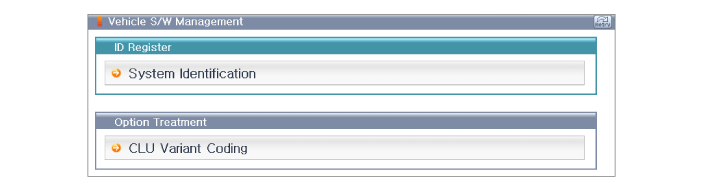
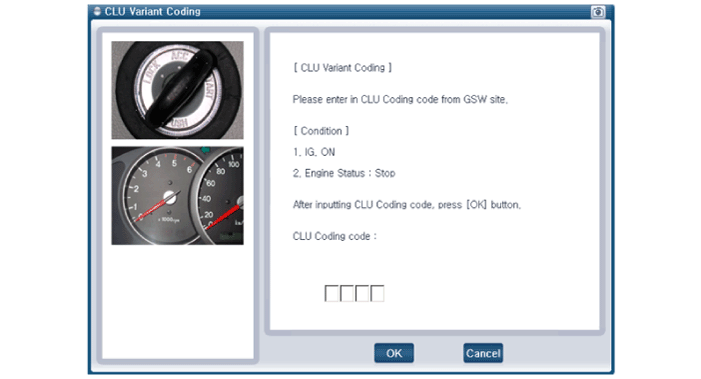
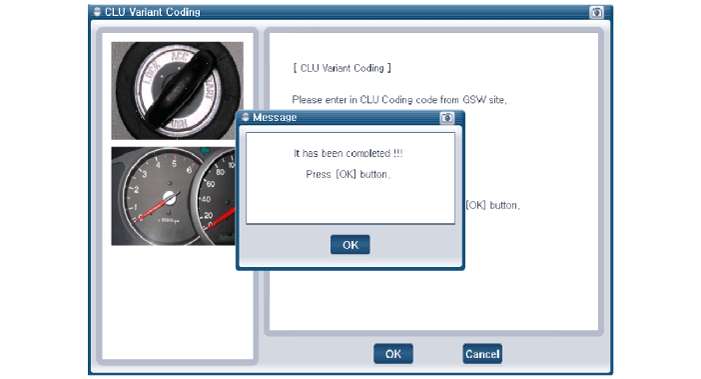
After replacing the cluster with a new one, must be performed the “Variant Coding” procedure.
Connect the cable of GDS to the data link connector in driver side crash pad lower panel, turn the power on GDS.
Select the 'Body Control Module (BCM)' to check the 'Cluster Module (CLU)'.
Select variant coding mode to perform.