Has a problem been found?

Repair as necessary and go to "Verification of Vehicle Repair" procedure.

Go to " Control Circuit Inspection " procedure.

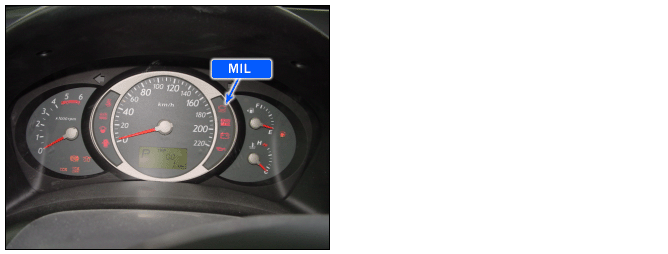
Failure diagnosis results are output as diagnosic codes and are displayed on malfuction indicator lamp.
When the diagnostic code output terminal is turned to the ON position.
The MIL is the error lamp demanded by the EOBD for exhaust-relevant errors.
Energizing by the MIL is done under the MIL lamp test is active or a path with the characteristic "MIL blinking" is preliminary entered in the memory. Then the MIL blinks.In case of the engine check failure, the engine check lamp will not illuminates to notify the driver.
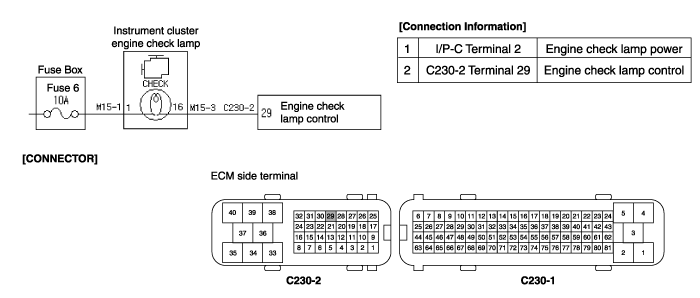
If the engine check lamp circuit is generated threshold value, the ECM judged this as a fault and DTC is set.
Item | Detecting Condition | Possible Cause |
DTC Strategy | ● Circuit continuity check | ● Short to MIL control circuit ● Faulty Bulb ● Faulty ECM |
Enable Conditions | ● Ignition on | |
Threshold Value | ● Short for engine check lamp control circuit | |
Diagnostic Time | ● 1 sec. | |
MIL Fuel Limit Fuel Cut EGR Off | ● No ● No ● No ● No |


Many malfunctions in the electrical system are caused by poor harness and terminals.
Faults can also be caused by interference from other electrical systems, and mechanical or chemical damage.
Thoroughly check connectors for looseness, poor connection, bending, corrosion, contamination, deterioration, or damage.
Has a problem been found?

Repair as necessary and go to "Verification of Vehicle Repair" procedure.

Go to " Control Circuit Inspection " procedure.
Ignition "OFF" & Engine "OFF".
Disconnect ECM connector.
Ignition "ON" & Engine "OFF".
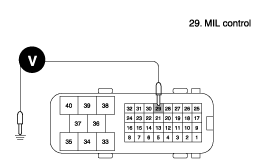
Measure voltage between terminal 29 of ECM harness connector and chassis ground.
Specification : Approx. 10.8 ~ 13.0V

Is the measured voltage within specifications ?

▶ Go to " Component Inspection " procedure.

▶ Check for short to battery in control harness.
Repair as necessary and go to "Verification of Vehicle Repair" procedure .
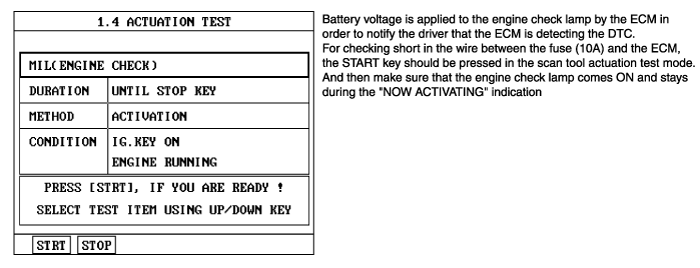
Check MIL.
Ignition "ON" & Engine "OFF".
Disconnect ECM connector.
Jump terminal 29 of ECM harness connector and chassis ground with jumper wire.
Is the MIL turned ON ?

▶ Go to " Check bulb " as below.

▶ Check for short to battery in the signal harness.
Repair as necessary and go to "Verification of Vehicle Repair" procedure.
Check Bulb.
Ignition "OFF" & Engine "OFF" .
Remove Instrument Panel and then remove bulb from instrument panel.
Apply 12 voltage to the bulb and check that bulb is turned ON.
Is the bulb turned ON ?

▶ Substitute with a known-good ECM and check for proper operation.
If the problem is corrected, replace ECM and then go to "Verification of Vehicle Repair" procedure.

▶ Substitute with a known-good bulb and check for proper operation.
If the problem is corrected, replace bulb and then go to "Verification of Vehicle Repair" procedure.
After a repair, it is essential to verify that the fault has been corrected.
Connect scan tool and select "Diagnostic Trouble Codes(DTCs)" mode and then clear DTC.
Operate the vehicle within DTC Enable conditions in General information.
Are any DTCs present ?

Go to the applicable troubleshooting procedure.

System is performing to specification at this time.