3.
Has a problem been found?

Repair as necessary and go to "Verification of Vehicle Repair" procedure.

Go to "Power Circuit Inspection" procedure.
The charging system includes a battery, generator with a built in regulator, the charging indicator light, and connecting wiring. The generator uses diodes to rectify alternating current (AC) to direct current (DC).
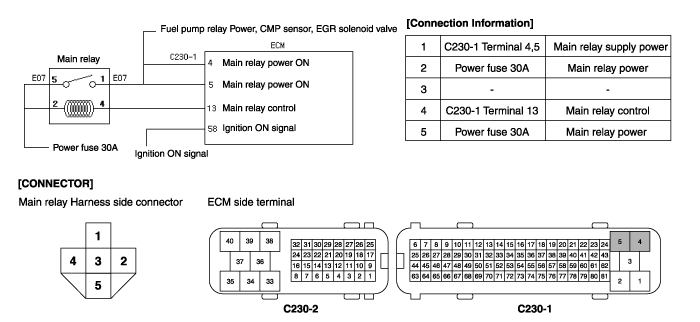
The ECM provides ground to one side of coil of engine main relay and the other side is connected to battery.
The ECM monitors battery voltage and the voltage through engine control relay.
If the signal is above threshold value, the ECM judged this as a fault and DTC is set.
Item | Detecting Condition | Possible Cause |
DTC Strategy | ● Votage check, low | ● Open or short in power(sensing) circuit ● Open or short in Charging warning circuit ● Charging warning Lamp ● Faulty alternator ● Faulty ECM |
Enable Conditions | ● Ignition on | |
Threshold Value | ● Battery voltage > 6V | |
Diagnostic Time | ● 5 sec | |
MIL Fuel Limit Fuel Cut EGR Off | ● No ● No ● No ● Yes | |
Fail safe | ● Battery voltage is fixed at about 7.9 V as a basic value |
Many malfunctions in the electrical system are caused by poor harness and terminals.
Faults can also be caused by interference from other electrical systems, and mechanical or chemical damage.
Thoroughly check connectors for looseness, poor connection, bending, corrosion, contamination, deterioration, or damage.
Has a problem been found?
Repair as necessary and go to "Verification of Vehicle Repair" procedure.
Go to "Power Circuit Inspection" procedure.
Check for open or short in Power harness
Ignition "OFF".
Disconnect Alternator connector.
Ignition "ON" & Engine "OFF".
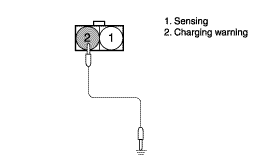
Measure voltage terminal 1 of Alternator harness connector and chassis ground.
Specification : Approx. 11.5V~13.0V
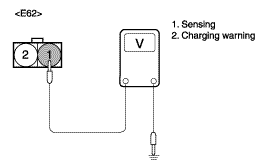
Is the measured voltage within specifications ?
▶ Go to " Check for open or short in Charging warning harness" as below.
▶ Check for open or short in the Chargnig warning harness.
Repair as necessary and go to "Verification of Vehicle Repair" procedure.
Check for open or short in Charging warning harness.
Ignition "OFF" & Engine "OFF".
Disconnect Alternator connector.
Ignition "ON" & Engine "OFF".
Measure voltage terminal 2 of Alternator narness connector and chassis ground.
Specification : Approx. 10.5V~12.0V
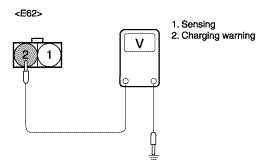
Is the measured voltage within specifications ?
▶ Go to "System Inspection" procedure.
▶ Check for open or short in the Charging warning harness.
Repair as necessary and go to "Verification of Vehicle Repair" procedure.
Check Chargnig warning lamp operation.
Ignition "OFF".
Disconnect Alternator connector.
Jump terminal 2 of Brake switch and chassis ground with jumper wire.
Specification : Warning Lamp ON when grounding
Is the warning lamp turned ON ?
▶ Go to " Check for voltage drop on Alternator B+ Cable" as below.
▶ Check warning lamp and then, repair as necessary and go to "Verification of Vehicle Repair" procedure.
Check for voltage drop on Alternator B+ Cable.
Ignition "ON" & Engine " ON ".
Measure voltage between Battery + and Alternator B+.
+ probe : Alternator B+, - probe : Battery +
Specification : Approx. below 0.2V(200mV)
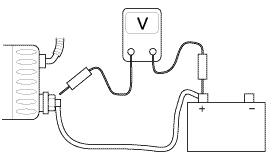
Is the measured voltage within specifications ?
▶ Go to " Component Inspection" procedure.
▶ Check warning lamp connector for contamination, corrosion or damage warning lamp and then, repair as necessary and go to "Verification of Vehicle Repair" procedure.
Check Charging voltage.
Ignition "OFF" & Engine "OFF".
Check belt tension for alternator.
Check Battery terminal, Fusible Link and Alternator B+ for poor connection and corrosion.
Ignition "ON" & Engine "ON".
Turn ON electrical Load such as Head Lamp, Blower Motor and Defroster.
Measure battery voltage when engien is more than 2000 rpm.
Specification : 12.5 ~ 14.5V
Is the measured voltage within specifications ?
▶ Substitute with a known-good ECM and check for proper operation.
If the problem is corrected, replace ECM and then go to "Verification of Vehicle Repair" procedure.
▶ Check height and condition of Brake switch. Substitute with a known-good Brake switch and check for proper operation. If the problem is corrected, replace Brake switch and then go to "Verification of Vehicle Repair" procedure.
After a repair, it is essential to verify that the fault has been corrected.
Connect scan tool and select "Diagnostic Trouble Codes(DTCs)" mode and then clear DTC.
Operate the vehicle within DTC Enable conditions in General information.
Are any DTCs present ?
Go to the applicable troubleshooting procedure.
System is performing to specification at this time.
