After removing the cover (A), then loowen the two Torx bolt (B).
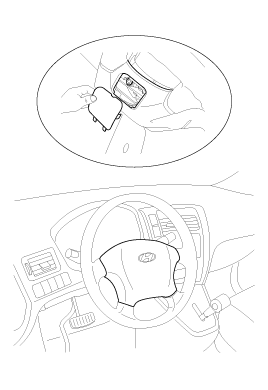
REMOVAL
Disconnect the battery negative cable and wait at least three minutes before beginning work.
After removing the cover (A), then loowen the two Torx bolt (B).

Remove the driver's airbag from the steering wheel, then disconnect the driver's airbag connectors.
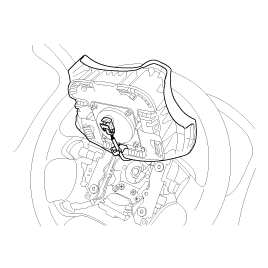
Connect the driver's airbag connectors, then install the driver's airbag on the steering wheel.
Secure the airbag with the new Torx bolts.
Connect the battery negative cable.
After installing the airbag, confirm proper system operation:
Turn the ignition switch ON; the SRS indicator light should blink for about six seconds and then go off.
Make sure both horn buttons work.
Enter the customer's preset radio stations.
Disconnect the negative battery cable, and wait at least 30 seconds before beginning work.
Remove the DAB (See page RT- 18).
Remove the steering wheel (See page ST- Steering wheel group).
After disconnecting the lock pin (A), disconnect the connector (B).
Loosen the mounting screw (C), then remove the clock spring (D).
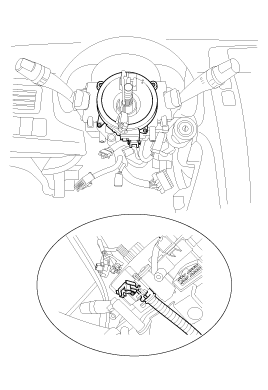
Installation is the reverse of removal.
As described direction on the clock spring warning label, align the centerline with adjusting the setting mark(▶◀) when installing the clock spring.
After installing the clock spring, confirm proper system operation; Turn the ignition switch ON: the SRS indicator light should tun on about 6 seconds and then go off.
Check the normal operation of horn and steering heel remote control switch.
REMOVAL
Disconnect the battery negative cable and wait at least three minutes before beginning work.
Remove the glove box (see BD group - glove box) , then disconnect the connector between the SRS main harness connector (A) and front passenger's airbag connector (B).
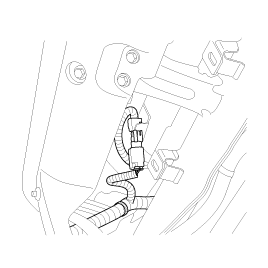
Remove the crash pad. (see BD group - crash pad)
Remove the mounting nuts (A) from the crash pad. Then remove the passenger's airbag (B).
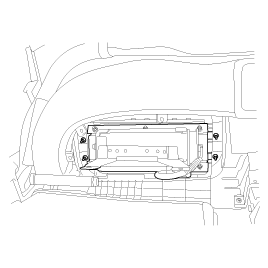
Place the new front passenger's airbag on the dashboard. Tighten the front passenger's airbag mounting nuts.
Install the dashboard.
Connect the front passenger's airbag connector to the SRS main harness connector.
Attach the front passenger's airbag connector to the connector holder, then reinstall the glove box.
Reconnect the battery negative cable.
After installing the airbag, confirm proper system operation: Turn the ignition switch On; the SRS indicator light should blink for about six seconds and then go off.
Enter the customer's preset radio stations.
Review the seats replacement procedure in the body section of the manual before performing repair or service
REMOVAL
Disconnect the battery negative cable and wait at least three minutes before beginning work.
Disconnect the side airbag harness connector (A).
Remove the seat-back cover (See page BD- Front seat).
Remove the two mounting nuts (A) and the side airbag (B).
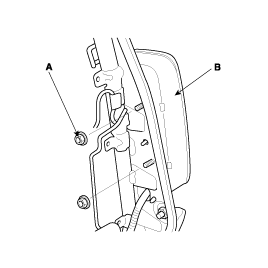
Be sure to install the harness wires so that they are not pinched or interfering with other parts.
If the side airbag lid is affxey by a tape, remove the tape.
Do not open the lid of the side airbag cover.
Use new mounting nuts tightened to the specified torque when you replace a side airbag.
Make sure that the seat-back cover is installed properly. Improper installation may prevent the proper deployment.
Place the new side airbag on the seat back-frame. Tighten the side airbag mounting nuts.
Install the new seat-back cover.
Install the seat assembly, then connect the side airbag harness connector.
Reconnect the battery negative cable.
After installing the side airbag, confirm proper system operation: Turn the ignition switch ON; the SRS indicator light should blink for about six seconds and then go off.
Recline and slide the front seat forward fully, make sure the harness wires are not pinched or interfering with other parts.
REMOVAL
Disconnect the battery negative cable and wait of least 30 second before beginning work.
Remove the follows parts (See page BD- group).
Front and rear seat
Interior trim
Trunk trim
Headlining
Disconnect the connector (A).
After loosening the mounting bolts, remove the curtain airbag (B).
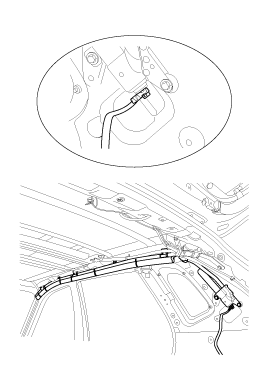
Installation is the reverse of removal
After installing the curtain airbag, confirm proper system operation: Turn the ignition switch ON; the SRS indicator light should blink for about seconds and then go off.
REMOVAL
Disconnect the battery negative cable, and wait at least three minutes before beginning work.
Disconnect the airbag connectors.
Disconnect the side airbag connectors.
Remove the center console. (See page BD- console group)
Remove the ECM (A) from the SRS unit (B).
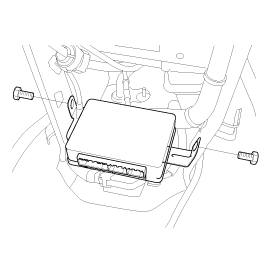
Disconnect the connector (A), than remove the SRSCM (B).
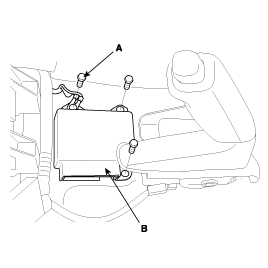
Install the new SRSCM unit with the three bolts, then connect the connectors to the SRSCM unit.
Install the console.
Reconnect the airbag connectors.
Reconnect the side airbag connectors.
Reconnect the battery negative cable.
After installing the SRSCM unit, confirm proper system operation: Turn the ignition switch ON; the SRS indicator light should blink for about six seconds and then go off.
REMOVAL
Disconnect the battery negative cable, and wait at least three minutes before beginning work.
Remove the seat assembly (see BD group - seat)
Remove the front door scuff trim (see BD group - interior)
Remove the center pillar trim (see BD group - interior)
Remove the lower anchor bolt (see BD group - belt)
Remove the upper anchor bolt (see BD group - belt)
Disconnect the connector (A).
After loowening the mounting bolt (B).
After the pretensioner (C).
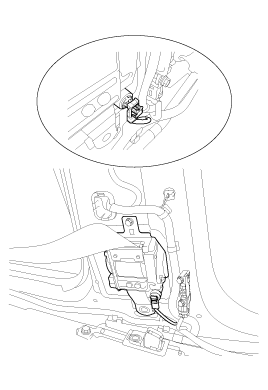
Install the new belt pretension with bolt.
Install the upper anchor bolt.
Install the lower anchor bolt.
Install the center piller trim.
Install the front door scuff trim.
Install the seat assembly.
Reconnect the negative battery cable.
After installing the belt pretensioner, confirm proper system operation: Turn the ignition switch ON: the SRS indicator light should blink for about six seconds and then go off.
REMOVAL
Removal of the airbag must be performed according to the precautions/procedures described previously.
Before disconnecting the side impact sensor connector(s), disconnect the side airbag connector(s).
Do not turn the ignition switch ON and do not connect the battery cable while replacing the side impact sensor.
Disconnect the negative battery cable, and wait at least three minutes before beginning work.
Remove the seat assembly (see BD group - seat).
Remove the front door sill trim (see BD group - interior).
Remove the center pillar trim (see BD group - interior).
Remove the lower anchor bolt (see BD group - belt).
Remove the belt pretensioner.
Remove the two bolts then remove the side impact sensor (A).
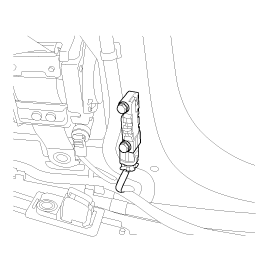
Disconnect the SRS harness connector from the side impact sensor.
Be sure to install the harness wires so that they are not pinched or interfere with other parts.
Do not turn the ignition switch ON and do not connect the battery cable while replacing the side impact sensor.
Install the new side impact sensor with the two bolts then connect the SRS harness connector to the side impact sensor.
Reinstall belt pretensioner.
Reconnect the negative battery cable.
After installing the side impact sensor, confirm proper system operation: Turn the ignition switch ON: the SRS indicator light should blink for about six seconds and then go off.
REMOVAL
Removal of the airbag must be performed according to the precautions/ procedures described previously.
Before disconnecting the front impact sensor connector, disconnect the front airbag connector(s).
Do not turn the ignition switch ON and do not connect the battery cable while replacing the front impact sensor.
Disconnect the negative battery cable, and wait at least three minutes before beginning work.
Remove the radiator guard (see BD group-exterior).
Remove the bolt then remove the front impact sensor.
Disconnect the SRS harness connector (A) from the front impact sensor (B).
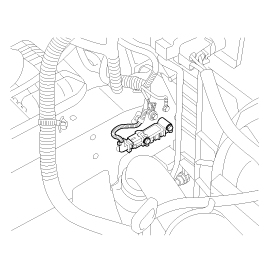
Be sure to install the harness wire so that they are not pinched or interfere with other parts.
Do not turn the ignition switch ON and do not contact the battery cable while replacing the front impact sensor.
Install the new front impact sensor with bolt then connect the SRS harness connector to the front impact sensor.
Install the radiator guard.
Reconnect the negative battery cable.
After installing the front impact sensor, confirm proper system operation: Turn the ignition switch ON: the SRS indicator light should blink for about six seconds and then go off.