10.
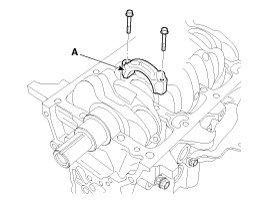
Remove the bed plate (A).
Engine removal is required for this procedure.
Use fender covers to avoid damaging painted surfaces.
To avoid damaging the cylinder head, wait until the engine coolant temperature drops below normal temperature before removing it.
When handling a metal gasket, take care not to fold the gasket or damage the contact surface of the gasket.
To avoid damage, unplug the wiring connectors carefully while holding the connector portion.
Mark all wiring and hoses to avoid misconnection.
Turn the crankshaft pulley so that the No.1 piston is at TDC (Top dead center).
Automatic transaxle : Remove the drive plate.
(Refer to Cylinder Block - “Drive Plate”)
Manual transaxle : Remove the flywheel.
(Refer to Cylinder Block - “Flywheel”)
Remove the rear oil seal.
(Refer to Cylinder Block - “Rear Oil Seal”)
Install the engine to engine stand for disassembly.
Remove the timing chain.
(Refer to Timing System - “Timing Chain”)
Remove the intake manifold.
(Refer to Intake And Exhaust System - "Intake Manifold")
Remove the exhaust manifold.
(Refer to Intake And Exhaust System - "Exhaust Manifold")
Remove the cylinder head.
(Refer to Cylinder Head Assembly - "Cylinder Head")
Remove the water pipe.
(Refer to Cooling System - “Water Pipe”)
Rmove the piston and connecting rod.
(Refer to Cylinder Block - "Piston and Connecting Rod")
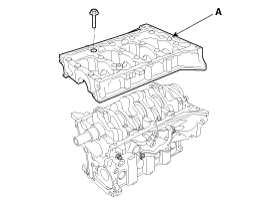
Remove the bed plate (A).
Remove the crankshaft.
(Refer to Cylinder Block - "Crankshaft")
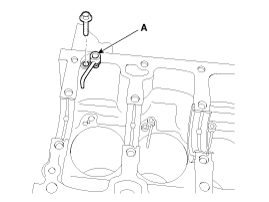
Remove the oil jet (A).
Remove the gasket material.
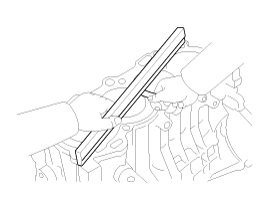
Using a gasket scraper, remove all the gasket material from the top surface of the cylinder block.
Clean the cylinder block
Using a soft brush and solvent, thoroughly clean the cylinder block.
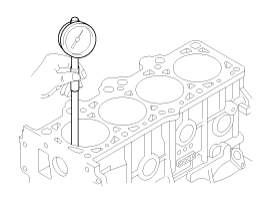
Inspect the top surface of cylinder block for flatness.
Using a precision straight edge and feeler gauge, measure the surface contacting the cylinder head gasket for warpage.
Flatness of cylinder block gasket surface
Less than 0.05 mm (0.0020 in)
Inspect the cylinder bore.
Visually check the cylinder for vertical scratchs.
If deep scratchs are present, replace the cylinder block.
Inspect the cylinder bore diameter.
Using a cylinder bore gauge, measure the cylinder bore diameter at position in the thrust and axial direction.
Standard diameter :
77.200 ~ 77.230 mm (3.0394 ~ 3.0405 in)
Check the cylinder bore size code on the cylinder block front face.

Mark | Cylinder bore inner diameter |
A | 77.200 ~ 77.210 mm (3.0394 ~ 3.0398 in) |
B | 77.210 ~ 77.220 mm (3.0398 ~ 3.0402 in) |
C | 77.220 ~ 77.230 mm (3.0402 ~ 3.0405 in) |
Check the piston size mark (A) on the piston top face.
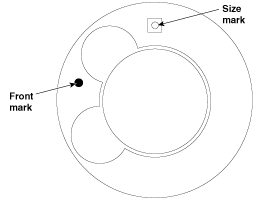
Mark | Piston outer diameter |
A | 77.130 ~ 77.140 mm (3.0366 ~ 3.0370 in) |
B | 77.140 ~ 77.150 mm (3.0370 ~ 3.0374 in) |
C | 77.150 ~ 77.160 mm (3.0374 ~ 3.0378 in) |
Select the piston related to cylinder bore class.
Piston-to-cylinder clearance :
0.060 ~ 0.080 mm (0.0024 ~ 0.0031 in)
Oversize pistons should be selected according to the largest bore cylinder.
The size of piston is stamped on top of the piston.
Measure the outside diameter of the piston to be used.
According to the measured O.D(Outer Diameter), calculate the new bore size.
New bore size = piston O.D + 0.060 to 0.080 mm (0.0024 to 0.0031 in) (clearance between piston and cylinder) - 0.01 mm (0.0004 in) (honing margin.)
Bore each of the cylinders to the calculated size.
To prevent distortion that may result from temperature rise during honing, bore the cylinder holes in the firing order.
Hone the cylinders, finishing them to the proper dimension (piston outside diameter + gap with cylinder).
Check the clearance between the piston and cylinder.
Standard : 0.060 ~ 0.080 mm (0.0024 ~ 0.0031 in)
When boring the cylinders, finish all of the cylinders to the same oversize. Do not bore only one cylinder to the oversize.
Thoroughly clean all parts to assembled.
Before installing the parts, apply fresh engine oil to all sliding and rotating surfaces.
Replace all gaskets, O-rings and oil seals with new parts.
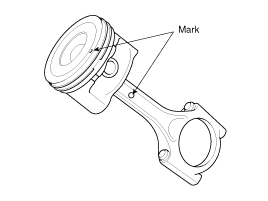
Assemble the piston and connecting rod.
Use a hydraulic press for installation.
The piston front mark and the connecting rod front mark must face the timing belt side of the engine.
Install the piston rings.
Install the oil ring expander and 2 side rails by hand.
Using a piston ring expander, install the 2 compression rings with the code mark facing upward.
Position the piston rings so that the ring ends are as shown.
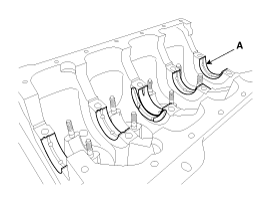
Install the connecting rod bearings.
Align the bearing claw with the groove of the connecting rod or connecting rod cap.
Install the bearings (A) in the connecting rod and connecting rod cap (B).

Install the crankshaft main bearings.
Upper 1, 2, 4, 5 bearings have an oil groove of oil holes ; Lower bearings do not.
Align the bearing claw with the claw groove of the cylinder block, push in the 5 upper bearings (A).
Align the bearing claw with the claw groove of the main bearing cap, and push in the 5 lower bearings.
Install the oil jet (A).
Tightening torque :
8.8 ~ 12.7 N.m (0.9 ~ 1.3 kgf.m, 6.5 ~ 9.4 lb-ft)
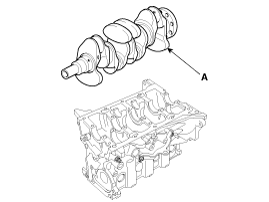
Place the crankshaft on the cylinder block (A).
Place the bed plate on the cylinder block (A).
Standard liquid gasket : FD20, HYLOMAR3000, Dreibond 5105
Check that the mating surfaces are clean and dry before applying liquid gasket.
Apply liquid gasket in a 3mm wide bead without stopping.
After assembly, wait at least 30 minutes before filling the engine with oil.
Install the bed plate bolts.
The bed plate bolts are tightened in 2 progressive steps.
If any of the bed plate bolts in broken or deformed, replace it.
Apply a light coat of engine oil on the threads and under the bed plate bolts.
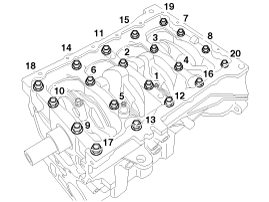
Tighten the bolts (11, 17, 20) in numerical order.
Tighten the main bearing cap bolts (1~10) in numerical order using the SST (09221-4A000).
Loosen the bolts (11, 17, 20).
Tighten the bolts (11~20) in numerical order.
Tighten torque of main bearing cap bolts.
Tightening torque
Long bolts(1~10) :
22.6 ~ 26.5 N.m (2.3 ~ 2.7 kgf.m, 16.6 ~ 19.5 lb-ft) + 90 ~ 94°
Short bolts(11~20) :
32.4 ~ 36.3 N.m (3.3 ~ 3.7 kgf.m, 23.9 ~ 26.8 lb-ft)
Always use new main bearing cap bolts.
Check that the crankshaft turns smoothly.
Check the crankshaft end play.
Install the piston and connecting rod assemblies.
Before installing the piston, apply a coat of engine oil to the ring grooves and cylinder bores.
Remove the connecting rod caps (A), and slip short sections of rubber hose over the threaded ends of the connecting rod bolts.
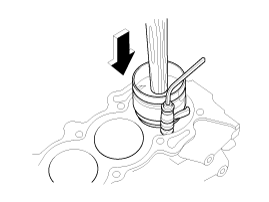
Install the ring compressor, check that the rings are securely in place, then position the piston in the cylinder, and tap it in using the wooden handle of a hammer.
Stop after the ring compressor pops free, and check the connecting rod-to-crank journal alignment before pushing the piston into place.
Apply engine oil to the bolt threads. Install the rod caps with bearings, and tighten the bolts using the SST (09221-4A000).
Tightening torque :
12.7 N.m (1.3 kgf.m, 9.4 lb-ft) + (87 ~ 93°)
Always use new connecting rod bearing cap bolts.
Maintain downward force on the ring compressor to prevent the rings from expending before entering the cylinder bore.
Install the water pipe.
(Refer to Cooling System – “Water Pipe”)
Install the cylinder head.
(Refer to Cylinder Head Assembly - "Cylinder Head")
Install the exhaust manifold.
(Refer to Intake And Exhaust System - "Exhaust Manifold")
Install the intake manifold.
(Refer to Intake And Exhaust System - "Intake Manifold")
Install the timing chain.
(Refer to Timing System – “Timing Chain”)
Remove the engine stand.
Install the rear oil seal.
(Refer to Cylinder Block – “Rear Oil Seal”)
Automatic transaxle : Install the drive plate.
(Refer to Cylinder Block – “Drive Plate”)
Manual transaxle : Install the flywheel.
(Refer to Cylinder Block – “Flywheel”)
