1.
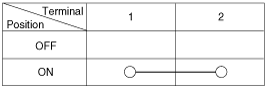
Check for continuity between the Trunk lid open switch terminals.
Refer to Body Electrical System - Inspection / Self Diagnosis With Gds.
Refer to Body Electrical System - Inspection / Self Diagnosis With Gds.
Refer to Body Electrical System - Inspection / Self Diagnosis With Gds.
Check for continuity between the Trunk lid open switch terminals.
If continuity is not specified, inspect the switch
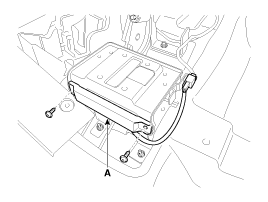
Take care not to scratch the crash pad and related parts
Disconnect the negative(-) battery terminal.
Remove the glove box.
(Refer to Body - "Crash Pad")
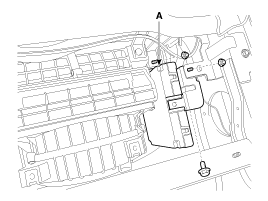
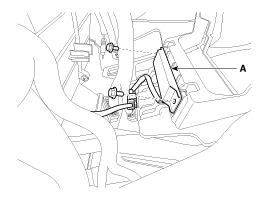
Remove the smart key unit (A) after disconnecting the connector and loosening the mounting nuts (2EA) and a bolt.
Take care not to scratch the crash pad and related parts
Disconnect the negative(-) battery terminal.
Remove the console.
(Refer to Body - "Console")
Remove the interior 1 antenna (A) after disconnecting the connector and loosening the mounting bolts (2EA).
Disconnect the negative(-) battery terminal.
Remove the console.
(Refer to Body - "Console")
Take care not to damage and scratch the console and its related parts.
Apply the protective tapes to the console and its related parts.
Disconnect the interior 2 antenna connector, then remove the interior 2 antenna (A) after loosening screws (2EA).
Disconnect the negative(-) battery terminal.
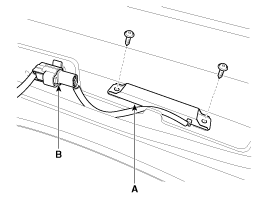
Remove the trunk transverse trim (A).
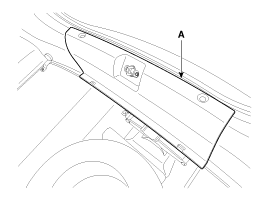
Disconnect the trunk antenna connector (A) and remove the trunk antenna (B) after loosening nuts (2EA).

Disconnect the negative(-) battery terminal.
Remove the rear bumper.
(Refer to Body - "Rear Bumper")
Disconnect the antenna connector (B) and remove the exterior bumper antenna (A) after loosening the screws (2EA).
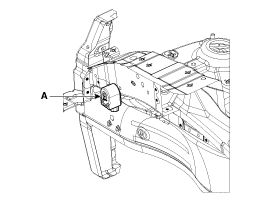
Disconnect the negative(-) battery terminal.
Remove the left side wheel guard.
Remove the external buzzer (A) after disconnecting the connector.
Disconnect the negative (-) battery terminal.
Remove the front door module.
(Refer to Body - "Front Door")
After loosening the mounting bolt, then remove the outside handle cover (A).
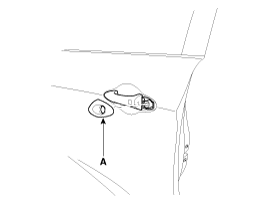
Remove the outside handle (A) by sliding it rearward.
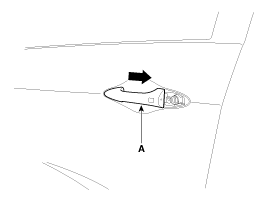
Disconnect the outside handle connector.
Disconnect the negative(-) battery terminal.
Remove the trunk door trim.
(Refer to Body - "Trunk")
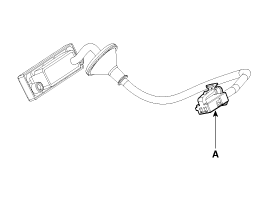
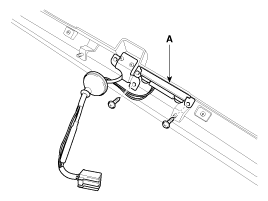
Disconnect the trunk lid open switch connector (A).
Remove the trunk open switch (A) from the trunk garnish.
Install the smart key unit.
Install the smart key unit mounting nuts and connector.
Install the glove box housing.
Install the glove box.
Install the negative (-) battery terminal and check the smart key system.
Install the interior 1 antenna.
Install the console.
Install the negative (-) battery terminal and check the smart key system.
Install the interior 2 antenna.
Install the console.
Install the negative (-) battery terminal and check the smart key system.
Install the trunk antenna.
Install the trunk transverse trim.
Install the negative (-) battery terminal and check the smart key system.
Install the exterior bumper antenna.
Install the rear bumper.
Install the negative (-) battery terminal and check the smart key system.
Install the buzzer.
Install the left side wheel guard.
Install the negative (-) battery terminal and check the smart key system.
Install the trunk lid open switch.
Install the trunk trim.
Install the negative (-) battery terminal and check the smart key system.
Install the outside handle.
Install the door trim.
Install the negative (-) battery terminal and check the smart key system.
