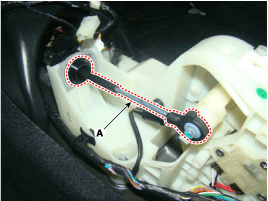
Remove the shift cable (A).

Remove the center console. (Refer to Body - "Floor Consol")
Remove the shift cable (A).

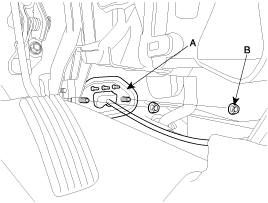
Remove the retainer (A) and nuts (B).

Air cleaner assembly and air duct.
(Refer to Engine Mechanical System - "Air cleaner")
Battery and battery tray.
(Refer to Engine Electrical System - "Battery")
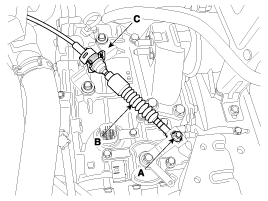
Remove the nut (A) from the manual control lever.
Remove the control cable (B) from the bracket (C) at transaxle assembly side.

Remove the control cable at cabin room.
Install the shift cable retainer (A).
Tightening torque:
8.8 ~ 13.7 N.m (0.9 ~ 1.4 kgf.m, 6.5 ~ 10.1 lb-ft)

Install the shift cable (A) in the shifter lever.
Install the cable after placing the shift lever and the manual control lever in the N position.

Install the shift cable (B) in the cable bracket (C).
Align the hole (E) in the manual control lever with the "N" position hole (F) of the inhibitor switch and then insert the inhibitor switch guide pin (SST No:09480-A3800).
Lightly tighten the nut (A) after connected the shift cable (B) in the manual control lever (D).
Push shift cable (B) lightly to "F" direction shown to eliminate free play of shift cable.
Tighten the nut (A) to the specified torque.
Tightening torque:
8.8 ~ 13.7 N.m (0.9 ~ 1.4 kgf.m, 6.5 ~ 10.1 lb-ft)

Remove the inhibitor switch guide pin (SST No.: 09480-A3800) from the hole.
Install the floor console assembly.
(Refer to Body - "Floor Consol")
Air cleaner assembly.
(Refer to Engine Mechanical System - "Air cleaner")
Battery and battery tray.
(Refer to Engine Electrical System - "Battery")
Install the air duct.
(Refer to Engine Mechanical System - "Air cleaner")
Check that operating surely at each range of the inhibitor switch corresponding to each position of shift lever.