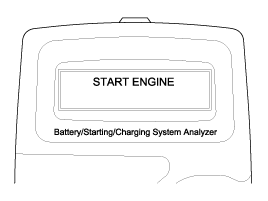
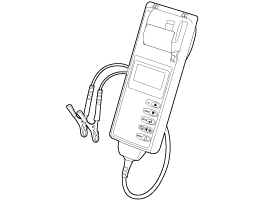
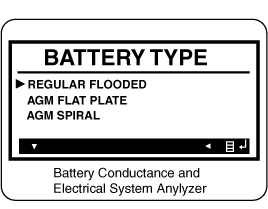
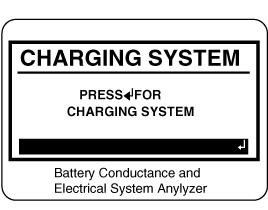
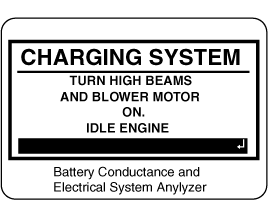
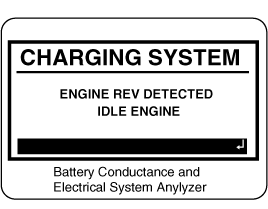
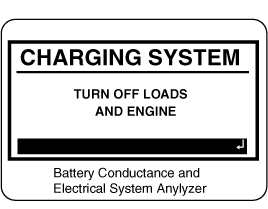
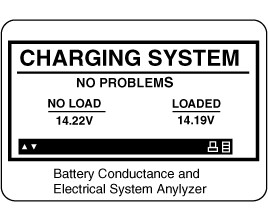
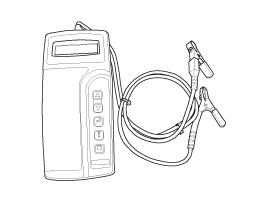
The Micro 570 Analyzer

The Micro 570 Analyzer provides the ability to test the charging and starting systems, including the battery, starter and alternator.

caution

Because of the possibility of personal injury, always use extreme caution and appropriate eye protection when working with batteries.

Keypad

The Micro 570 button on the key pad provide the following functions :

Battery Test Procedure
1.

Connect the tester to the battery.

A.

Red clamp to battery positive (+) terminal.

B.

Black clamp to battery negative (-) terminal.
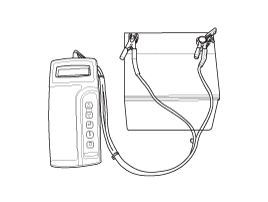
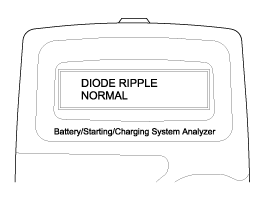
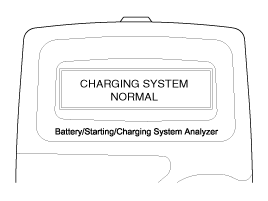
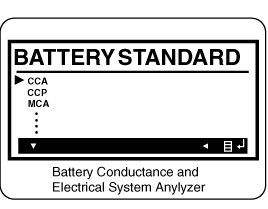
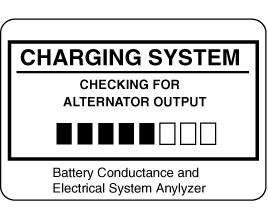
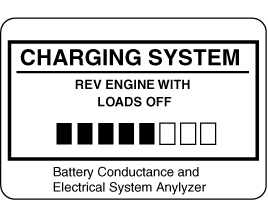
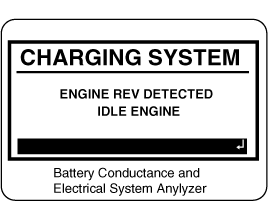
caution

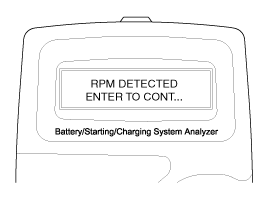
Connect clamps securely. If "CHECK CONNECTION" message is displayed on the screen, reconnect clamps securely.

2.

The tester will ask if the battery is connected "IN-VEHICLE" or "OUT-OF-VEHICLE". Make your selection by pressing the arrow buttons; then press ENTER.

3.

Select CCA and press the ENTER button.

note

CCA : Cold cranking amps, is an SAE specification for cranking batteried at -0.4°F (-18°C).

4.

Set the CCA value displayed on the screen to the CCA value marked on the battery label by pressing up and down buttons and press ENTER.

note

The battery ratings(CCA) displayed on the tester must be identical to the ratings marked on battery label.

5.

The tester will conduct battery test.

6.

The tester displays battery test results including voltage and battery ratings.

Refer to the following table and take the appropriate action as recommended by the Micro 570.

Battery Test Results

Result On Printer

Remedy

GOOD BATTERY

No action is required.

GOOD RECHARGE

Battery is in a good state.

Recharge the battery and use.

CHARGE & RETEST

Battery is not charged properly.

-

Charge and test the battery again. (Failure to charge the battery fully may read incorrect measurement value.)

REPLACE BATTERY

Replace battery and recheck the charging system.

-

Improper connection between battery and vehicle cables may cause "REPLACE BATTERY", retest the battery after removing cables and connecting the tester to the battery terminal directly prior to replacing the battery.

BAD CELL-REPLACE

Charge and retest the battery.

-

If the Micro 570 recommends "REPLACE BATTERY", replace the battery and recheck the charging system.

warning

Whenever filing a claim for battery, the print out of the battery test results must be attached.

Starter Test Procedure

7.

After the battery test, press ENTER immediately for the starter test.

8.

Start the engine.

9.

Cranking voltage and starter test results will be displayed on the screen.

Refer to the following table and take the appropriate action as recommended by the Micro 570.

Starter Test Results

Result On Printer

Remedy

CRANKING VOLTAGE NORMAL

System shows a normal starter draw.

CRANKING VOLTAGE LOW

Cranking voltage is lower than normal level.

-

Check starter.

CHARGE BATTERY

The state of battery charge is too low to test.

-

Charge the battery and retest.

REPLACE BATTERY

Replace battery.

-

If the vehicle is not started though the battery condition of "GOOD BATTERY" is displayed, check wiring for open circuit, battery cable connection, starter and repair or replace as necessary.

-

If the engine does crank, check fuel system.

note

When testing the vehicle with old diesel engines, the test result will not be favorable if the glow plug is not heated. Conduct the test after warming up the engine for 5 minutes.

Charging System Test Procedure

10.

Press ENTER to begin charging system test.

11.

The tester displays the actual voltage of alternator.

Press ENTER to continue.

12.

Turn off all electrical load and rev engine for 5 seconds with pressing the accelerator pedal. (Follow the instructions on the screen)

13.

The message that engine RPM is detected will be displayed on the screen. Press ENTER to continue.

14.

If the engine RPM is not detected, press ENTER after revving engine.

15.

The tester will conduct charging system test during loads off.

16.

Turn on electrical loads (air conditioner, lamps, audio and etc). Press ENTER to continue.

17.

The tester will conduct charging system test during loads on.

18.

Rev engine for 5 seconds with pressing the accelerator pedal. (Follow the instructions on the screen)

19.

The message that engine RPM is detected will be displayed on the screen. Press ENTER to continue.

20.

If the engine RPM is not detected, press ENTER after revving engine.

21.

Turn off electrical loads (air conditioner, lamps, audio and etc). Turn the engine off.

22.

Charging voltage and charging system test results will be displayed on the screen.

Shut off engine end disconnect the tester clamps from the battery. Refer to the following table and take the appropriate action as recommended by the Micro 570.

Charging System Test Results

Result On Printer

Remedy

CHARGING SYSTEM NORMAL / DIODE RIPPLE NORMAL

Charging system is normal.

NO CHARGING VOLTAGE

Alternator does not supply charging current to battery.

-

Check belts, connection between alternator and battery and replace belts or cable or alternator as necessary.

LOW CHARGING VOLTAGE

Alternator does not supply charging current to battery and electrical load to system fully.

-

Check belts and alternator and replace as necessary.

HIGH CHARGING VOLTAGE

The voltage from alternator to battery is higher than normal limit during voltage regulating.

-

Check connection and ground and replace regulator as necessary.

-

Check electrolyte level in the battery.

EXCESS RIPPLE DETECTED

One or more diodes in the alternator is not functioning properly.

-

Check alternator mounting and belts and replace as necessary.

The MDX-670P Analyzer

The MDX-670P battery conductance and electrical system analyzer tests batteries as well as starting and charging systems for vehicle.

It displays the test results in seconds and features a built-in printer to provide a copy of the results.

caution

Because of the possibility of personal injury, always use extreme caution and appropriate eye protection when working with batteries.

note

When testing the vehicle with old diesel engines, the test result will not be favorable if the glow plug is not heated. Conduct the test after warming up the engine for 5 minutes.

1.

Connect the red clamp to the positive (+) terminal and the black clamp to the negative (–) terminal.

note

For a proper connection, rock the clamps back and forth. The tester re¬quires that both sides of each clamp be firmly connected before testing. A poor connection will produce a CHECK CONNECTION or WIGGLE CLAMPS message. If the message appears, clean the terminals and reconnect the clamps.

2.

Scroll to and select IN VEHICLE or OUT OF VEHICLE for a battery not connected to a vehicle.

note

Following an IN VEHICLE test you will be prompted to test the starting and charging systems.

3.

Scroll to and select REGULAR FLOODED, AGM FLAT PLATE, or AGM SPIRAL where applicable.

note

If the vehicle equipped with ISG function, select the AGM FLAT PLATE.

4.

Scroll to and select the battery’s rating system.

note

Mostly, the CCA value is marked on the battery label, but sometimes marked EN or SEA value. Select one of them.

A.

CCA: Cold Cranking Amps, as specified by SAE. The most common rating for cranking batteries at 0 ºF (–17.8 ºC).

B.

EN: Europe-Norm

C.

SEA: Society of Automotive Engineers, the European labeling of CCA

5.

Set the selected rating value displayed on the screen to the value marked on the battery label by pressing up and down arrow buttons.

6.

Press ENTER to start test.

7.

After several seconds the tester displays the decision on the battery’s condition and the measured voltage. The tester also displays your selected battery rating and the rating units.

Result On Printer

Remedy

GOOD BATTERY

No action is required.

GOOD RECHARGE

Battery is in a good state.Recharge the battery and use. (Battery may be charged by running the engine at idle for 20 minutes.)

CHARGE & RETEST

Battery is not charged properly.

-

Charge and test the battery again. (Failure to charge the battery fully may read incorrect measurement value.)

REPLACE BATTERY

Replace battery and recheck the charging system.

-

Improper connection between battery and vehicle cables may cause "REPLACE BATTERY", retest the battery after removing cables and connecting the tester to the battery terminal directly prior to replacing the battery.

BAD CELLREPLACE

Charge and retest the battery.

-

If recommends "REPLACE BATTERY", replace the battery and recheck the charging system.

note

For an in-vehicle test, the display alternates between the test results and the message “PRESS FOR STARTER TEST.

note

Before starting the test, inspect the alternator drive belt. A belt that is glazed or worn, or lacks the proper tension, will prevent the en¬gine from achieving the rpm levels needed for the test.

8.

Press the ENTER button to proceed with the starter test.

9.

Start the engine when prompted.

10.

The tester displays the decision on the starter system, cranking voltage, and cranking time in milliseconds.

Starter Test Results

Result On Printer

Remedy

CRANKING VOLTAGE NORMAL

System shows a normal starter draw.

CRANKING VOLTAGE LOW

Cranking voltage is lower than normal level.

-

Check starter.

CHARGE BATTERY

The state of battery charge is too low to test.

-

Charge the battery and retest.

REPLACE BATTERY

Replace battery.

-

If the vehicle is not started though the battery condition of "GOOD BATTERY" is displayed, check wiring for open circuit, battery cable connection, starter and repair or replace as necessary.

-

If the engine does crank, check fuel system.

note

For an in-vehicle test, the display alternates between the test results and the message “PRESS FOR CHARGING TEST.

Step 3: Charging System Test

11.

Press the ENTER button to proceed with the charging test.

12.

Rev the engine with loads off. (Following the on-screen prompts)

13.

The message that engine RPM is detected will be displayed on the screen, idle the engine.

14.

Turn on electrical loads (air conditioner, lamps, audio and etc). Press ENTER to continue.

15.

Turn on electrical loads (air conditioner, lamps, audio and etc). Press ENTER to continue.

16.

The message that engine RPM is detected will be displayed on the screen, idle the engine.

17.

Turn off loads and engine.

18.

The Charging System decision is displayed at the end of the procedure.

Result On Printer

Remedy

NO PROBLEMS

System is showing normal output from the alternator.

NO OUTPUT

No alternator output detected.

-

Check all connections to and from the alternator, especially the connection to the battery. If the connection is loose or heavily corroded, clean or replace the cable and retest.

-

If the belts and connections are in good working condition, replace the alternator. (Older vehicles use external voltage regulators, which may require only replacement of the voltage regulator.)

LOW OUTPUT

Alternator does not supply charging current to battery and electrical load to system fully.

-

Check belts and alternator and replace as necessary.

HIGH OUTPUT

The voltage from alternator to battery is higher than normal limit during voltage regulating.

-

Check connection and ground and replace regulator as necessary.

-

Check electrolyte level in the battery.

EXCESSIVE RIPPLE

The voltage from alternator to battery is higher than normal limit during voltage regulating.

-

Check alternator mounting and belts and replace as necessary.

CHARGE BATTERY

The starter voltage is low and the battery is discharged. Fully charge the battery and repeat the starter system test.

REPLACE BATTERY

Battery must be replaced before the starting system can be tested.

19.

Press the BACK/PRINT button to print the test results or MENU to return to the Options Menu.

Яндекс.Метрика