4.
Check for intensity. If the light intensity of the lamps changes smoothly without any flickering when the rheostat is turned, it can beassumed that the rheostat is normal.
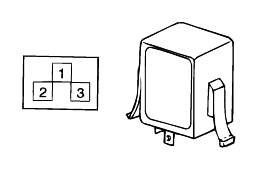
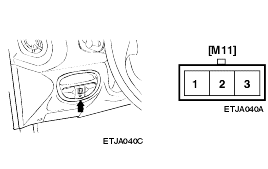
Remove the head lamp relay from the engine compartment relay box.
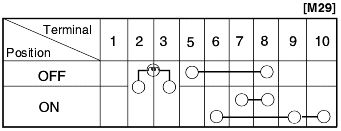
Check for continuity between terminals.
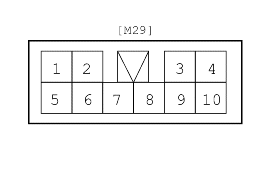
Remove the flasher unit from the relay box.
Connect the positive (+) lead from the battery to terminal 2 and the negative (-) lead to terminal 3.
Connect the two turn signal lamps in parallel to each other to terminals 2 and 3. Check that the bulbs turn on and off.
The turn signal lamps should flash 60 to 120 times per minute. If one of the front or rear turn signal lamps has an open circuit, the number of flashes will be more than 120 per minute. If operation is not as specified,replace the flasher unit.
Disconnect the negative (-) battery terminal.
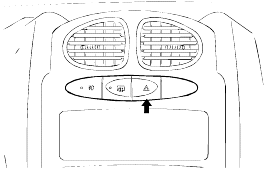
Remove the center facia panel(Refer to page BD-26).
Disconnect the connector from the hazard lamp switch.
Operate the switch and check for continuity between terminals with an ohmmeter.
Disconnect the negative (-) battery terminal.
Remove the crash pad lower panel.
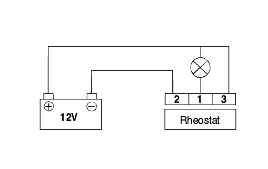
Disconnect the connector from the rheostat.
Check for intensity. If the light intensity of the lamps changes smoothly without any flickering when the rheostat is turned, it can beassumed that the rheostat is normal.
Disconnect the negative (-) battery terminal.
Remove the center facia panel(Refer to page BD-26).
Disconnect the connector from the front fog lamp switch.
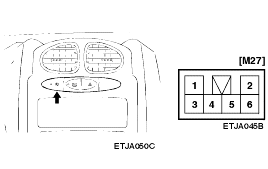
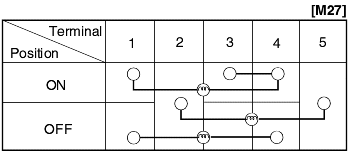
Operate the switch and check for continuity between the terminals with an ohmmeter.
Disconnect the negative (-) battery terminal.
Remove the center facia panel (Refer to page BD-26).
Disconnect the connector from the rear fog lamp switch.
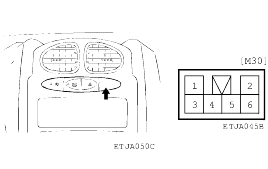
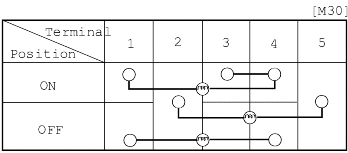
Operate the switch and check for continuity between the terminals with an ohmmeter.
Disconnect the negative (-) battery terminal.
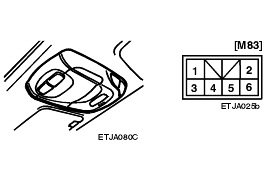
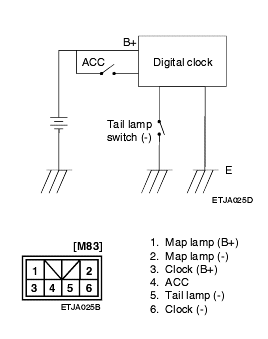
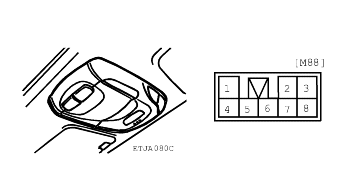
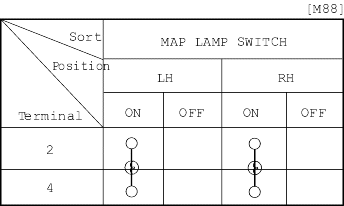
Remove the overhead console.
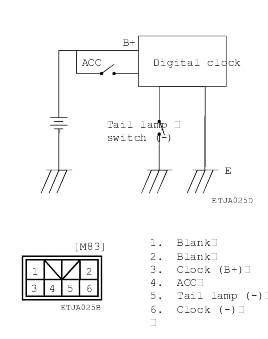
Disconnect the connector from the map lamp switch and then check for continuity between the terminals.

If there are any regulations pertinent to the aiming of headlamps in the area where the vehicle is to be used, adjust soas to meet those requirements.
Inflate the tires to the specified pressure and remove any loads from the vehicle except the driver, spare tire, and tools.
The vehicle should be placed on a flat floor.
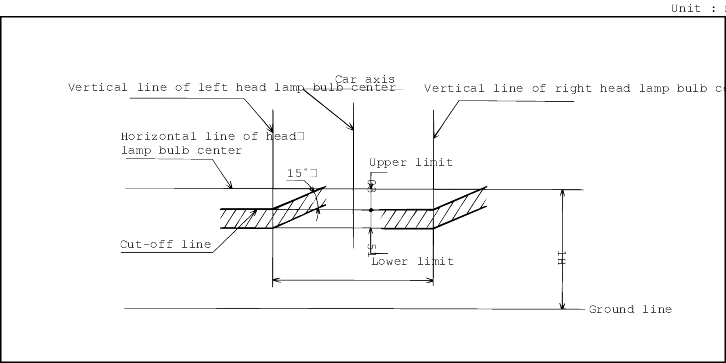
Draw vertical lines (Vertical lines passing through respective headlamp centers) and a horizontal line (Horizontal line passing through center ofheadlamps) on the screen.
With the headlamp and battery in normal condition, aim the headlamps so the brightest portion falls on the horizontal and vertical lines.
Make vertical and horizontal adjustments to the lower beam using the adjusting wheel.
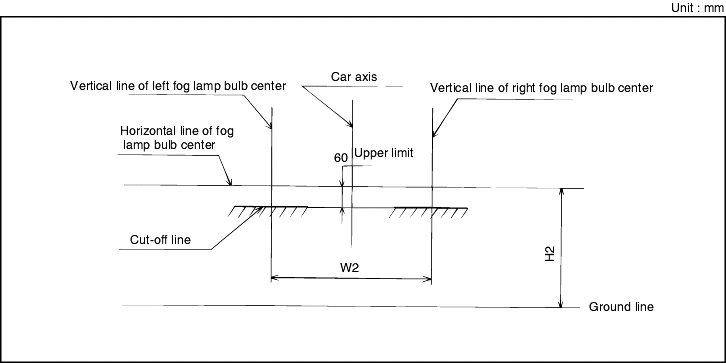
With the front fog lamps and battery normal condition, aim the front fog lamps by turning the adjusting gear.
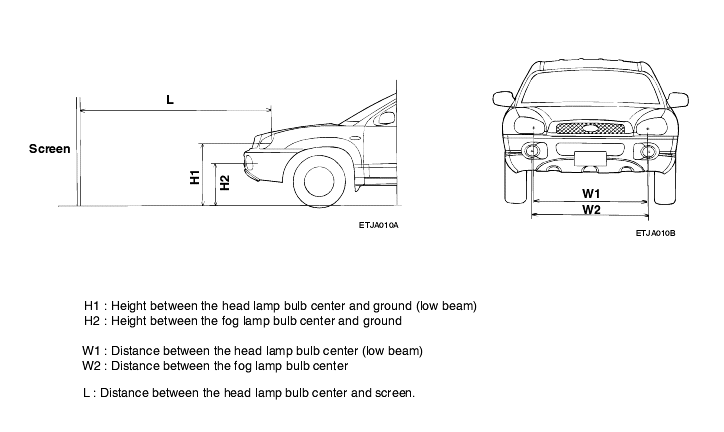
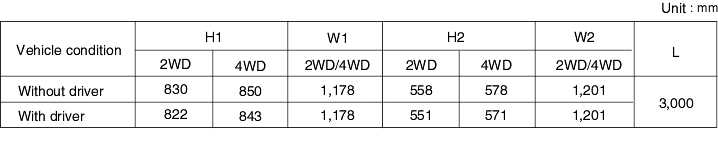
Turn the low beam on without the driver aboard. The cut-off line should be projected in the allowable range (shaded region).
Turn the front fog lamp on without the driver aboard. The cut-off line should be projected in the allowable range. (shaded region)
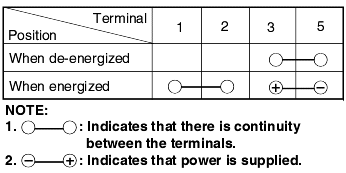
Remove the head lamp relay from the engine compartment relay box.
Check for continuity between terminals.
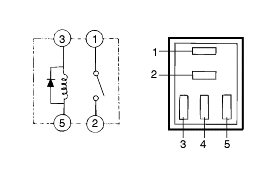
Remove the flasher unit from the relay box.
Connect the positive (+) lead from the battery to terminal 2 and the negative (-) lead to terminal 3.
Connect the two turn signal lamps in parallel to each other to terminals 2 and 3. Check that the bulbs turn on and off.
The turn signal lamps should flash 60 to 120 times per minute. If one of the front or rear turn signal lamps has an open circuit, the number of flashes will be more than 120 per minute. If operation is not as specified,replace the flasher unit.
Disconnect the negative (-) battery terminal.
Remove the center facia panel(Refer to page BD-26).
Disconnect the connector from the hazard lamp switch.
Operate the switch and check for continuity between terminals with an ohmmeter.
Disconnect the negative (-) battery terminal.
Remove the crash pad lower panel.
Disconnect the connector from the rheostat.
Check for intensity. If the light intensity of the lamps changes smoothly without any flickering when the rheostat is turned, it can beassumed that the rheostat is normal.
Disconnect the negative (-) battery terminal.
Remove the center facia panel(Refer to page BD-26).
Disconnect the connector from the front fog lamp switch.
Operate the switch and check for continuity between the terminals with an ohmmeter.
Disconnect the negative (-) battery terminal.
Remove the center facia panel (Refer to page BD-26).
Disconnect the connector from the rear fog lamp switch.
Operate the switch and check for continuity between the terminals with an ohmmeter.
Disconnect the negative (-) battery terminal.
Remove the overhead console.
Disconnect the connector from the map lamp switch and then check for continuity between the terminals.
If there are any regulations pertinent to the aiming of headlamps in the area where the vehicle is to be used, adjust soas to meet those requirements.
Inflate the tires to the specified pressure and remove any loads from the vehicle except the driver, spare tire, and tools.
The vehicle should be placed on a flat floor.
Draw vertical lines (Vertical lines passing through respective headlamp centers) and a horizontal line (Horizontal line passing through center ofheadlamps) on the screen.
With the headlamp and battery in normal condition, aim the headlamps so the brightest portion falls on the horizontal and vertical lines.
Make vertical and horizontal adjustments to the lower beam using the adjusting wheel.
With the front fog lamps and battery normal condition, aim the front fog lamps by turning the adjusting gear.
Turn the low beam on without the driver aboard. The cut-off line should be projected in the allowable range (shaded region).
Turn the front fog lamp on without the driver aboard. The cut-off line should be projected in the allowable range. (shaded region)
