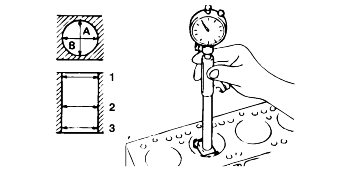
Measure the cylinder bore with a cylinder gauge at the three levels indicated and in the directions of A and B.
Level 1: No. 1 piston ring position at TDC
Level 2 : Center of cylinder
Level 3 : Bottom of cylinder

Check the cylinder block for scores, rust and corrosion. Also check for cracks or any other defects. Replace the block if defective.
Measure the cylinder bore with a cylinder gauge at the three levels indicated and in the directions of A and B.
Level 1: No. 1 piston ring position at TDC
Level 2 : Center of cylinder
Level 3 : Bottom of cylinder

If the cylinder bores show more than specified out-of-round or taper, or if the cylinder walls are badly scuffed or scored, the cylinder block shouldbe rebored and honed. New oversize piston and rings should be installed.
Standard value |
Cylinder bore : |
2.4 L : 86.5 + 0.03 mm (3.41 + 0.0012 in.) |
2.0 L : 85.0 + 0.03 mm (3.35 + 0.0012 in.) |
Out - of - round and taper of cylinder bore : |
Max. 0.01 mm (0.0004 in.) |
If a ridge exists at the top of the cylinder, cut it away with a ridge reamer.
Identification Mark | Size |
0.50 | 0.50 (0.020) O.S. |
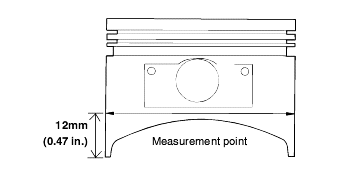
To rebore the cylinder bore to oversize, maintain the specified clearance between the oversize piston and the bore, and make sure that all pistons used are of the same oversize. The standard measurement of the piston outside diameter is taken at a level 12 mm (0.47 in.) above the bottom of the piston skirtand across the thrust faces.
Piston - to - cylinder clearance : |
0.02 - 0.04 mm (0.0008 - 0.0016 in.) |

Check for damage and cracks.
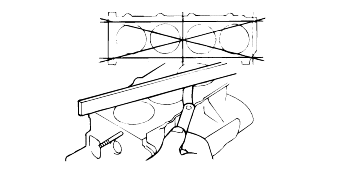
Check the top surface of the cylinder block for flatness. If the top surface exceeds limits, surface to minimum limit or replace.
Standard value |
Flatness of cylinder block : Max. 0.05 mm (0.0020 in.) |
Service limit |
Flatness of cylinder block : 0.1 mm (0.0039 in.) |
When the cylinder head is assembled, grinding less than 0.2 mm (0.008 in.) is permissible.

Oversize pistons should be selected on the basis of the largest cylinder bore.
Identification Mark | Size |
0.50 | 0.50 mm (0.020 in.) O.S. |
The size of a piston is stamped on top of the piston.
Measure the outside diameter of the piston to be used.
On the basis of the measured O.D., calculate the new bore size.
New bore size = Piston O.D + 0.02 to 0.04 mm (0.0008 to 0.0016 in.) (clearance between piston and cylinder) - 0.02 mm (0.0008 in.) (honing margin.)
Bore each of cylinders to the calculated size.
To prevent distortion that may result from temperature rise during honing, bore the cylinders, holes in the firing order sequence.
Hone the cylinders, finishing them to the proper dimension (piston outside diameter + gap with cylinder).
Verify the clearance between the piston and cylinder.
When boring cylinders, finish all four cylinders to the same oversize. Do not bore only one cylinder to the oversize.
Crankshaft
Flywheel
Piston
Cylinder head
Timing belt train
Front case