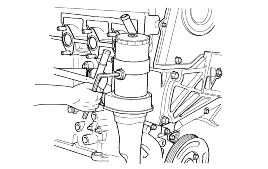
After loosening the drain plug and copper washer, drain a small quantity of oil from the filter.
Description | Specification 2.0 (D4EA) | Limit |
General Type Number of cylinders Bore Stroke Total displacement Compression ratio Firing order | In-line, Single Overhead Camshaft 4 83 mm (3.27 in.) 92 mm (3.62 in.) 1991 cc (121.5 cu.in.) 17.7:1 1 - 3 - 4 - 2 | |
Valve timing Intake valve Opens (BTDC) Closes (ABDC) Exhaust valve Opens (BBDC) Closes (ATDC) | 7° 43° 52° 6° | |
Cylinder head Flatness of gasket surface | 0.03 mm (0.0012 in.) for width 0.09 mm (0.0035 in.) for length 0.012 mm (0.00047 in.) / 51x51 | |
Camshaft Cam height Intake Exhaust Journal O.D. Bearing oil clearance End play | 34.697 mm (1.366 in.) 34.570 mm (1.361 in.) 28 mm (1.10 in.) 0.040 - 0.074 mm (0.0020 - 0.0029 in.) 0.05 - 0.15 mm (0.002 - 0.006 in.) | 34.197 mm (1.346 in.) 34.070 mm (1.341 in.) |
Valve Valve length Intake Exhaust Stem O.D. Intake Exhaust Face angle Thickness of valve head (margin) Intake Exhaust Valve stem to valve guide clearance Intake Exhaust | 95.7 mm (3.77 in.) 95.4 mm (3.76 in.) 5.953 mm (0.234 in.) 5.925 mm (0.233 in.) 44.5° 1.6 mm (0.063 in.) 1.3 mm (0.0512 in.) 0.022 - 0.067 mm (0.00086 - 0.00263 in.) 0.050 - 0.095 mm (0.0020 - 0.0037 in.) | 0.1 mm (0.0039 in.) 0.15 mm (0.0059 in.) |
Valve guide Length Intake Exhaust | 36.5 mm (1.437 in.) 36.5 mm (1.437 in.) | |
Valve seat Width of seat contact Seat angle | 1.21 mm (0.0477 in.) / 1.61 mm (0.0634 in.) (IN/EX) 44° - 44.5° | |
Valve spring Free length Load | 39.14 mm (1.541 in.) 21.4 kg/32 mm (47.2 lb/1.26 in.) at installed height | 38.14 mm (1.502 in.) |
Cylinder block Cylinder bore Flatness of gasket surface | 83 + 0.03 mm (3.27 + 0.0012 in.) 0.042 mm (0.00165 in.) for width 0.096 mm (0.00378 in.) for length 0.012 mm (0.00047 in.) / 50 x 50 | |
Piston O.D. Piston - to - cylinder clearance Ring groove width No. 1 No. 2 Oil Service size | 82.919 - 82.951 mm (3.26 - 3.27 in.) 0.069 - 0.091 mm (0.0027 - 0.0036 in.) 1.915 - 1.945 mm (0.075 - 0.076 in.) 2.06 - 2.08 mm (0.08 - 0.082 in.) 3.02 - 3.04 mm (0.119 - 0.1196 in.) 0.25 mm (0.010 in), 0.5 mm (0.020 in.) 0.75 mm (0.030 in.), 1.00 mm (0.039 in.) oversize | |
Piston ring Side clearance No. 2 Oil ring End gap No. 1 No. 2 Oil ring side rail | 0.065 - 0.11 mm (0.00256 - 0.00433 in.) 0.03 - 0.07 mm (0.00118 - 0.00275 in.) 0.2 - 0.3 mm (0.0079 - 0.0118 in.) 0.3 - 0.45 mm (0.0118 - 0.0177 in.) 0.2 - 0.45 mm (0.0079 - 0.0177 in.) | |
Connecting rod Connecting rod pin O.D Connecting rod bearing oil clearance Crankshaft main bearing oil clearance | 28.022 - 28.034 mm (1.103 - 1.104 in.) 0.024 - 0.042 mm (0.0009 - 0.0016 in.) 0.024-0.042 mm (0.0009-0.0016 in.) | 0.1 mm (0.0039 in.) 0.1 mm (0.0039 in.) |
Crankshaft Journal O.D. Out-of-round of journal and pin Taper of journal and pin End play | 60.002 - 60.020 mm (2.362 - 2.363 in.) Less than 0.015 mm (0.0006 in.) Less than 0.005 (0.0002 in.) 0.09 - 0.32 mm (0.0035 - 0.0126 in.) | |
Flywheel Runout | 0.13 mm (0.0051in.) | |
Oil pressure (1500 rpm) [Oil temperature is 95-105°C (203-221°F)] | More than 250 kPa (36.26 psi) | |
Oil pump Tip clearance Radial clearance Side clearance | 0.12 - 0.2 mm (0.00472 - 0.0078 in.) 0.13 - 0.23 mm (0.0051-0.009 in.) 0.02 - 0.07 mm (0.00078 - 0.0027 in.) | |
Relief spring Free length Opening pressure | 47.5 mm ( 1.835 in.) 570 ± 50 kPa (82.67 ± 7.25 psi) | |
Silent shaft Front journal diameter Rear journal diameter Oil clearance Front Rear | 27.99 - 28.01 mm (1.102 - 1.1027 in.) 41.99 - 42.01 mm (1.6531 - 1.6539 in.) 0.050 - 0.09 mm (0.0020 - 0.0036 in.) 0.050-0.091 mm (0.0020-0.0036 in.) | |
Cooling method Cooling system quantity (Radiator) Thermostat Type Normal opening temperature Opening temperature range Wide open temperature Radiator cap Main valve opening pressure Main valve closing pressure Vacuum valve opening pressure | Forced circulation with electric fan 5 lit (5.3 U.S.qts., 4.4 Imp.qts.) Wax pellet type with jiggle valve 85°C(185°F) 83.5°C-86.5°C (182°F-188°F) 100°C (212°F) 107.9±14.7 kPa (1.1±0.15 kg/cm² , 15.64±2.13 psi) 83.4 kPa (0.85 kg/ cm², 12.1 psi) -6.86 kPa (-0.07 kg/ cm², -1.00 psi) | |
Air cleaner Type Element Exhaust pipe Muffler Suspension system | Dry type Unwoven cloth type Expansion resonance type Rubber hangers | |
Coolant temperature sensor Type Resistance 20°C (68°F) 80°C (176°F) | Thermister type 2.45±0.14 kΩ 0.3222 kΩ |
Standard value Coolant concentration Tropical area Other area | 40% 50% |
Engine coolant | Ethylene glycol base for aluminum radiator |
Engine coolant temperature sensor Oil pressure switch | LOCTITE 262, three bond No. 1324 or equivalent 3M ATD No. 8660 or Three bond No. 1141E |
Item | Nm | kg·cm | lb·ft |
Engine mount insulator bolt | 90 - 110 | 900 - 1100 | 65 - 80 |
Engine mounting bracket nuts | 60 - 80 | 600 - 800 | 43 - 58 |
Engine mounting bracket bolts | 60 - 80 | 600 - 800 | 43 - 58 |
Engine Support bracket bolt and nut | 43 - 55 | 430 - 550 | 32 - 40 |
Front roll stopper bracket to cross member bolts | 40 - 55 | 400 - 550 | 29 - 40 |
Front roll stopper insulator bolt and nut | 50 - 65 | 500 - 650 | 36 - 47 |
Rear roll stopper bracket to cross member bolts | 50 - 65 | 500 - 650 | 36 - 47 |
Rear roll stopper insulator bolt and nut | 50 - 65 | 500 - 650 | 36 - 47 |
Transaxle mounting bracket bolts | 60 - 80 | 600 - 800 | 43 - 58 |
Transaxle mounting insulator bolt | 90 - 110 | 900 - 1100 | 65 - 80 |
Front exhaust pipe to exhaust manifold | 30 - 40 | 300 - 400 | 22 - 29 |
Head cover bolt | 8 - 10 | 80 - 100 | 6 - 7 |
Camshaft sprocket bolt | 125 - 140 | 1250 - 1400 | 92 - 103 |
Camshaft bearing cap bolt | 26.5 - 29.5 | 265 - 295 | 20 - 22 |
Crankshaft position sensor | 7 - 11 | 70 - 110 | 5 - 8 |
Crankshaft sprocket bolt | 185 - 195 | 1850 - 1950 | 136 - 144 |
Damper pulley to crankshaft sprocket | 30 - 34 | 300 - 340 | 22 - 25 |
Cylinder head bolt (cold engine) | 50 + 120° + 90° | 500 + 120° + 90° | 36 + 120° + 90° |
Timing belt auto tensioner bolt | 50 - 55 | 500 - 550 | 36 - 40 |
Drive blet Auto tensioner bolt | 26 - 31 | 260 - 310 | 19 - 23 |
Timing belt auto tensioner adjustable bolt | 10 - 12 | 100 - 120 | 7 - 9 |
Drive belt idler bolt | 46 - 51 | 460 - 510 | 34 - 38 |
Front exhaust pipe clamp bolt | 20 - 30 | 200 - 300 | 14 - 22 |
Oil pan | 10 - 12 | 100 - 120 | 7 - 9 |
Oil pan drain plug | 35 - 45 | 350 - 450 | 25 - 33 |
Oil screen | 10 - 12 | 100 - 120 | 7 - 9 |
Oil pressure switch | 15 - 22 | 150 - 220 | 11 - 16 |
Oil screen bracket bolt | 34 - 38 | 340 - 380 | 25 - 28 |
Oil pump bolt | 20 - 27 | 200 - 270 | 15 - 20 |
Oil seal case bolt | 10 - 12 | 100 - 120 | 7 - 9 |
Plug cap | 20 - 27 | 200 - 270 | 14 - 20 |
Oil jet bolt | 9 - 13 | 90 - 130 | 7 - 10 |
Oil pump rotor bolt | 8 - 10 | 80 - 100 | 6 - 97 |
Timing belt upper cover | 8 - 12 | 80 - 120 | 6 - 9 |
Timing belt lower cover | 8 - 12 | 80 - 120 | 6 - 9 |
Relief plug | 42 - 52 | 420 - 520 | 31 - 38 |
Flywheel | 70 - 80 | 700 - 800 | 52 - 59 |
Drive plate | 70 - 80 | 700 - 800 | 52 - 59 |
Connecting rod cap bolt | 25 + 90° | 250 + 90° | 18 + 90° |
Engine coolant pump to cylinder block bolt | |||
14 mm | 48 - 52 | 480 - 520 | 35 - 38 |
10 mm | 10 - 12 | 100 - 120 | 7 - 9 |
Engine coolant temperature sensor | 40 - 55 | 400 - 550 | 30 - 41 |
Engine coolant inlet fiting attaching bolt | 20 - 25 | 200 - 250 | 15 - 18 |
Air cleaner mounting bolts | 8 - 10 | 80 - 100 | 6 - 7 |
Resonator mounting bolt (Nut) | 8 - 10 | 80 - 100 | 6 - 7 |
Intake manifold mounting bolt (M8) | 15 - 20 | 150 - 200 | 11 - 14 |
Hanger bolt to body | 10-15 | 100 - 150 | 7 - 11 |
Hanger bolt to main muffler | 10 - 15 | 100 - 150 | 7 - 11 |
Exhaust manifold nuts | 25 - 38 | 250 - 380 | 18 - 28 |
Heat protector bolt to exhaust manifold | 15 - 20 | 150 - 200 | 11 - 14 |
Air cleaner bracket bolt | 10 - 13 | 100 - 130 | 7 - 9 |
Oil level gauge | 10 - 12 | 100 - 120 | 7 - 9 |
Balance shaft bolt | 53 - 57 | 530 - 570 | 39 - 42 |
Starter bolt to cylinder block | 48 - 52 | 480 - 520 | 35 - 38 |
Turbocharger support bolt | 35 - 45 | 350 - 450 | 26 - 33 |
Crankshaft bedplate bolt | |||
15 mm | 28 - 32 + 120° | 280 - 320 + 120° | 20.65 - 23.6 + 120° |
12 mm | 33.7 - 37.7 | 337 - 377 | 24.9 - 27.8 |
Position a vehicle on a level surface.
Turn off the engine.
If a vehicle that has not been used for a prolonged period, run the engine for several minutes.
Turn off the engine and wait for 5 minutes at least, and then check the oil level.
Check that the engine oil level is within the level range indicated on the oil dipstick. If the oil level is found to have fallen to the lowerlimit (the "L" mark), refill to the "F" mark.
When refilling, use the proper grade of engine oil.
Check that the oil is not dirty or mixed with coolant or gasoline and it has the proper viscosity.

Run the engine until it reaches normal operating temperature.
Turn off the engine.
Remove the oil filler cap and the drain plug. Drain the engine oil.
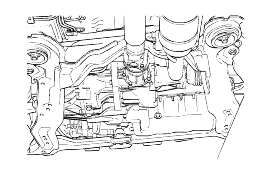
Tighten the drain plug to the specified torque.
Tightening torque |
Oil pan drain plug : |
35-45 Nm (350-450 kg.cm, 25-33 lb.ft) |
Whenever tightening the oil drain plug, use a new drain plug gasket.
Fill new engine oil through the oil filler cap opening.
Capacity : |
Drain and refill : 5.4 lit (5.7 U.S.qts., 4.75 lmp.qts.) |
Oil filter : 0.5 lit (0.53 U.S.qts., 0.44 lmp.qus.) |
Do not overfill. This will cause oil aeration and loss of oil pressure.
Install the oil filler cap.
Start and run the engine.
Turn off the engine and then check the oil level. Add oil if necessary.
After loosening the drain plug and copper washer, drain a small quantity of oil from the filter.

After loosening the plastic upper cap until the O - ring in the lower case is visible, completely drain oil from the filter. (Use filter wrench.09263 - 27100)
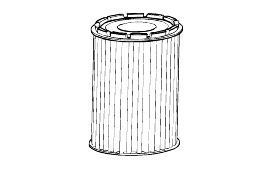
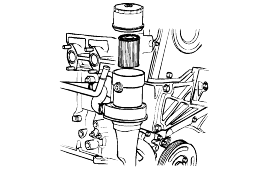
Remove the upper cap. Be sure that the oil filter element is removed with the plastic upper cap simultaneously.
Replace the oil filter element and O - ring with new ones.
Tighten the oil filter upper cap to the specified torque.
Oil filter : 23 - 25 Nm (230 - 250 kg.cm, 17 - 18 lb.ft) |
After replacing the copper washer in drain plug with a new one, install to the aluminum lower case.
8 - 10 Nm (80 - 100 kg.cm, 5.9 - 7.4 lb.ft) |
Star and run the engine and check for engine oil leak.
After turning off the engine, check the oil level and add oil if necessary.
Loosen the radiator cap.
Confirm that the coolant level is up to the filler neck.
Install a radiator cap tester to the radiator filler neck and apply 150 KPa (21psi, 1.53 kg/cm²) pressure. Hold it for two minutes in that condition while checking for leakage from the radiator, hoses or connections.
Radiator coolant may be extremely hot. Do not open the system because hot, or scalding water could gush out causing personal injury. Allow the vehicleto cool before servicing this system.
When the tester is removed, be careful not to spill any coolant from it.
Be sure to clean away completely any from the area.
Be careful when installing and removing the tester and when testing, not to deform the filler neck of the radiator.
If there is leakage, repair or replace with the appropriate part.
Use an adapter to attach the cap to the tester.
Increase the pressure until the gauge stops moving.
Main valve opening pressure : |
107.9kPa±14.7kPa (1.1±0.15 kg/cm², 15.64±2.13) |
Main valve closing pressure : |
83.4 kPa (0.85 kg/cm², 12.1 psi) |
Check that the pressure level is maintained at or above the limit.
Replace the radiator cap if the reading does not remain at or above the limit.
Be sure that the cap is clean before testing, since rust or other foreign material on the cap seal will cause an incorrect reading.

Measure the specific gravity of the coolant with a hydrometer.
Measure the coolant temperature and calculate the concentration from the relation between the specific gravity and temperature, using the followingtable for reference.
Coolant temperature °C (°F) and specific gravity | Freezing temperature °C (°F) | Safe operating temperature °C (°F) | Coolant concentration (Specific volume) | ||||
10 (50) | 20 (68) | 30 (86) | 40 (104) | 50 (122) | |||
1.054 | 1.050 | 1.046 | 1.042 | 1.036 | -16 (3.2) | -11 (12.2) | 30% |
1.063 | 1.058 | 1.054 | 1.049 | 1.044 | -20 (-4) | -15 (5) | 35% |
1.071 | 1.067 | 1.062 | 1.057 | 1.052 | -25 (-13) | -20 (-4) | 40% |
1.079 | 1.074 | 1.069 | 1.064 | 1.058 | -30 (-22) | -25 (-13) | 45% |
1.087 | 1.082 | 1.076 | 1.070 | 1.064 | -36 (-32.8) | -31 (-23.8) | 50% |
1.095 | 1.090 | 1.084 | 1.077 | 1.070 | -42 (-44) | -37 (-35) | 55% |
1.103 | 1.098 | 1.092 | 1.084 | 1.076 | -50 (-58) | -45 (-49) | 60% |
If the concentration of the coolant is below 30%, its anti-corrosion properties will be adversely affected.
if the concentration is above 60%, both the anti-freeze and engine cooling property will decrease, affecting the engine adversely. For these reasons,be sure to maintain the concentration level within the specified range.
Do not mix types of anti-freeze.
Antifreeze | Mixture ratio of anti freeze in coolant |
ETHYLENE GLYCOL BASE FOR ALUMINUM | 50% [Except tropical areas] 40% [Tropical areas] |
Before checking engine compression, check the engine oil level. Also check that the starter motor and battery are all in normal operating condition.
Start the engine and wait until the engine coolant temperature reaches 80-95°C (176-205°F).
Turn off the engine and remove the aircleaner element.
Remove the injectors.
Crank the engine to remove any foreign material in the cylinders.
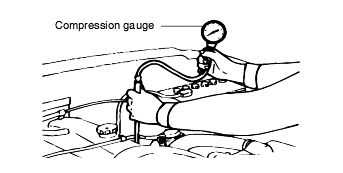
Insert the compression gauge (09351 - 27000) into the injector hole.
Crank the engine and read the gauge.
Standard value : 2942 kpa (30 Kg/cm², 426 psi) |
Repeat steps 6 to 7 for all cylinders, ensuring that the pressure difference for each of the cylinders is within the specified limit.
Limit : | Max. 100 kpa (1.0 kg/cm² ,14 psi) between cylinders |
If a cylinder's compression or pressure differential is outside the specification, add a small amount of oil through the injector hole, and repeatsteps 6 to 8.
If the addition of oil causes the compression to rise, it is likely that there may be wear between the piston ring and cylinder wall.
If compression remains the same, valve seizure, poor valve seating or a compression leak from the cylinder head gasket are all possible causes.
Check that the belts are not damaged and are properly placed for the pulley grooves.
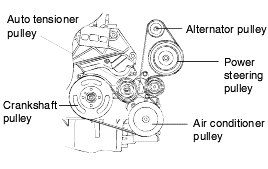
Install the belt in the following order.
[Alternator ⇒ Power steering ⇒ Idler ⇒ Air conditioner pulley ⇒ Crankshaft pully]
When installing the belt on the pulley, make sure it is centered on the pulley

When installing the V-ribbed belt, check that the V-ribs are properly aligned.
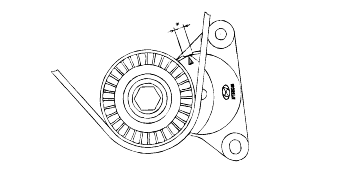
If noise or slippage is detected, check the belt for wear, damage, or breakage on the pulley contact surface, and check the pulley for scoring.Also check the amount that the belt is deflected.
The tensioner mark should be between the "*" position.
If not, replace the belt.
Recommended API classification: CE OR ABOVE |
Recommended SAE viscosity grades: |
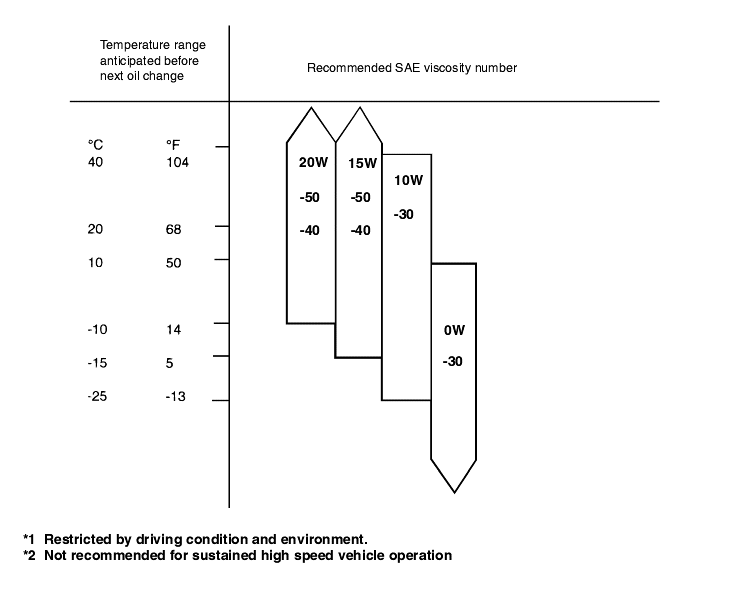
Satisfy the requirements of the API classification.
Have the proper SAE grade number for expected ambient temperature range.