2.
Push each piston-connecting rod assembly toward the top of the cylinder.
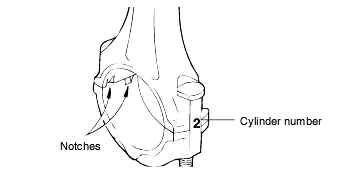
Keep the bearings in order with their corresponding connecting rods (according to cylinder numbers) for proper reassembly.
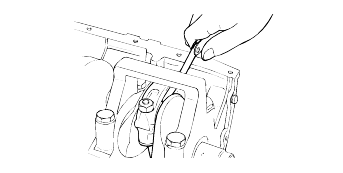
Remove the connecting rod cap nuts and then remove the caps and the big end lower bearing. Mark for reassembly.
Push each piston-connecting rod assembly toward the top of the cylinder.
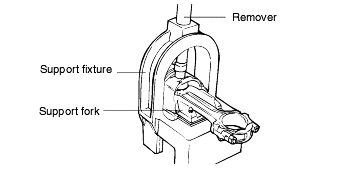
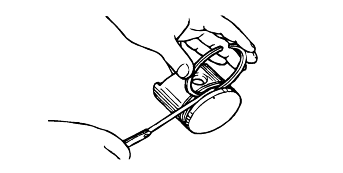
Use the special tools 09234 - 33001 and 09234 - 33002, disassemble and reassemble the piston and connecting rod.

The piston pin is a press fit in the rod little end, and the piston floats on the pin.
The tool consists of a support fixture with fork inserts, guides, adapters, an installer and a remover. The piston is supported in the support fixture while the pin is being installed or removed. Guides help position the pin as it is installed or removed, while the rod is supported by fork inserts.
To remove the pin from the piston, place the piston in the support fixture while the rod resting on the fork inserts. Pass the remover tool through thetop of the support fixture and use it to press out the pin.
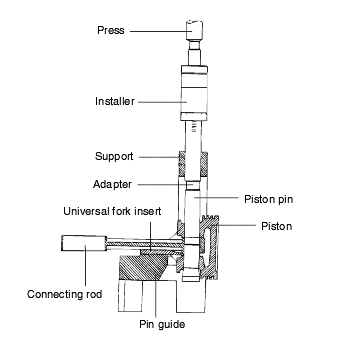
To install a new pin, the proper fork inserts must be in place to support the rod.
Position the rod inside the piston. Insert the proper pin guide through on side of the piston and through the rod. Hand tap the pin guide so it is held by the piston. Insert the new pin into the piston from the other side and set the assembly into the support fixture with the pin guide facing down.
The pin guide should be centered on the connecting rod though the piston. If assembled correctly, the pin guide will sit exactly under the center of the hole in the tool's arch, and rest evenly on the fort inserts. If the wrong size pin guide is used, the piston and pin will not line up with the supportfixture.

Insert the installer tool through the hole in the arch of the support fixture and use an hydraulic press to force the piston pin through the rod little end. Continue pressing until the pin guide falls free and the installertool seats against the top of the arch.
Do not exceed 1250±500 kg (2756±1102 lb) of force when stopping the installing arbor sleeve against the arch.
Check each piston for scuffing, scoring, wear and other defects. Replace any piston that is defective.
Check each piston ring for breakage, damage and abnormal wear. Replace the defective rings. When the piston requires replacement, its rings shouldalso be replaced.
Check that the piston pin fits in the piston pin hole. Replace any piston and pin assembly that is defective. The piston pin must be smoothly pressedby hand into the pin hole (at room temperature).
Measure the piston ring side clearance. If the measured value exceeds the service limit, insert a new ring in a ring groove to measure the side clearance. If the clearance still exceeds the service limit, replace the piston and rings together. If it is less than the service limit, replace only thepiston ring only.
Standard value |
Piston ring side clearance : |
No. 1 : 0.03 - 0.07 mm (0.0012 - 0.0028 in.) |
No. 2 : 0.02 - 0.06 mm (0.0008 - 0.0024 in.) |
Oil ring : 0.06 - 0.15 mm (0.0024 - 0.0059 in.) |
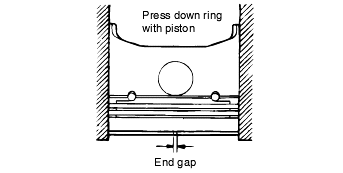
To measure the piston ring end gap, insert a piston ring into the cylinder bore. Position the ring at right angles to the cylinder wall by gently pressing it down with a piston. Measure the gap with a feeler gauge. If the gap exceedsthe service limit, replace the piston ring.
Piston ring end gap |
[Standard dimensions] |
No.1 : 0.25 - 0.35 mm (0.0098 - 0.0138 in.) |
No.2 : 0.40 - 0.55 mm (0.0157 - 0.0216 in.) |
Oil ring side rail : 0.10 - 0.40 mm (0.0039 - 0.0157 in.) |
[Limit] |
No.1, No.2 : 0.8 mm (0.031 in.) |
Oil ring side rail : 1.0 mm (0.039 in.) |
When the connecting rod cap is installed, make sure that cylinder numbers, marked on the rod end cap at disassembly, match. When a new connecting rod is installed, make sure that the notches for holding the bearing in placeare on the same side.
Replace the connecting rod if it is damaged at either end of the thrust faces. If it has stratified wear in, or if the surface of, the inside diameterof the small end is severely rough, replace the rod.
Install the spacer.
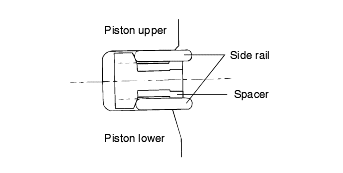

Install the upper side rail. To install the side rail, first put one end of the side rail between the piston ring groove and spacer, hold it firmly, then press down with your finger the portion to be inserted into groove asillustrated.
Do not use a piston ring expander when installing the side rail.
Install the lower side rail by the same procedure as described in Step No. 2.
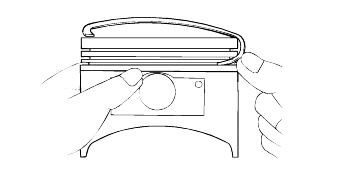
Apply engine oil around the piston and piston grooves.
Using piston ring expander, install the No. 2 piston ring.
Install the No. 1 piston ring.

Place each piston ring end gap as far apart from its neighboring gaps as possible. Make sure that gaps are not positioned in the thrust and pindirections.
Hold the piston rings firmly with a piston ring compressor as they are inserted into cylinder.

Make sure that the front mark of the piston and the front mark (identification mark) of the connecting rod are directed toward the front of the engine.
When the connecting rod cap is installed, make sure that the cylinder numbers put on the rod and cap at disassembly match.
When a new connecting rod is installed, make sure that the notches for holding the bearing in place are on the same side.
Tighten the connecting rod cap nuts.
Tightening torque |
Connecting rod cap nuts : |
20 Nm (200 kg.cm, 14 lb.ft) + 90° |
Check the connecting rod side clearance.
Connecting rod side clearance |
: 0.10 - 0.25 mm (0.004 - 0.0098 in.) |
Limit : 0.4 mm (0.0157 in.) |