note
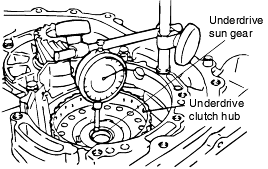
Installing the underdrive clutch hub makes it easy to measure the underdrive sun gear end play.
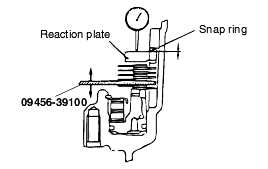
Standard value : 0 - 0.16 mm |
(Refer to the "Snap ring and spacer for adjustment")

Standard value : F4A42 : 0.79 - 1.25 mm F4A51 : 1.09 - 1.55 mm |
Select a pressure plate whose thickness is within the following value. [A (moving amount) + thickness of the special tool - 1.55] to [A (moving amount) + thickness of the special tool - 1.09]. (Refer to the "Snap ring andspacer for adjustment")
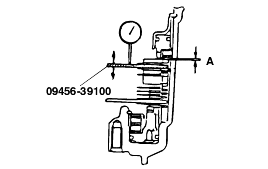
Standard value : F4A42 : 1.35 - 1.81 mm F4A51 : 1.65 - 2.11 mm |
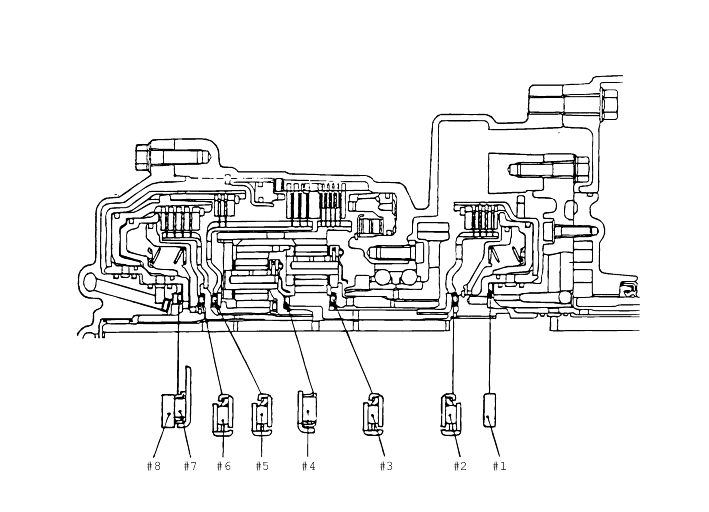
O.D. | I.D. | Thickness | Symbol | O.D. | I.D. | Thickness | Symbol |
59 | 47 | 1.8 | #1 | 48.9 | 37 | 1.6 | #8 |
59 | 47 | 2.0 | #1 | 48.9 | 37 | 1.7 | #8 |
59 | 47 | 2.2 | #1 | 48.9 | 37 | 1.8 | #8 |
59 | 47 | 2.4 | #1 | 48.9 | 37 | 1.9 | #8 |
59 | 47 | 2.6 | #1 | 48.9 | 37 | 2.0 | #8 |
59 | 47 | 2.8 | #1 | 48.9 | 37 | 2.1 | #8 |
49 | 36 | 3.6 | #2 | 48.9 | 37 | 2.2 | #8 |
49 | 36 | 3.6 | #3 | 48.9 | 37 | 2.3 | #8 |
45.3 | 31 | 3.3 | #4 | 48.9 | 37 | 2.4 | #8 |
49 | 36 | 3.6 | #5 | 48.9 | 37 | 2.5 | #8 |
49 | 36 | 3.6 | #6 | 48.9 | 37 | 2.6 | #8 |
59 | 37 | 2.8 | #7 | - | - | - | - |
Standard value : 0.25 - 0.45 mm |
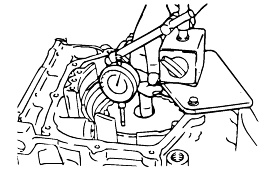
Installing the underdrive clutch hub makes it easy to measure the underdrive sun gear end play.
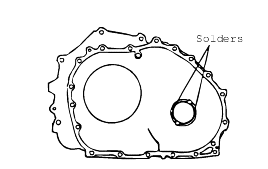
Place a piece of solder (approx. 10 mm in length, 3 mm in diameter) on the torque converter housing as shown in the figure.
Install the torque converter housing to the transmission case without applying sealant. Tighten its mounting bolts to the specified torque. Loosen the bolts, and remove the solder. Use a micrometer to measure the thickness (T) of the pressed solder. Select a spacer with a thickness that is withinthe following value.
Standard value : (T+0.045 mm) to (T+0.105 mm) |
Drive the vehicle until the fluid temperature rises to the normal temperature (70-80°C).
Park the vehicle on a level surface.
Move the selector lever through all positions to fill the torque converter and the hydraulic circuits with fluid, and then move the selectorlever to the N position.
After wiping off any dirt around the oil level gauge, reinsert and remove the oil level gauge and check the condition of the fluid.
If the fluid smells as if it is burning, it means that the fluid has been contaminated by fine particles from the bushesand friction materials, a transaxle overhaul may be necessary.
Check that the fluid level is at the HOT mark on the oil level gauge. If the fluid level is lower than this, add more fluid until the level reachesthe HOT mark.
Automatic transaxle fluid : GENUINE HYUNDAI ATF SP-III.
If the fluid level is low, the oil pump will draw in air along with the fluid, which will cause bubbles to form inside the hydraulic circuit. This will in turn cause the hydraulic pressure to drop, which will result in late shifting and slipping of the clutches and brakes. If there is too much fluid, the gears can churn it up into foam and cause the same conditions that can occur with low fluid levels. In either case, air bubbles can cause overheating and oxidation of the fluid which can interfere with normal valve, clutch, and brake operation. Foaming can also result in fluid escaping from the transaxle vent, in which case it may be mistaken fora leak.
Insert the oil level gauge securely.
The fluid and the oil filters should always be replaced when overhauling the transaxle or after the vehicle has been driven under severe conditions. The replacement procedures are given below. Furthermore, the oil filters are special filters which are only to be used for the automatic transaxle.
REPLACEMENT
If you have a fluid changer, use this changer to replace the fluid. If you do not have a fluid changer, replace the fluid using following procedure.
Remove the drain plug from the bottom of the transaxle case to drain the fluid.
Install the drain plug and gasket, and tighten to the specified torque.
Tightening torque : 32 Nm (320 kg·cm, 23 lb·ft.) |
Pour the new fluid in through the oil filler tube.
Stop pouring if the full volume of fluid cannot be poured in.
Repeat the procedure in step 1 if too much fluid was added.
Reconnect the hose that was disconnected in step 1 above, and firmly replace the oil level gauge.
Start the engine and run it at idle for 1-2 minutes.
Move the select lever through all positions, and then move it to the N position.
Drive the vehicle until the fluid temperature rises to the normal temperature (70-80°C), and then check the fluid level again. The fluidlevel must be at the HOT Mark.
Firmly insert the oil level gauge into the oil filler tube.
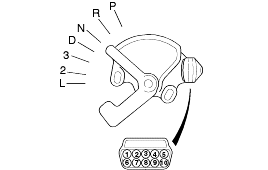
Set the selector lever to the "N" position.
Loosen the control cable to the manual control lever coupling nut to free the cable and lever.
Set the manual control lever to the neutral position.
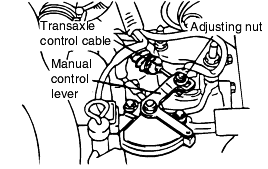
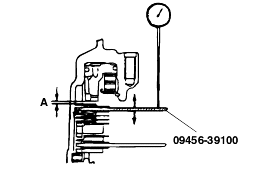
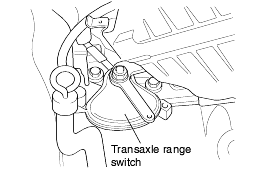
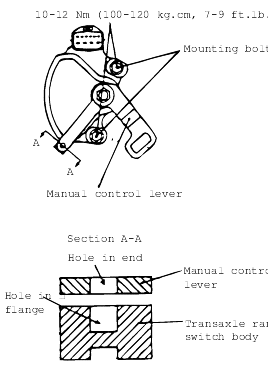
Loosen the transaxle range switch body mounting bolts and then turn the transaxle range switch body so the hole in the end of the manual control lever and the hole (cross section A-A in the figure) in the flange of thetransaxle range switch body flange are aligned.
Tighten the transaxle range switch body mounting bolts to the specified torque. Be careful at this time that the position of the switch body doesnot change.
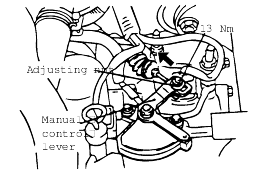
Gently pull the transaxle control cable in the direction of the arrow, then tighten the adjusting nut.
Check that the selector lever is in the "N" position.
Check that each range on the transaxle side operates and functions correctly for each position of the selector lever.
THROTTLE POSITION SENSOR CHECK.
The TPS is a variable resistor type that rotates with the throttle body shaft to sense the throttle valve angle. As the throttle shaft rotates, the output voltage of the TPS changes. The ECM detects the throttle valve openingbased on voltage change. (Refer to FL-section).
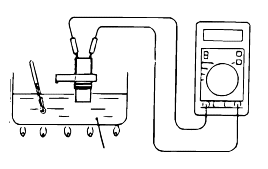
OIL TEMPERATURE SENSOR CHECK
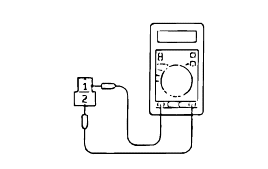
Remove the oil temperature sensor.
Measure the resistance between terminals 1 and 2 of the oil temperature sensor connector.
Oil temperature (°C) | Resistance (KΩ) |
0 | 16.7-20.5 |
100 | 0.57-0.69 |
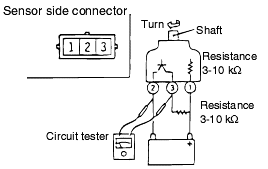
VEHICLE SPEED SENSOR CHECK
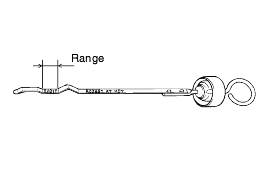
Remove the vehicle speed sensor and connect a 3-10 KΩ resistance as shown in the illustration.
Turn the shaft of the vehicle speed sensor and check that there is voltage between terminals 2-3 (1 turn=4 pulses).
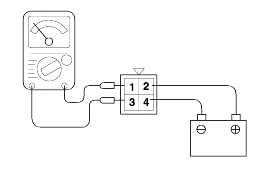
A/T CONTROL RELAY CHECK
Remove the A/T control relay.
Use jumper wires to connect A/T control relay terminal 2 to the battery (+) terminal and terminal 4 to the battery (-) terminal.
Check the continuity between terminal 1 and terminal 3 of the A/T control relay when the jumper wires are connected and disconnected fromthe battery.
If there is a problem, replace the A/T control relay.
Jumper wire | Continuity between terminal No.1 |
Connected | Continuity |
Disconnected | No continuity |
SOLENOID VALVE CHECK
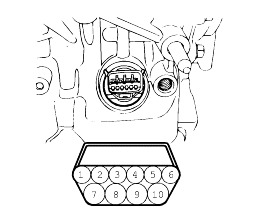
Remove the valve body cover.
Disconnect the connectors of each solenoid valve.
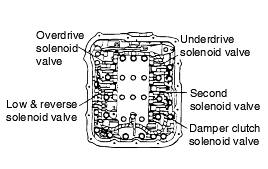
Measure the resistance between terminals 1 and 2 of each solenoid valve.
Name | Resistance |
Damper clutch solenoid valve | 2.7-3.4Ω (at 20°C) |
Low and reverse solenoid valve | |
Second solenoid valve | |
Underdrive solenoid valve | |
Overdrive solenoid valve |
If the resistance is outside the standard value, replace the solenoid valve.
Resistance of the solenoid valve connector.
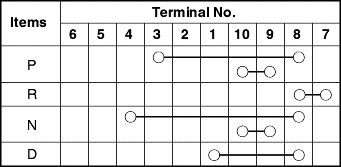
Terminal No. | Name | Resistance |
7 & 10 | Damper clutch solenoid valve | 2.7-3.4Ω (at 20°C) |
10 & 6 | Low and reverse solenoid valve | |
9 &4 | Second solenoid valve | |
9 & 3 | Underdrive solenoid valve | |
9 & 5 | Overdrive solenoid valve |
Do not let anybody stand in front of or behind the vehicle while this test is being carried out.
Check the automatic transaxle fluid level and temperature, and the engine coolant temperature.
● Fluid level : At the HOT mark on the oil level gauge ● Fluid temperature : 80-100°C ● Engine coolant temperature : 80-100°C |
Chock both rear wheels (left and right).
Apply the parking brake lever with the brake pedal fully depressed.
Start the engine.
Move the selector lever to the D position, fully depress the accelerator pedal and take a reading of the maximum engine speed at this time.
The throttle should not be left fully open for more than eight seconds.
If carrying out the stall test two or more times, move the selector lever to the N position and run the engine at 1,000 rpm to let the automatictransaxle fluid cool down before carrying out subsequent tests.
Standard value stall speed : 2,100-2,900 rpm
Move the selector lever to the R position and carry out the same test again.
Stall speed is too high in both D and R ranges
Low line pressure
Low & reverse brake slippage
Stall speed is too high in D range only
Underdrive clutch slippage
Stall speed is too high in R range only
Reverse clutch slippage
Stall speed too low in both D and R ranges
Malfunction of torque converter
Insufficient engine output
Warm up the engine until the automatic transaxle fluid temperature is 80-100°C.
Jack up the vehicle so that the wheels are free to turn.
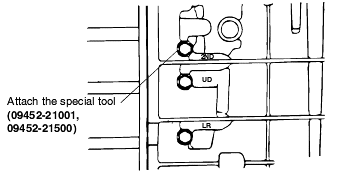
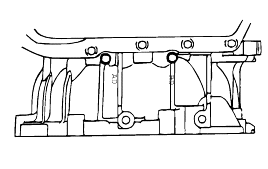
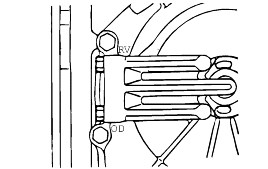
Connect the special tool (oil pressure gauge) to each pressure discharge port.
Measure the hydraulic pressure at each port under the conditions given in the standard hydraulic pressure table, and check that the measuredvalues are within the standard value ranges.
If a value is outside the standard range, correct the problem while referring to the hydraulic pressure test diagnosis table.
Measurement condition | Standard hydraulic pressure kPa/(psi) | |||||||||
Selector lever position | Shift position | Engine speed (rpm) | Under drive clutch pressure(UD) | Reverse clutch pressure (REV) | Overdrive clutch pressure(OD) | Low and reverse brake pressure(LR) | Second brake pressure (2ND) | Direct clutch pressure | Damper clutch release pressure(DR) | Reduction brake pressure |
P | - | 2,500 | - | - | - | 260-340 (38-49) | - | - | 220-360 (31-52) | 260-340 (38-49) |
R | Reverse | 2,500 | - | 1,270-1,770 (185-256) | - | 1,270-1,770 (185-256) | - | - | 500-700 (73-101) | 1270-1770 (185-256) |
N | Neutral | - | - | - | - | 260-340 (38-49) | - | - | 220-360 (31-52) | 260-340 (38-49) |
D | 1st gear | 2,500 | 1,010-1,050 (147-152) | - | - | 1,010-1,050 (147-152) | - | - | 500-700 (73-101) | 1010-1050 (147-152) |
2nd gear | 2,500 | 1,010-1,050 (147-152) | - | - | - | 1,010-1,050 (147-152) | - | 500-700 (73-101) | 1010-1050 (147-152) | |
3rd gear | 2,500 | 780-880 (113-128) | - | 780-880 (113-128) | - | - | - | 450-650 (65-94) | 780-880 (113-128) | |
4th gear | 2,500 | 780-880 (113-128) | - | 780-880 (113-128) | - | - | 780-880 (113-128) | 450-650 (65-94) | - | |
5th gear | 2,500 | - | - | 780-880 (113-128) | - | 780-880 (113-128) | 780-880 (113-128) | 450-650 (65-94) | - | |
Trouble symptom | Possible cause |
All hydraulic pressures are high | Incorrect transaxle control cable adjustment |
Malfunction of the regulator valve | |
All hydraulic pressures are low | Incorrect transaxle control cable adjustment |
Malfunction of the oil pump | |
Clogged internal oil filter | |
Clogged external oil filter | |
Clogged oil cooler | |
Malfunction of the regulator valve | |
Malfunction of the relief valve | |
Incorrect valve body installation | |
Hydraulic pressure is abnormal in "R" range only | Malfunction of the regulator valve |
Clogged orifice | |
Incorrect valve body installation | |
Hydraulic pressure is abnormal in "3" or "4" range only | Malfunction of the regulator valve |
Clogged orifice | |
Incorrect valve body installation | |
Malfunction of the overdrive solenoid valve | |
Malfuction of the overdrive pressure control valve | |
Malfunction of the regulator valve | |
Malfunction of the switch valve | |
Clogged orifice | |
Incorrect valve body installation | |
Only underdrive hydraulic pressure is abnormal | Malfunction of the oil seal K |
Malfunction of the oil seal L | |
Malfunction of the oil seal M | |
Malfunction of the underdrive solenoid valve | |
Malfunction of the underdrive pressure control valve | |
Malfunction of check ball | |
Clogged orifice | |
Incorrect valve body installation | |
Only reverse clutch hydraulic pressure is abnormal | Malfunction of the oil seal A |
Malfunction of the oil seal B | |
Malfunction of the oil seal C | |
Clogged orifice | |
Incorrect valve body installation | |
Only overdrive hydraulic pressure is abnormal | Malfunction of the oil seal D |
Malfunction of the oil seal E | |
Malfunction of the oil seal F | |
Malfunction of the overdrive solenoid valve | |
Malfunction of the overdrive pressure control valve | |
Malfunction check ball | |
Clogged orifice | |
Incorrect valve body installation | |
Only low and reverse hydraulic pressure is abnormal | Malfunction of the oil seal I |
Malfunction of the oil seal J | |
Malfunction of the low and reverse solenoid valve | |
Malfunction of the low and reverse pressure control valve | |
Malfunction of the switch valve | |
Malfunction of the fail safe valve A | |
Malfunction of check ball | |
Clogged orifice | |
Incorrect valve body installation | |
Only second hydraulic pressure is abnormal | Malfunction of the oil seal G |
Malfunction of the oil seal H | |
Malfunction of the oil seal O | |
Malfunction of the second solenoid valve | |
Malfunction of the second pressure control valve | |
Malfunction of the fail safe valve B | |
Clogged orifice | |
Incorrect valve body installation | |
Only reverse clutch hydraulic pressure is abnormal | Malfunction of the oil cooler |
Malfunction of the oil seal N | |
Malfunction of the damper clutch control solenoid valve | |
Malfunction of the damper clutch control valve | |
Malfunction of the torque converter pressure control valve | |
Clogged orifice | |
Pressure applied to non operating element | Incorrect valve body installation |
Incorrect transaxle control cable adjustment | |
Malfunction of the manual valve | |
Malfunction of check ball | |
Incorrect valve body installation |
