This Manual consists of five major diagnostic sections for electrical problem troubleshooting.
Schematic diagrams
Component location indexes
Component locations
Connector configurations
Harness layouts
The starting point of each system section is the schematic diagram. These diagrams show how all the components work together, such as electrical current paths from power source to ground(via electrical load), switch connections at each position, and other related circuit functions.
It is important to fully understand how a circuit works prior to troubleshooting and diagnosis.
When you want to locate the schematic components on the vehicle, use the Component Location Index which follows each schematic. A Component Location Index lists major components, connectors, grounds, diodes, and their physical location and page reference. Almost all components, connectors or grounds, and diodes shown on a schematic can be pinpointed visuallyby using the Component Location Illustrations.
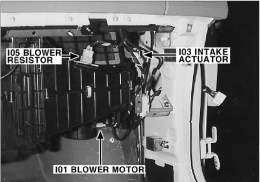
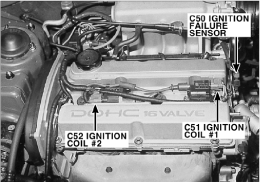
Component Locations make it easy to find the schematic components on the vehicle shown in the Component Location Index.
| |
This section shows the cavity or terminal locations in all the multi-pin connectors shown in the schematic diagrams. It will help you to locate check points, together with the wire colors and terminal numbers in the schematic. The configuration drawings show the connector view as seen from a component after the harness connector has been disconnected. When more than one connector is connected to a component, the connectors are all shown together. Both halves of in-line connectors are shown together.
1. CONNECTOR VIEW
UNLESS OTHERWISE STATED, ALL CONNECTOR VIEWS ARE FROM THE TERMINAL SIDE OF THE CONNECTOR.
2. NUMBERING ORDER
Harness layouts show the routing of the major wiring harnesses, the in-line connectors and the splices between the majorharnesses. These layouts will make electrical troubleshooting easier.
The symbols and abbreviations explained in this section are used throughout the manual.
The following abbreviations are used to identify wire colors in the circuit schematics.
Symbol | Color of wire | Symbol | Color of wire |
B | Black | O | Orange |
Br | Brown | P | Pink |
G | Green | R | Red |
Gr | Gray | W | White |
L | Blue | Y | Yellow |
Lg | Light green |
Electrical wiring connectors are classified according to the wiring parts in the Harness Layouts.
Harness name | Location | Symbol |
Engine harness | Engine compartment | E |
Main, Floor, Roof, Sunroof, Seat warmer ext. harness | Passenger compartment, Floor, Roof | M |
Control, Injector harness | Engine compartment | C |
Tail gate harness | Tail gate | R |
Air bag harness | Under crash pad and Floor | I |
Door harness | Door | D |
A connector identification symbol consists of a wiring harness location classification symbol corresponding to a wiring harness location and number corresponding to the connector. These connector locations can be found in the HARNESS LAYOUTS.
For example :
Connectors which connect each wiring harness are represented by the following symbols.
For example :
A junction block identification symbol consists of a wiring harness location classification symbol corresponding to a wiring harness location and number corresponding to the connector in the junction block.
For example :
For example :
