4.
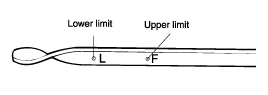
Check that the engine oil level is within the level range indicated on the oil dipstick If the oil level is found to have fallen to the lower limit (the L mark), refill to the "F" mark.
note
When refilling, use the same type of engine oil.
Description | Specification | Limit |
General Type Number of cylinders Bore 1.6 L 1.5 L Stroke 1.6 L 1.5 L Total displacement 1.6 L 1.5 L Compression ratio Firing order | In-line, Double Over Head Camshaft 4 76.5mm (3.0118 in) 75.5mm ( 2.972 in.) 87mm (3.4252 in) 83.5mm (3.287 in.) 1599 cc (97.54 cu.in) 1495 cc (91.27 cu.in) 10 1-3-4-2 | |
Valve timing Intake valve Opens (BTDC) Closes (ABDC) Exhaust valve Opens (BBDC) Closes (ATDC) Valve overlap | 5° 35° 43° 5° 10° | |
Cylinder head Flatness of cylinder head surface Flatness of mainfold mounting surface Oversize rework dimension of valve seat hole Intake 0.3mm (0.012 in.) O.S. 0.6mm (0.024 in.) O.S. Exhaust 0.3mm (0.012 in.) O.S. 0.6mm (0.024 in.) O.S | Max. 0.03mm (0.0012 in.) 0.15mm (0.0059 in.) 29.8 ~ 29.821 mm (1.173 ~ 1.174 in.) 30.1 ~ 30.121 mm (1.185 ~ 1.186 in.) 27.3 ~ 27.321mm (1.0748 ~ 1.0756 in.) 27.6 ~ 27.621mm (1.0866 ~ 1.0874 in.) | 0.1 mm (0.0039in.) 0.2mm (0.008in.) |
Oversize rework dimensions of valve Guide hole 0.05mm (0.002 in.) O.S. 0.25mm (0.010 in.) O.S. 0.50mm (0.020 in.) O.S. | 11.05 ~ 11.068mm (0.435 ~ 0.4357 in.) 11.25 ~ 11.268mm (0.443 ~ 0.4436 in.) 11.50 ~ 11.518mm (0.453 ~ 0.4535 in.) | |
Camshaft Camlobe height Intake Exhaust Joumal O.D Bearing oil clearance End play | 43.4484mm (1.7106 in.) 43.8489mm (1.7263 in.) ø27mm (1.0630 in.) 0.035 ~ 0.072mm (0.0014 ~ 0.0028 in.) 0.1 ~ 0.2mm (0.004 ~ 0.008 in.) | 42.9484mm (1.6909in.) 43.3489mm (1.7.66in.) |
Valve Valve length Intake Exhaust Stem O.D. Intake Exhaust Face angle thickness of valve head (Margin) Intake Exhaust Valve stem to valve guide clearance Intake Exhaust | 91.7mm (3.6102 in.) 92.3mm (3.6339 in.) 5.955 ~ 5.97mm (0.2344 ~ 0.2350 in.) 5.935 ~ 5.95mm (0.2337 ~ 0.2343 in.) 1.1mm (0.0433 in.) 1.3mm (0.0512 in.) 0.03 ~ 0.06mm (0.0012 ~ 0.0024 in.) 0.05 ~ 0.08mm (0.0020 ~ 0.0031 in.) | 0.8mm (0.031in.) 1.0mm (0.039in.) 0.10mm (0.0039in.) 0.15mm (0.0059in.) |
Valve guide Installed dimension O.D. Intake Exhaust Service size | 12.8mm (0.504 in.) 12.8mm (0.504 in.) 0.05, 0.25, 0.50mm (0.002, 0.010, 0.020 in.) oversize | |
Valve seat Width of seat contact Intake Exhaust Seat angle Oversize | 0.8 ~ 1.2mm (0.031 ~ 0.047 in.) 1.3 ~ 1.7mm (0.051 ~ 0.066 in.) 45° 0.3, 0.6mm (0.012, 0.024 in.) oversize | |
Valve spring Free length Load Squareness | 44.00mm (1.7323 in.) 21.6kg/ 35mm (47.6lb/1.3780 in.) 45.1kg/ 27.2mm (99.4lb/1.709 in.) 1.5° or less | |
Cylinder block Cylinder bore 1.6 L 1.5 L Out- of- round and taper of cylinder bore Clearance with piston 1.6 L 1.5 L | 76.50 ~ 76.53mm (3.0118 ~ 3.0130 in.) 75.50 ~ 75.53 mm (2.9724 ~ 2.9736 in.) Less than 0.01mm (0.0004 in.) 0.025 ~ 0.045mm (0.0009 ~ 0.0017 in.) 0.02 ~ 0.04 mm (0.00078 ~ 0.0016 in.) | |
Piston O.D. 1.6 L 1.5 L Service size | 76.465 ~ 76.495mm (3.0104 ~ 3.0116 in.) 75.465 ~ 75.495mm (2.9710 ~ 2.9722 in.) 0.25, 0.50, 0.75, 1.00mm (0.010, 0.020, 0.030, 0.039 in.) oversize | |
Piston ring Side clearance No. 1 No. 2 Endgap No. 1 No. 2 Oil ring side rail Service size | 0.04-0.085mm (0.0015-0.0033 in.) 0.04-0.085mm (0.0015-0.0033 in.) 0.20-0.35mm (0.0079- 0.0138 in.) 0.37-0.52mm (0.0146-0.02 in.) 0.2-0.7mm (0.0078- 0.0275 in.) 0.25, 0.50, 0.75, 1.00mm (0.010, 0.020, 0,030, 0.039 in.) oversize | 0.1mm (0.004in.) 0.1mm (0.004in.) 1.0mm (0.039in.) 1.0mm (0.039in.) 1.0mm (0.039in.) |
Connecting rod Bend Twist Connecting rod big end to crankshaft side clearance Connecting rod bearing oil clearance Undersize | 0.05mm (0.0020 in.) or less 0.1mm (0.0039 in.) or less 0.100-0.250mm (0.0039-0.0098 in.) 0.018-0.036mm (0.0007-0.0014 in.) 0.25, 0.50, 0.75mm (0.010, 0.020, 0.030 in.) | 0.4mm (0.0157in.) |
Crankshaft Pin O.D. Journal O.D. Bend Out- of- round, taper of journal and pin End play | 45 mm (1.77 in.) 50 mm (1.97 in.) 0.03 mm (0.0012 in.) or less 0.005 mm (0.0002 in.) or less 0.05- 0.175 mm (0.0019- 0.0068 in.) | |
Undersize rework dimension of pin 0.25mm (0.010 in.) 0.50mm (0.20 in.) 0.75mm (0.030 in.) | 44.725 ~ 44.74mm (1.7608 ~ 1.7614 in.) 44.475 ~ 44.49mm (1.7509 ~ 1.7516 in.) 44.225 ~ 44.24mm (1.7411 ~ 1.7417 in.) | |
Undersize rework dimension of journal 0.25mm (0.010 in.) 0.50mm (0.20 in.) 0.75mm (0.030 in.) | 49.727 ~ 49.742mm (1.9577 ~ 1.9583 in.) 49.477 ~ 49.492mm (1.9479 ~ 1.9485 in.) 49.227 ~ 49.242mm (1.9380 ~ 1.9386 in.) | |
Flywheel Runout | 0.1mm (0.0039 in.) | 0.13mm (0.0051in.) |
Oil pump Clearance between outer circumference and front case (body clearance) Front case tip clearance Side clearance Inner gear Outer gear | 0.12 ~ 0.18mm (0.0047 ~ 0.0070 in.) 0.025 ~ 0.069mm (0.001 ~ 0.0027 in.) 0.04 ~ 0.085mm (0.0016 ~ 0.0033 in.) 0.06 ~ 0.11mm (0.0024 ~ 0.0043 in.) | |
Engine oil pressure Engine at idle [Oil temperature is 90 to 100°C (194 to 215°F)] | 147KPa (1.5 kg/ cm², 21.33psi) | |
Relief spring Free height Load | 46.6mm (1.8346 in.) 6.1kg at 40.1mm (13.42lb/ 1.578 in.) | |
Cooling method | Water-cooled, pressurized, forced circulation with electrical fan | |
Coolant Quantity Radiator Type | 6.5 liter Pressurized corrugated fin type | |
Radiator cap Main valve opening pressure Vacuum valve opening pressure | 81.4 ~ 108 kpa (11.8 ~ 15.6 psi.,0.83 ~ 1.1kg/cm² ) -6.86 kpa (-1.00 psi, -0.07 kg/cm² or less | |
Coolant pump | Centrifugal type impeller | |
Thermostat Type Valve opening temperature Full-opening temperature | Wax pellet type with jiggle valve 82°C (180°F) 95°C (203°F) | |
Engine coolant temperature sensor Type Resistance | Heat-sensitive thermistor type 2.31 ~ 2.59k Ω at 20°C(68°F) 146.9 ~ 147.3 Ω at 110°C(230°F) | |
Air cleaner Type Element | Dry type Un woven cloth type | |
Exhaust pipe Muffler Suspension system | Expansion resonance type Rubber hangers |
O.D. = Outer Diameter
I.D. = Inner Diameter
O.S. = Oversize Diameter
U.S. = Undersize Diameter
Item | Nm | Kg.cm | Ib.ft |
Cylinder Block Front engine support bracket bolt and nut Engine suppot bracket stay bolt Oil pressure switch | 45 ~ 55 45 ~ 55 13 ~ 15 | 450 ~ 550 450 ~ 550 130 ~ 150 | 33 ~ 41 33 ~ 41 10 ~ 11 |
Cylinder head Cylinder head bolt 1.6 L 1.5 L Intake manifold bolts or nuts Exhaust manifold nut Cylinder head cover bolt Camshaft bearing cap bolt Rear plate bolt | 30+(90°)+Release all bolts+30+(90°) 35+90°+Release all bolts+35+90° 15 ~ 20 25 ~ 30 8 ~ 10 12 ~ 14 32 ~ 35 | 300+(90°)+Release all bolts+300+(90°) 350+90°+Release all bolts+350+90° 150 ~ 200 250 ~ 300 80 ~ 100 120 ~ 140 320 ~ 350 | 22+(90°)+Release all bolts+22+(90°) 26+90°Release all bolts+26+90° 11 ~ 15 18 ~ 22 6 ~ 7 9 ~ 10 24 ~ 26 |
Main Moving system Connecting rod cap nut Crankshaft bearing cap bolt Fly wheel M/T bolt Drive plate A/T bolt | 32 ~ 35 55 ~ 60 120 ~ 130 120 ~ 130 | 320 ~ 350 550 ~ 600 1200 ~ 1300 1200 ~ 1300 | 24 ~ 26 41 ~ 44 89 ~ 96 89 ~ 96 |
Timing system Crankshaft pulley bolt Camshaft sprocket bolt Timing belt tensioner bolt Timing belt idle bolt Timing belt cover bolt Front case bolt | 140 ~ 150 80 ~ 100 20 ~ 27 43 ~ 55 8 ~ 10 20 ~ 27 | 1400 ~ 1500 800 ~ 1000 200 ~ 270 430 ~ 550 80 ~ 100 200 ~ 270 | 103 ~ 111 59 ~ 74 15 ~ 20 32 ~ 41 6 ~ 7 15 ~ 20 |
Engine Mounting Right mounting insulator (large) nut Right mounting insulator (small) nut Right mounting bracket to engine nuts and bolts Transmission mount insulator nut Transmission insulator bracket to side member bolts Rear roll stopper insulator nut Rear roll stopper bracket cross member bolt | 70 ~ 95 35 ~ 55 35 ~ 55 35 ~ 55 35 ~ 55 35 ~ 55 70 ~ 95 | 700 ~ 950 350 ~ 550 350 ~ 550 350 ~ 550 350 ~ 550 350 ~ 550 700 ~ 950 | 52 ~ 70 26 ~ 40 26 ~ 40 26 ~ 40 26 ~ 40 26 ~ 40 52 ~ 70 |
Oil filter Oil pan bolts Oil pan drain plug Oil screen bolts | 12 ~ 16 10 ~ 12 35 ~ 45 15 ~ 22 | 120 ~ 160 100 ~ 120 350 ~ 450 150 ~ 220 | 9 ~ 12 7 ~ 9 25 ~ 33 11 ~ 16 |
Alternator support bolt and nut Alternator lock bolt Alternator brace mounting bolt Coolant pump pulley Coolant pump bolt Coolant temperature sensor Coolant inlet fitting bolt Thermostat housing bolt | 20 ~ 25 12 ~ 15 20 ~ 27 8 ~ 10 12 ~ 15 25 ~ 30 17 ~ 20 15 ~ 20 | 200 ~ 250 120 ~ 150 200 ~ 270 80 ~ 100 120 ~ 150 250 ~ 300 170 ~ 200 150 ~ 200 | 15 ~ 18 9 ~ 11 15 ~ 20 6 ~ 7 9 ~ 11 18 ~ 22 13 ~ 14 11 ~ 14 |
Air cleaner body mounting bolts Resonator mounting bolts Intake manifold to cylinder head nuts and bolts Surge tank stay to cylinder block bolts Throttle body to surge tank bolts Exhaust manifold to cylinder head nuts Exhaust manifold cover to exhaust manifold bolts Oxygen sensor to exhaust manifold Front exhaust pipe to exhaust manifold nuts Front exhaust pipe bracket bolts Front exhaust pipe to catalytic converter bolts | 8 ~ 10 4 ~ 6 15 ~ 20 18 ~ 25 15 ~ 20 25 ~ 30 15 ~ 20 50 ~ 60 30 ~ 40 30 ~ 40 40 ~ 60 | [80 ~ 100 40 ~ 60 150 ~ 200 180 ~ 250 150 ~ 200 250 ~ 300 150 ~ 200 500 ~ 600 300 ~ 400 300 ~ 400 400 ~ 600 | 6 ~ 7 3 ~ 4 11 ~ 14 13 ~ 18 11 ~ 14 18 ~ 22 11 ~ 14 37 ~ 44 22 ~ 30 22 ~ 30 30 ~ 44 |
Standard value | |
Antifreeze | Mixture ratio of anti-freeze in coolant |
ETHYLENE GLYCOL BASE FOR ALUMINUM | 50% |
Position the vehicle on a level surface.
Warm up the engine.
If a vehicle has been out of service for a prolonged period of time, warm up the engine for approximately 20 minutes.
Turn off the engine, and wait 2 or 3 minutes, then check the oil level.
Check that the engine oil level is within the level range indicated on the oil dipstick If the oil level is found to have fallen to the lower limit (the L mark), refill to the "F" mark.
When refilling, use the same type of engine oil.
Check that the oil is not dirty or contaminated with coolant or gasoline, and that it has the proper viscosity.
Be careful not to burn yourself, as the engine oil is hot.
Run the engine until it reaches normal operating temperature.
Turn off the engine
Remove the oil filler cap and the drain plug (on the oil pan). Drain the engine oil.
Install and tighten the drain plug to the specified torque.
Tightening torque
Drain plug : 35 ~ 45 Nm (350 ~ 450 kg.cm, 24 ~ 33 lb.ft)
Fill the crankcase with fresh engine oil through the oil filler cap opening.
Drain and Refill Without oil filter :
3.0 liter (3.17 U.S.qts, 2.64 lmp.quts)
Draing and Refill With oil filter :
3.3 liter (3.48 U.S.qts, 2.64 lmp.quts)
Install the oil filler cap.
Start and run the engine.
Turn off the engine and then check the oil level. Add oil if necessary.
Be careful not to burn yourself, as the engine and engine oil are hot.
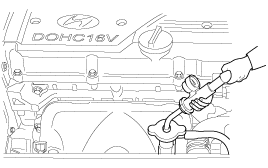
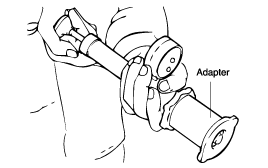
Use a filter wrench to remove the oil filter.
Before installing the new oil filter on the engine, apply clean engine oil to the surface of the rubber gasket.

Tighten the oil filter to the specified torque.
Tightening torque
Oil filter : 12 - 16 Nm (120 - 160 kg.cm, 9 - 12 lb.ft)
Run the engine to check for engine oil leaks.
After turning off the engine, check the oil level and add oil as necessary.
Satisfy the requirements of the API classification.
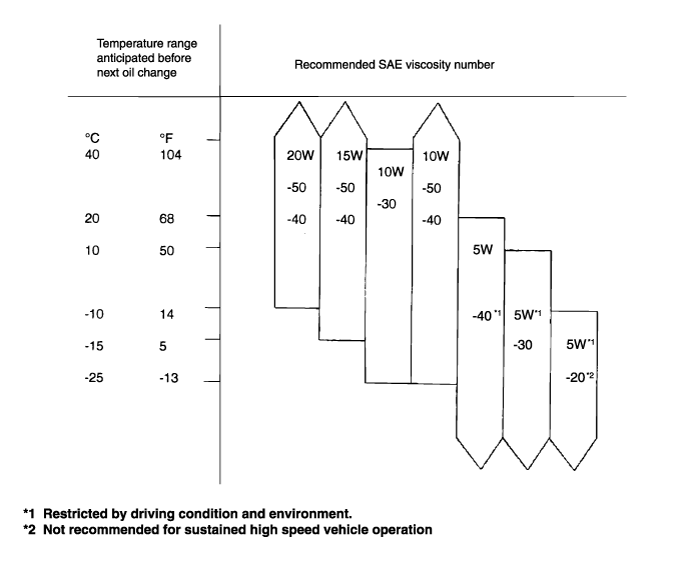
Have proper SAE grade number for expected ambient temperature range.
Wait until the engine is cool, then carefully remove the radiator cap.
Confirm that the coolant level is up to the filler neck.
Install a radiator cap tester to the radiator filler neck and apply 140 KPa (1.4 kg/cm², 20psi ) pressure. Hold it for two minutes in that condition, while checking for leakage from the radiator, hoses or connections.
Radiator coolant may be extremely hot. Do not open the system because hot, or scalding water could gush out causing personal injury. Allow the vehicle to cool before servicing this system.
Be sure to clean away any moisture from the places checked completely.
When the tester is removed, be careful not to spill any coolant from it.
Be careful, when installing and removing the tester and when testing, not to deform the filler neck of the radiator.
If there is leakage, repair or replace with the apropriate part.
Remove the radiator cap, wet its seal with engine coolant, then install it on the tester.
Increase the pressure until the gauge stops moving.
Main valve opening pressure :
83 - 110 kPa (0.83 - 1.1 kg/cm², 12 - 16 psi)
Vacuum valve opening pressure :
-7 kPa (-0.07 kg/cm², -1.0 psi)
Check that the pressure level is maintained at or above the limit.
Replace the radiator cap if the reading does not remain at or above the limit.
Be sure that the cap is clean before testing, since rust or other foreign material on the cap seal will cause an incorrect reading.
Measure the specific gravity of the coolant with a hydrometer.
Measure the coolant temperature and calculate the concentration from the relation between the specific gravity and temperature, using the following table for reference.
Coolant temperatur °C (°F) and specific gravity | Freezing temperature °C (°F) | Safe operating temperature °C (°F) | Coolant concentration (Specific volume) | ||||
10 (50) | 20 (68) | 30 (86) | 40 (104) | 50 (122) | |||
1.054 | 1.050 | 1.046 | 1.042 | 1.036 | -16 (3.2) | -11 (12.2) | 30% |
1.063 | 1.058 | 1.054 | 1.049 | 1.044 | -20 (-4) | -15 (5) | 35% |
1.071 | 1.067 | 1.062 | 1.057 | 1.052 | -25 (-13) | -20 (-4) | 40% |
1.079 | 1.074 | 1.069 | 1.064 | 1.058 | -30 (-22) | -25(-13) | 45% |
1.087 | 1.082 | 1.076 | 1.070 | 1.064 | -36 (-32.8) | -31 (-23.8) | 50% |
1.095 | 1.090 | 1.084 | 1.077 | 1.070 | -42 (-44) | -37 (-35) | 55% |
1.103 | 1.098 | 1.092 | 1.084 | 1.076 | -50 (-58) | -45 (-49) | 60% |
If the concentration of the coolant is below 30%, its anti-corrosion properties will be adversely affected.
If the concentration is above 60%, both the anti-freeze and engine cooling property will decrease, affecting the engine adversely. For these reasons, be sure to maintain the concentration level within the specified ragne.
Do not use together with another brank's product.
Antifreeze | Mixture ratio of anti freeze in coolant |
ETHYLENE GLYCOL BASE FOR ALUMINUM | 50% [Except tropical areas] 40% [Tropical areas] |
When pouring engine coolant, be sure to shut the relay box lid and not to let coolant spill on electrical parts or the paint. If any coolant spills, rinse it off immediately.
Slide the heater temperature control lever to maximum heat. Make sure the engine and radiator are cool to the touch.
Remove the radiator cap.
Loosen the drain plug, and drain the coolant.
Tighten the radiator drain plug securely.
Remove, drain and reinstall the reservior.
Fill the tank halfway to the MAX mark with water, then up to the MAX mark with antifreeze.
Pour coolant into the radiator up to the base of the filler neck, and install the radiator cap loosely.
Start the engine and let it run until it warms up (the radiator fan comes on at least twice).
Turn off the engine.
Check the level in the radiator, add coolant if needed.
Put the radiator cap on tightly, then run the engine again and check for leaks.
Before checking engine compression, check the engine oil level. Also check that the starter motor and battery are all in normal operating condition.
Check the DTC and note it. Use the scan tool to clear the ECM'S memory.
Start the engine and wait until engine coolant temperature reaches 80 ~ 95°C (176 ~ 205°F).
Disconnect the fule pump connector.
Turn off engine and disconnect the spark plug cables.
Remove the spark plugs.
Disonnect the I.G. connector.
Crank the engine to remove any foreign material in the cylinders.
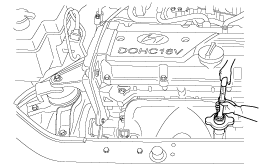
Insert the compression gauge into the spark plug hole.
Depress the accelerator pedal to open the throttle fully.
Crank the engine and read the gauge.
Standard value : 1500kpa (15Kg/cm², 218 psi)
Limit : 1400kpa (14Kg/cm², 203 psi)
Repeat steps 9 to 11 over all cylinders, ensuring that the pressure differential for each of the cylinders is within the specified limit.
Limit :
Max 100 kpa (1.0 kg/cm², 14 psi) between cylinders
If a cylinder's compression or pressure differential is outside the specification, add a small amount of oil through the spark plug hole, and repeat steps 9 to 12.
If the addition of oil makes the compression to rise, it is likely that there may be wear between the piston ring and cylinder wall.
If compression remains the same, valve seizure, poor valve seating or a compression leak from the cylinder head gasket are all possible causes.
Tightening torque
Spark plug : 20 ~ 30 Nm (200 ~ 300 kg.cm, 14 ~ 22 lb.ft)
Rotate the steering wheel counter-clockwise throughly.
Do watch not to over load.
Lift the vehicle by using of jack.
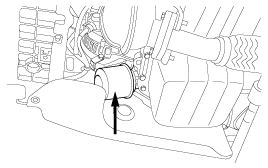
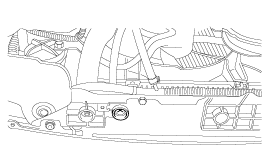
Remove the engine support bracket. (14mm bolt and 2nuts, 17mm nut)
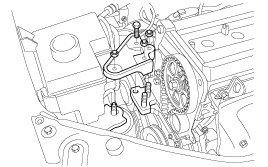
Remove the drive belts and the water pump pulley. (10 mm 4 bolts)
Remove the timing belt upper cover. (10 mm 4 blts)
Remove the timing belt lower cover.
Place the pistion of No. 1 cylinder to TDC of the compression stroke by rotating the crankshaft clockwise.
Crankshaft is to be rotated clockwise otherwise, the tension is inadequately adjusted.
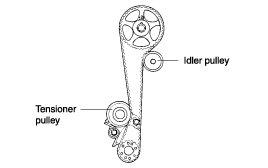
Loosen the tensioner bolt of pivot side and slotside.
Rotate the crankshaft clockwise as many as 2 teeth of camshaft sprocket.
Check that the teeth of sprocket and belt coincide with each other.
Tighten the bolt of slot side of first and then tighten the bolt of pivot side.
Rotate tthe crankshaft pulley two turns clockwise so that the timing belt positions on the pulleys.
Install the timing belt tension.
Install the timing belt lower cover.
Install the timing belt upper cover.
Install the water pump pulley and engine support bracket.
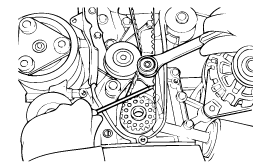
Check that the belts are not damaged and are properly fit for the pulley grooves.
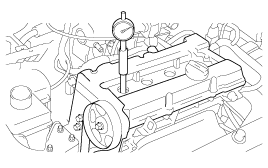
Apply 100 N (22 lbs.) force to the back and midway portion of the belt between the pulleys as shown in the illustration, measure the amount of deflection with a tension gauge.
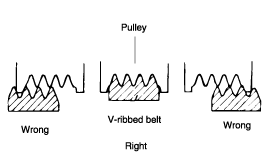
When installing the V-ribbed belt, check that the V-ribs are properly aligned.
If noise or slippage is detected, check the belt for wear, damage, or breakage on the pulley contact surface, and check the pulley for scoring. Also check the amount that the belt is deflected.
Itmes | Inspection | Adjustment | ||
New | Used | |||
For alternator | Deflection mm (in.) | 5.1~6.0(0.200~0.236) | 4.0~4.4(0.157~0.173) | 5.0~5.7(0.200~0.224) |
Tension N (lb) | 350~500(79~112 | 650~750(143~165) | 400~500(88~110) | |
For air conditioner | Deflection mm (in.) | 8(0.31) | 5.0~5.5(0.20~0.22) | 6.0~7.0(0.24~0.28) |
Tension N (lb) | 250~500(56~112) | 470~570(106~128) | 320~400(72~90) | |
For power steering | Deflection mm (in.) | 6.0~9.0(0.24~0.35) | - | - |
The belt tension must be measured half - way between the specified pulleys.
When a new belt is installed, adjust the tension to the central value of the standard range indicated under "New" in the above table. Let the engine idle for 5 minutes or more, and check the standard value indicated under "Inspection."
When adjusting a belt which has been used,or newly installed, after 5 minutes or more of operation, refer to the standard value indicated under "Used" in the above table.
Refer to the standard value indicated under "Inspection" for periodic inspections.
When measuring, turn the reset button in the direction of the arrow and set the gauge needle to the RESET position.
If the tension gauge is removed from the belt, the needle will still indicate the tension. Read the tension value after removing the gauge.

If the belt is too loose, it will cause noise or sudden wear.
If the belt is too tight, the engine coolant pump bearing or the alternator can get damaged.
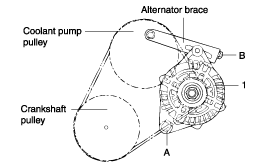
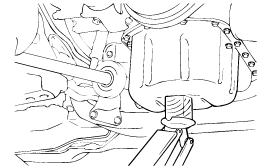
Loosen the alternator nut "A" and the tension adjuster lock bolt "B".
Using the tension adjuster bolt, adjust the belt tension to the specification.
Tighten the adjuster lock bolt "B".
Tighten the alternator nut "A".
Check the tension or the deflection of belt, readjust if necessary.
Tightening torque
Alternator support bolt and nut :
20 ~ 25 Nm (200 ~ 250 kg.cm, 14 ~ 18 lb.ft)
Alternator lock bolt B :
12 ~ 15 Nm (120 ~ 150 kg.cm, 9 ~ 11 lb.ft)
Alternator brace mounting bolt :
20 ~ 27 Nm (200 ~ 270 kg.cm, 15 ~ 20 lb.ft)