Remove scale, sealing compound and carbon deopsits completely. After cleaning the oil passages, apply compressed aor to verify that the passages are not clogged.
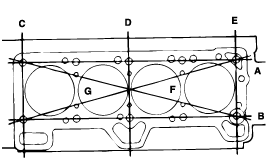
Check the cylinder head for cracks, damage and coolant leakage. If cracked, replace the cylinder head.
Remove scale, sealing compound and carbon deopsits completely. After cleaning the oil passages, apply compressed aor to verify that the passages are not clogged.

Check the cylinder head surface for flatness in the direction as shown in the illustration. If flatness exceeds the service limit in any direcftion, either replace the cylinder head or machine the cylinder head matching surface lightly.
Flatness of cylinder head gasket surface
Standard : Less than 0.03 mm (0.0012 in.)
Limit : 0.2 mm (0.008 in.)
Using a wire brush, clean the valve thoroughly.
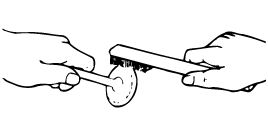
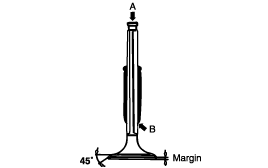
Check each valve for wear, damage and distortion of the head and the stem at B position. Replace, if necessary. If stem end, A, is hollowed out or worn, resurface as necessary. This correction must be limited to a minimum. Also resurface the valve face.
Replace the valve if the margin has decreased to less than the service limit.
Margin
[Standard]
Intake : 1.1 mm (0.043 in.)
Exhaust : 1.3 mm (0.051 in.)
[Limit]
Intake : 0.8 mm (0.028 in.)
Exhaust : 1.0 mm (0.040 in.)
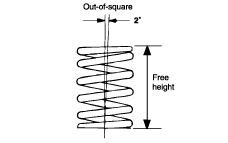
Check the free height of each valve spring. If they exceed the servicd limit, replace the springs.
Using a square, test the squareness of each spring.
If a spring is excessively out - of - square, replace it.
Valve spring
[Standard]
Free height : 44 mm (1.7323 in.)
Load :
21.6 kg/35 mm (47.6 lb/1.0709 in.)
45.1 kg/27.2 mm (16 lb/1.0709 in.)
Out of square : 1.5° or less 100
[Limit]
Free height : - 1.0 mm (- 0.039 in.)
Out of square : 4°
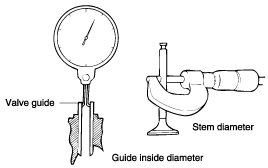
Check the valve stem-to-guide clearance. If the clearance exceeds the service limit, replace the valve guide with the next oversize part.
Valve stem-to-clearance
[Standard]
Intake : 0.03 ~ 0.06 mm (0.0012 ~ 0.0024 in.)
Exhaust : 0.05 ~ 0.08 mm (0.0020 ~ 0.0031 in.)
[Limit]
Intake : 0.1 mm (0.0040 in.)
Exhaust : 0.15 mm (0.0059 in.)
Check the valve seat for overheating and unequal contact with the valve face. Recondition or replace the seat if necessary. Before reconditioning the seat, check the valve guide for wear. If the valve guide is worn, replace it and then recondition the seat. Recondition the valve seat with a valve seat grinder or cutter. The valve seat contact width should be within specifications and centered on the valve face. After reconditioning, the valve and valve seat should be lapped lightly with a lapping compound.
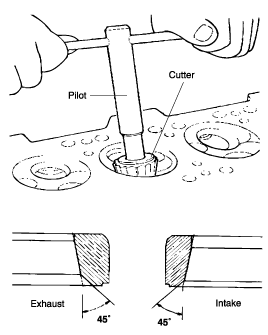
Cut away the inner face of the valve seat to reduce the wall thickness.
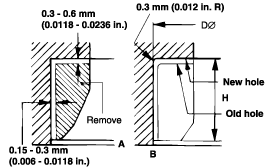
Enlarge the diameter of the valve seat so that it matches the specified oversize hole diameter of the new valve seat ring.
Heat the cylinder head to about 250°C (480°F) and press - fit an oversize seat ring for the bore in the cylinder head.
Using lapping compound, lap the valve to the new seat.
Valve seat contact width
Intake : 0.8 ~ 1.2 mm (0.0315 ~ 0.0472 in.)
Exhaust : 1.3 ~ 1.7 mm (0.0512 ~ 0.0670 in.)
Description | Size mm (in.) | Size mark | Seat ring height H mm (in.) | Oversize hole diameter I.D. mm (in.) |
Intake valve Seat ring | 0.3 (0.012) O.S. | 30 | 5.1~5.3(0.2008~0.2087) | 30.7~30.721 (1.2087~1.2095 |
0.6 (0.024) O.S. | 60 | 5.4~5.6(0.2126~0.2205) | 31.0~31.021(1.2205~1.2213) | |
Exhaust valve Seat ring | 0.3 (0.012) O.S. | 30 | 6.2~6.4(0.2441~0.2520) | 27.3~27.321(1.0748~1.0756) |
0.6 (0.024) O.S. | 60 | 6.5~6.7(0.2560~0.2638) | 27.6~27.621(1.0866~1.0874) |
Using the special tool (09221~22000 A/B), withdraw the old valve guide toward the bottom of cylinder head.
Recondition the valve guide hole so that it can match the newly press-fitted oversize valve guide.
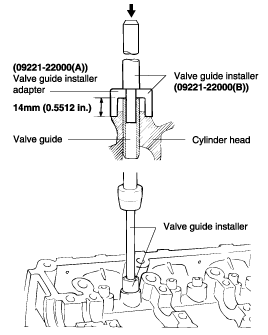
Using the special tool (09221 ~ 22000 A/B), press-fit the valve guide. The valve guide must be press-fitted from the upper side of the cylinder head.
After the valve guide is press-fitted, insert a new valve and check for proper the clearance
After the valve guide is replaced, check that the valve is seated properly. Recondition the valve seats as necessary.
Over size mm (in.) | Size mark | Oversize valve guide hole size mm (in.) |
0.05 (0.002) | 5 | 11.05~11.068 (0.4350~0.4357) |
0.25 (0.010) | 25 | 11.25~11.268 (0.4429~0.4436) |
0.50 (0.020) | 50 | 11.50~11.518 (0.4528~0.4535) |