Remove the timing belt, front case, flywheel, cylinder head assembly and oil pan. For details, refer to the respective chapters.
Remove the rear plate and the rear oil seal.
Remove the connecting rod caps.
Remove the main bearing caps and remove the crankshaft.
Remove the crankshaft position sensor wheel.
Mark the main bearing caps to permit reassembly in the original position and direction.
Remove the Transmission and clutch.
Remove the flywheel.
Check the crankshaft journals and pins for damage, uneven wear, and cracks. Also check oil holes for clogging. Correct or replace any defective part.
Inspect the crankshaft journal for taper and out - of - round.
Standard value
Crankshaft journal O.D : 50 mm (1.9685 in.)
Crankshaft pin O.D : 45 mm (1.7717 in.)
Crankshaft journal, pin out-of-roundness and taper :
0.005 mm (0.0002 in.) or less
Visually inspect each bearing for peeling, melting, seizure, and improper contact. Replace the defective bearings.
Measure the diameter of the crankshaft journal and pin.
Measure the diameter of the crankshaft bore and connecting rod bore.
Measure the thickness of the crankshaft bearing and connecting rod bearing.
Measure the clearance by the value that subtract the diameter of journal and pin and the thickness of bearing from the diameter of bore.
Connecting rod bearing oil clearance :
0.018 ~ 0.036 mm (0.0007 ~ 0.0014 in.)
Crankshaft main bearing oil clearance
NO. 1,2,4,5 : 0.022 ~ 0.040 mm (0.0009 ~ 0.0018 in.)
NO.3 : 0.028 ~ 0.046 mm (0.0011 ~ 0.0018 in.)
Check front and rear oil seals for damage or wear. Replace any seal that is defective.
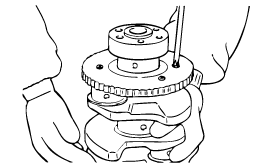
Remove the sensor wheel.
Check the sensor wheel for damage, cracks and wear, and replace if necessary.
Check the clearance between the sensor wheel and the crank position sensor with a depth gage.
Standard value
Clearance between sensor wheel and crank position sensor : 0.5 ~ 1.1 mm (0.020 ~ 0.043 in.)
Measure the depth of the top of sensor wheel tooth and the cylinder block mounting block.
Measure the difference between sensor length and depth.
Sensor length is the distance between the end of the sensor and the inner point of the contacting face.
Check the clutch disc contacting surface of the flywheel for damage and wear. Replace the flywheel if excessively damaged or worn.
Check the clutch disc contacting surface of the flywheel for runout.
Standard value
Flywheel run - out : 0.1 mm (0.0039 in.)
Check the ring gear for damage, cracks, and wear, and replace if necessary.
Install the upper main bearing inserts in the cylinder block.
When reusing the main bearings, remember to install them by referring to the location marks made at the time of disassembly.
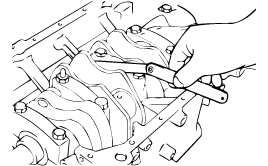
Install the crankshaft. Apply engine oil to the journals.
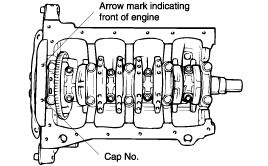
Install bearing caps and tighten cap bolts to the specified torque in the following sequence; center, No.2, No.4, front, and rear caps.
Cap bolts should be tightened evenly in 2 to 3 stages before they are tightened to the specified torque.
The caps should be installed with the arrow mark directed toward the crank pulley side of engine. Cap numbers must be correct.
Tightening torque
Main bearing cap bolt :
55 ~ 60 Nm (550 ~ 600 kg.cm, 41 ~ 44 lb.ft)
Connecting rod cap bolt :
32 ~ 35 Nm (320 ~ 350 kg.cm, 24 ~ 26 lb.ft)
Make certain that the crankshaft turns freely and has the proper clearance between the center main bearing thrust flange and the connecting rod big end bearing.
Standard value
Crankshaft end play :
0.005 ~ 0.175 mm (0.0019 ~ 0.0068 in.)
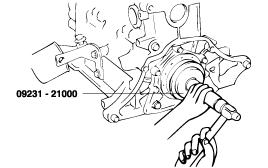
Install the oil seal in the crankshaft rear oil seal case. Use the Special Tool, Crankshaft Rear Oil Seal Installer (09231 - 21000) as shown. Press fit the oil seal all the way in, being careful not to misalign it.
Install the rear plate and tighten the bolts.
Install the connecting rod caps.
Install the flywheel, front case, oil pan and timing belt. For further details, refer to the respective chapters.
Install the flywheel assembly and tighten the nolts to the specified torque.
Tightening torque
Flywheel bolt :
120 ~ 130 Nm (1200 ~ 1300 kg.cm, 89 ~ 96 lb.ft)
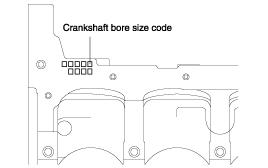
Check the cylinder block crankshaft bore size code.
Record the cylinder block crankshaft bore size code letters on cylinder block as shown.
Reading order is from left to right with front crankshaft bore size code shown first.
Class | Crankshaft bore diameter | Size code |
a | 54 ~ 54.006 mm (2.1259 ~ 2.1262 in.) | A |
b | 54.006 ~ 54.012 mm (2.1262 ~ 2.1264 in.) | B |
c | 54.012 ~ 54.016 mm (2.1264 ~ 2.1266 in.) | C |
Check the crankshaft main journal size code.
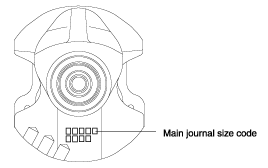
Record the main journal size code letters on the crankshaft balance weight.
Reading order is from left to right as shown, with No.1 main journal size code shown first.
Class | Main journal diameter | Size code |
I | 50.032 ~ 50.038 mm (1.9697 ~ 1.9699 in.) | Λ |
II | 50.038 ~ 50.044 mm (1.9699 ~ 1.9702 in.) | b |
III | 50.044 ~ 50.050 mm (1.9702 ~ 1.9704 in.) | c |
Color | Main journal bearing thinckness |
Yellow | 2.002 ~ 2.005 mm (0.0788 ~ 0.0789 in.) |
Green | 2.005 ~ 2.008 mm (0.0789 ~ 0.0790 in.) |
No color | 2.008 ~ 2.011 mm (0.0790 ~ 0.0791 in.) |
Black | 2.011 ~ 2.014 mm (0.0791 ~ 0.0793 in.) |
Blue | 2.014 ~ 2.017 mm (0.0793 ~ 0.0794 in.) |
Color | Main journal bearing thickness |
Yellow | 1.999 ~ 2.002 mm (0.0787 ~ 0.0788 in.) |
Green | 2.002 ~ 2.005 mm (0.0788 ~ 0.0789 in.) |
No color | 2.005 ~ 2.008 mm (0.0788 ~ 0.0790 in.) |
Black | 2.008 ~ 2.011 mm (0.0790 ~ 0.0791 in.) |
Blue | 2.011 ~ 2.014 mm (0.0791 ~ 0.0793 in.) |
Choose proper main journal bearing in table.