Has a problem been found?
YES
Repair as necessary and go to "Verification of Vehicle Repair" procedure
NO
Go to "DAB Circuit Inspection" procedure
Many malfunctions in the electrical system are caused by poor harness(es) and terminals. Faults can also be caused by interference from other electrical systems, and mechanical or chemical damage.
Thoroughly check connectors for looseness, poor connection, bending, corrosion, contamination, deterioration, or damage.
Has a problem been found?
YES
Repair as necessary and go to "Verification of Vehicle Repair" procedure
NO
Go to "DAB Circuit Inspection" procedure
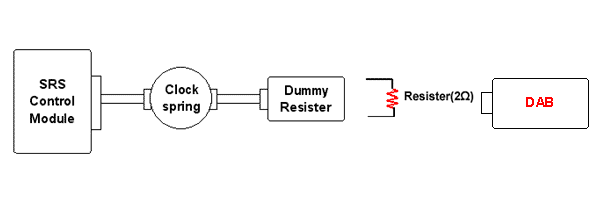
Check for circuit condition of Driver’s airbag squib.
Ignition OFF.
Disconnect the battery (+) & (-) terminal cable from the battery, and wait at least one minutes.
Remove the DAB module and connect the dummy (0957A-38200) and dummy adapter (0957A-1C000) to DAB connector of the clock spring harness connector."
If you don’t have Dummy resister, use new DAB with normal condition or resister (2Ω).
[WARNING] Place the DAB with the front surface facing upward.
Connect the battery (+) & (-) terminal cable to the battery and Ignition "ON" & Engine "OFF".

Using a scan tool, clear the DTC.
Monitor the diagnosis trouble code.
Is DTC "B1349" present ?
YES
Go to "Clock Spring Circuit Inspection" procedure.
NO
Short circuit in the driver’s airbag squib, substitute a known-good DAB, and check for proper operation.
If the problem is corrected, replace DAB and then go to "Verification of Vehicle Repair" procedure.
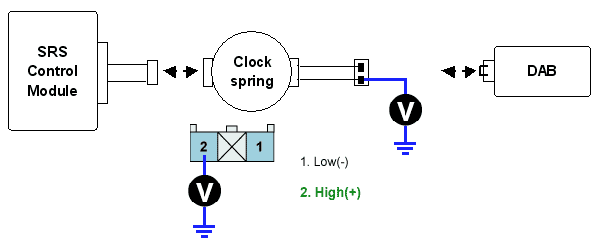
Check for an open circuit in the Clock Spring .
Ignition "OFF" and wait at least one minutes
Disconnect DAB connector and SRSCM connector of the clock spring harness.
Remove the DAB module.
[WARNING] Place the DAB with the front surface facing upward.
Ignition "ON" & Engine "OFF"
Measure Voltage between terminal "1 or 2 "of the clock spring harness connector and chassis ground.
Specification : Approx. 0~0.5V(No voltage)

Is the measured voltage within specifications?
YES
Poor contact at the Clock spring connector; check the connector.
If the connector is OK,substitute a known-good SRSCM, and check for proper operation.
If the problem is corrected, replace SRSCM and then go to "Verification of Vehicle Repair" procedure.
If the problem is still present, substitute the Clock spring and check for proper operation.
If the problem is corrected, replace Clock spring and then go to "Verification of Vehicle Repair" procedure.
Go to "Main harness circuit inspection " procedure.
NO
Short power in the Clock spring assembly or SRS wiring harness, substitute the Clock spring and check for proper operation.
If the problem is corrected, replace Clock spring and then go to "Verification of Vehicle Repair" procedure.
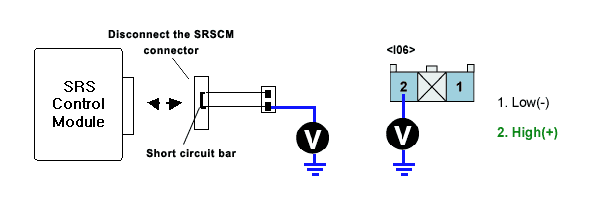
Check for a short circuit in the SRS wiring harness.
Ignition "OFF" and wait at least one minutes.
Disconnect DAB connector and SRSCM connector of the clock spring harness.
Ignition "ON" & Engine "OFF"
Measure voltage between terminal 1 or 2 of the main harness connector and chassis ground.
Specification : approx. 0~0.5V

Is the measured voltage within specifications?
YES
Poor contact at the SRS main harness connector; check the connector.
If the connector is OK,substitute a known-good SRSCM, and check for proper operation.
If the problem is corrected, replace SRSCM and then go to "Verification of Vehicle Repair" procedure.
If the problem is still present, substitute the SRS main harness and check for proper operation.
If the problem is corrected, replace SRS main harness and then go to "Verification of Vehicle Repair" procedure.
NO
Short circuit in the SRS main harness replace the SRS main harness assembly, substitute the SRS main harness and check for proper operation.
If the problem is corrected, replace SRS main harness and then go to "Verification of Vehicle Repair" procedure.