3.
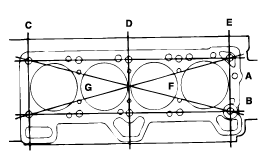
Check the cylinder head surface for flatness using a straight edge in the direction of A, B, ...as shown.

If flatness exceeds service limit in any direction, replace the cylinder head, or lightly machine the cylinder head surface.
Cylinder head flatness
Standard value
1.3 L : Less than 0.03 mm (0.012 in.)
1.1 L : Less tha 0.05 mm (0.002 in.)
Limit
1.3 L : 0.08 mm (0.0031 in.)
1.1 L : 0.1 mm (0.004 in.)
