7.
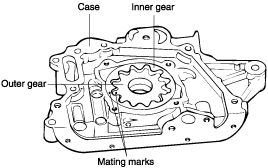
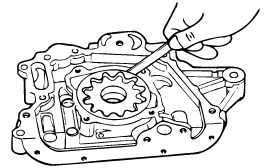
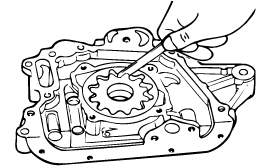
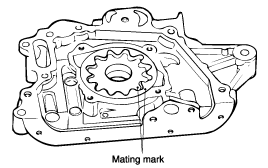
Remove the inner and outer gears from the front case. The mating marks on the inner and outer gears indicate the direction of installation. Make sure that the inner and outer gears are installed as shown.
Remove the timing belt. Refer to the "Timing Belt" section.
Remove all the oil pan bolts.
Remove the oil pan.
Remove the oil screen.
Remove the front case assembly.
Remove the oil pump cover.
Remove the inner and outer gears from the front case. The mating marks on the inner and outer gears indicate the direction of installation. Make sure that the inner and outer gears are installed as shown.
Remove the plug and remove the relief spring and relief plunger.
Check the oil pan for failure, damage or cracks. Replace of defective.
Check the oil screen for failure, damage and cracks and replace of defective.
Check for worn (especially stepped) or damaged surfaces contacting gears.
Check for worn or damaged gear teeth surfaces.
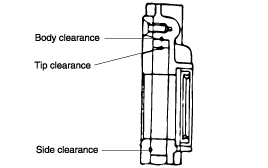
Check for clearance between outer gear and front case.
Outer gear
Clearance between outer circumference and front case
1.3 L : 0.12 ~ 0.18 mm (0.005 ~ 0.007 in.)
1.1 L : 0.10 ~ 0.18 mm (0.004 ~ 0.007 in.)
Check the tip clearance on the pump rotor.
Standard value
1.3 L : 0.025 ~ 0.069 mm (0.001 ~ 0.003 in.)
1.1 L : 0.06 ~ 0.18 mm (0.002 ~ 0.007 in.)
Check the axial clearance on the outer pump roter.
Standard value
1.3 L : 0.04 ~ 0.087 mm (0.0016 ~ 0.0034 in.)
1.1 L : 0.04 ~ 0.095 mm (0.0016 ~ 0.0037 in.)

Install the outer and inner gears into the front case.
Make sure that the inner and outer gears are installed in the same direction as shown.
Install the oil pump cover and tighten the bolts to the specified torque. Atfer the bolts have been tithtened, check to ensure that the gear turns smoothly.
Tightening torque
Oil pump cover bolt :
8 ~ 12 Nm (80 ~ 120 kg.cm, 6 ~ 8.8 lb.ft)
Install the relief valve and spring. Tighten the plug to the specified torque. Apply engine oil to the relief valve.
Tightening torque
Relief valve plug
1.3 L : 40 ~ 50 Nm (400 ~ 500 kg.cm, 30 ~ 37 lb.ft)
1.1 L : 20 ~30 Nm (200 ~ 300 kg.cm, 15 ~ 22 lb.ft)
Inspect for worn, distorted or damaged lips.
Check for elongated spring ring.
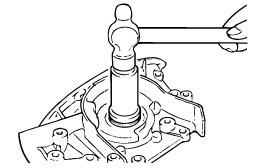
Install the Special Tool, Crankshaft Front Oil Seal Guide (09231 - 22100), to the front end of the crankshaft. Apply engine oil to the outer surface of the oil seal guide, and install the new oil seal along the guide by hand, until it touches front case. Always use a new oil seal when reassembling.
Use the Special Tool, Crankshaft Front Oil Seal Installer 909231 - 22000), to install the oil seal.
Install the crankshaft sprocket, timing belt and crankshaft pulley. Refer to the "Timing Belt" section.
Install the oil screen.
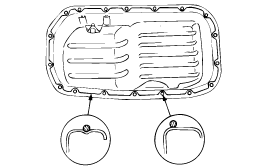
Clean both gasket surfaces of the oil pan and the cylinder bolck.
Apply sealant into the groove of the oil pan glange as shown.
Apply sealant approx. 4 mm (0.16 in.) in thickness.
After application of sealant, do not exceed 15 minutes before installing the oil pan.
Install the oil pan and tighten the bolts to the specified torque.
Tightening torque
Oil pan bolt : 6 ~ 8 Nm (60 ~80 kg.cm, 4 ~ 6 lb.ft)