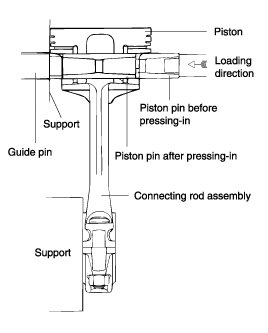
Use the Special Tools (09234-33001) to disassemble and reassemble the piston and connecting rod.
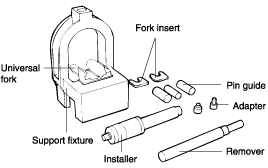
Use the Special Tools (09234-33001) to disassemble and reassemble the piston and connecting rod.

Place the proper fork inserts in the fork of the tool.
Between the connecting rod and the piston.
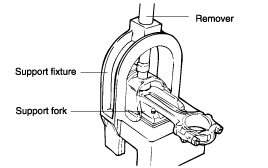
Insert the proper removal tool through the hole in the arch of the tool.
Center the piston, rod and pin assembly with the removal arbor.
Press the piston pin out of the connecting rod.
Check each piston for scuffing, scoring wear, and other defects. Replace any piston that is defective.
Check each piston ring for breakage, damage and abnormal wear. Replace the defective rings. When the piston requires replacement, also replace the rings.
Check the piston pin fit in the piston pin hole. Replace any defective piston and pin assembly that is defective. The piston pin must be smoothly pressed by hand into the pin hole (at room temperature).
Measure the piston ring side clearance. If the measured value exceeds the service limit, insert a new ring in a ring groove to measure the side clearance. If the clearance still exceeds the service limit, replace the piston and rings together. If it is less than the service limit, replace only the piston rings.
Piston ring side clearance
Standard value
No. 1
1.3 L : 0.04 ~ 0.085 mm (0.0016 ~ 0.0033 in.)
1.1 L : 0.03 ~ 0.07 mm (0.001 ~ 0.003 in.)
No.2
1.3 L : 0.04 ~ 0.085 mm (0.0016 ~ 0.0033 in.)
1.1 L : 0.02 ~ 0.06 mm (0.0007 ~ 0.0024 in.)
Limit
No. 1 : 0.1 mm (0.004 in.)
No. 2 : 0.1 mm (0.004 in.)
To measure the piston ring end gap, insert a piston ring into the cylinder bore. Position the ring at right angles to the cylinder wall by gently pressing it down with a piston Measure the gap with a feeler gauge. If the gap exceeds the service limit, replace the piston ring.
Item | Standard - mm (in.) | Limit - mm (in.) |
Piston ring end gap No.1 1.3 L 1.1 L | 0.20 ~ 0.35 (0.0079 ~ 0.0138) 0.15 ~ 0.30 (0.0059 ~ 0.0118) | 1 (0.039) |
Piston ring end gap No.2 1.3 L 1.1 L | 0.37 ~ 0.52 (0.015 ~ 0.02) 0.30 ~ 0.50 (0.012 ~ 0.02) | 1 (0.039) |
Oil ring side rail end gap | 0.20 ~ 0.70 (0.078 ~ 0.0275) | 1 (0.039) |
When replacing the ring without correcting the cylinder bore, check the gap with the ring positioned at the bottom of the ring travel.
When replacing a ring, use a ring of the same size.
Piston ring service size and mark
STD : None
0.25 mm (0.010 in.) O.S. : 25
0.50 mm (0.020 in.) O.S. : 50
0.75 mm (0.030 in.) O.S. : 75
1.00 mm (0.039 in.) O.S. : 100
The mark can be found on the upper side of the ring.
Install the spacer.
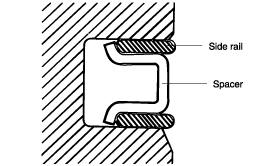
Install upper side rail. To install side rail, first put one end of side rail between piston ring groove and spacer, hold it down firmly, then press down the portion to be inserted with your finger into groove as illustrated.
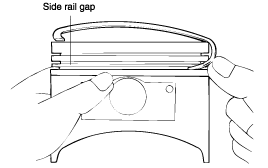
Do not use piston ring expander when installing side rail.
Install lower side rail using same procedure as Step 2.
Using piston ring expander, install No. 2 piston ring.
Install No. 1 piston ring.
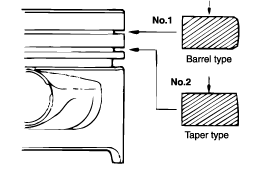
Apply engine oil around piston and piston rings.
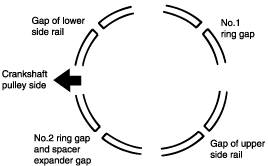
Position each piston ring end gap as far apart from neighboring gaps as possible. Make sure that gaps are not positioned in side rail thrust and pin directions.
Hold piston rings firmly in a piston ring compressor as you insert them into cylinder.
Make sure that the front mark of piston and the front mark (identification mark) of connecting rod are directed toward frront of engine.
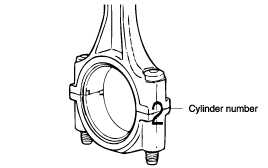
When connecting rod cap is installed, make sure that cylinder numbers put on rod and cap at disassembly match each other.
When new connecting rod is installed, make sure that notches for holding bearing in place are on same side.
Tighten the connecting rod cap nuts.
Tightening torque
Connecting rod cap nuts
1.3 L : 32 ~ 35 Nm (320 ~ 350 kg.cm, 24 ~ 26 lb.ft)
1.1 L : 20 ~ 23 Nm (200 ~ 230 kg.cm, 15 ~ 17 lb.ft)
Check connecting rod side clearance.
Connecting rod side clearance
Standard value : 0.10 ~ 0.25 mm (0.004 ~ 0.0098 in.)
Limit : 0.4 mm (0.0157 in.)
Check the cylinder bore size code on the cylinder block top face (1.3L)
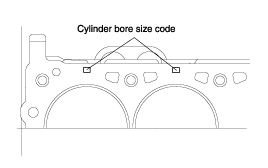
Check the cylinder bore size code on the cylinder block bottom face. (1.1 L)
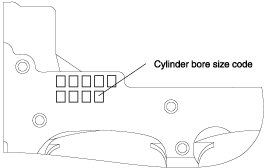
Class | Cylinder bore inner diameter | Size code |
A | 71.5 ~ 71.51 mm (2.815 ~ 2.8153 in.) | A |
B | 71.51 ~ 71.52 mm (7.8153 ~ 2.8157 in.) | None |
C | 71.52 ~ 71.53 mm (2.8157 ~ 2.8161 in.) | C |
Class | Cylinder bore inner diameter | Size code |
a | 67 ~ 67.01 mm (2.6378 ~ 2.6381 in.) | A |
b | 67.01 ~ 67.02 mm (2.6381 ~ 2.6385 in.) | B |
c | 67.02 ~ 67.03 mm (2.6385 ~ 2.6389 in.) | C |
Check the piston size code on the piston top face.
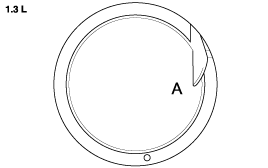
Class | Piston outer diameter | Size code |
A | 71.47 ~ 71.48 mm (2.8138 ~ 2.814 in.) | A |
B | 71.48 ~ 71.49 mm (2.8141 ~ 2.8145 in.) | None |
C | 71.49 ~ 71.50 mm (2.8145 ~ 2.8149 in.) | C |
Class | Piston outer diameter | Size code |
A | 66.97 ~ 66.98 mm (2.6366 ~ 2.6370 in.) | A |
B | 66.98 ~ 66.99 mm (2.6370 ~ 2.6374 in.) | None |
C | 66.99 ~ 67.00 mm (2.6374 ~ 2.6378 in.) | C |
Selce the piston related to cylinder bore class.
Oil clearance : 0.02 ~ 0.04 mm (0.00078 ~ 0.00157 in.)
Install proper pin guide through piston and into connecting rod. Hand tap pin guide into piston for proper retention. Drop piston pin into the other side of the piston.
The pin guide centers the connecting rod in the piston. When the piston, connecting rod, piston pin and pin guide assembly are positioned on the fork of the tool, the pin guide will also center this assembly in the tool.If too small a pin guide is used, the piston assembly will not be located centrally in the tool, and damage may occur to the fork and/or insert of the tool.
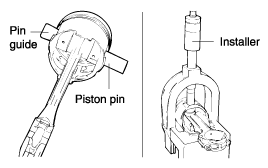
Install piston assembly onto fork assembly of tool.
Tool will supprot connecting rod at the piston pin. Be sure to slide the piston assembly into the fork until the pin guide contacts the fork insert.
Adjust the installing arbor to the proper length by turning the numbered sleeve on the lettered shaft until the specified alpha-numeric setting from the application chart is obtained. Turn knurled nut to lock numbered sleeve on shaft.
Insert the installing arbor through the hole in the arch of the tool. Press piston pin into the connecting rod until the sleeve on the installing arbor contacts the top of the tool arch. The pin guide will fall out of the connecting rod as the piston pin is pressed in.
Do not exceed 5000 pounds of force when stopping the installing arbor sleeve against the arch.
