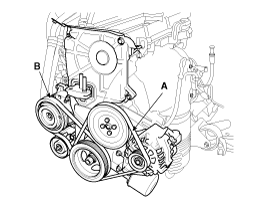
Remove the drive belts.
Drain the engine coolant.
System is under high pressure when the engine is hot.
To avoid danger of releasing scalding engine coolant, remove the cap only when the engine is cool.
Loosen the water pump pulley bolts.
Remove the drive belts.

Remove the water pump pulley.
Remove the timing belt. (Refer to EM - 22)
Remove the timing belt idler.
Remove the water pump.
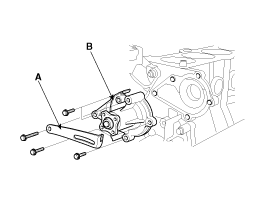
Remove the 2 bolts and alternator brace(A).
Remove the 3 bolts and remove the water pump(B) and gasket.
Disassembly of the thermostat would have an adverse effect, causing a lowering of cooling efficiency.
Drain the engine coolant so its level is below thermostat.
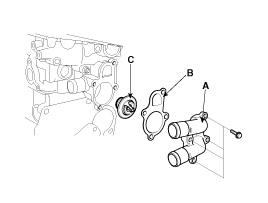
Remove the water inlet fitting(A), gasket(B) and thermostat(C).
Drain the engine coolant.
Remove the radiator cap to speed draining.
Remove the upper radiator hose(A) and lower radiator hose(B).
Remove the ATF(Automatic Transaxle Fluid) oil cooler hoses(C). (A/T)
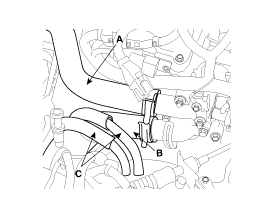
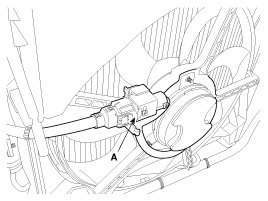
Disconnect the fan motor connector(A).
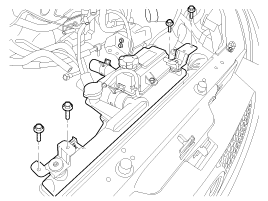
Remove the radiator upper bracket, then pull up the radiator.
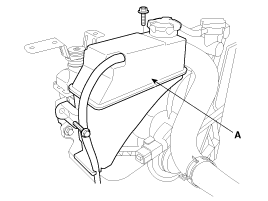
Remove the coolant reservoir tank(A).
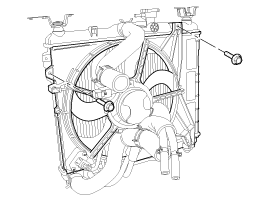
Remove the cooling fan assembly (A).
Install the water pump.
Install the water pump(C) and a new gasket with the 3 bolts(B).
Tightening torque :
11.8 ~ 14.7N.m (1.2 ~ 1.5kgf.m, 8.7 ~ 10.8lb-ft)

Install the alternator brace(D) with the 2 bolts(A).
Tightening torque :
19.6 ~ 26.5N.m (2.0 ~ 2.7kgf.m, 14.5 ~ 19.5lb-ft)
Install the timing belt idler.
Install the timing belt. (Refer to EM - 27)
Install the water pump pulley.
Install the drive belts.
Tighten the water pump pulley bolts.
Tightening torque :
7.8 ~ 9.8N.m (0.8 ~ 1.0kgf.m, 5.8 ~ 7.2lb-ft)
Fill with engine coolant.
Start engine and check for leaks.
Recheck engine coolant level.
Place the thermostat in thermostat housing.
Install the thermostat(B) with the jiggle valve upward.
Install a new gasket(A) to the thermostat(B).
Install the water inlet fitting(A).
Tightening torque :
14.7 ~ 19.6N.m (1.5 ~ 2.0kgf.m, 10.8 ~ 14.5lb-ft)

Fill with engine coolant.
Start engine and check for leaks.
Install the cooling fan assembly (A).
Tightening torque :
6.9 ~ 10.8N.m (0.7 ~ 1.1kgf.m, 5.1 ~ 8.0lb-ft)

Install the coolant reservoir tank (A).
Tightening torque :
6.9 ~ 10.8N.m (0.7 ~ 1.1kgf.m, 5.1 ~ 8.0lb-ft)

Install the radiator.
Install the radiator upper bracket.

Connect the fan motor connector( A).

Install the upper radiator hose(A) and lower radiator hose(B).
Install the ATF(Automatic Transaxle Fluid) oil cooler hoses(C).

Fill with engine coolant.
Start engine and check for leaks.
Check each part for cracks, damage or wear, and replace the coolant pump assembly if necessary.
Check the bearing for damage, abnormal noise and sluggish rotation, and replace the coolant pump assembly if necessary.
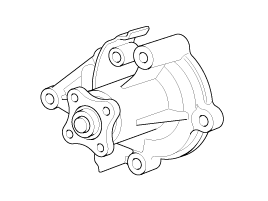
Check for coolant leakage. If coolant leaks from hole, the seal is defective. Replace the coolant pump assembly.
A small amount of “weeping” from the bleed hole is normal.
Immerse the thermostat in water and gradually heat the water.
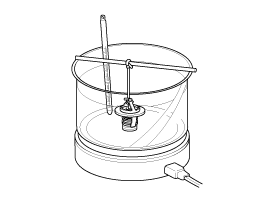
Check the valve opening temperature.
Valve opening temperature : 82±1.5°C (179.6±2.7˚F)
Full opening temperature : 95°C (203˚F)
If the valve opening temperature is not as specified, replace the thermostat.
Check the valve lift.
Valve lift : 8mm(0.3in) or more at 95°C (203˚F)
If the valve lift is not as specified, replace the thermostat.
Disconnect the cooling fan motor connector.

Check that the radiator fan rotates when battery voltage is applied between the terminals.
Cooing fan inspection | Cooling fan motor connector | Action | ||||
1 | 2 | 3 | 4 | |||
Battery | + | O | Low speed | |||
- | O | |||||
Battery | + | O | High speed | |||
- | O | |||||