1.
Remove the air cleaner.
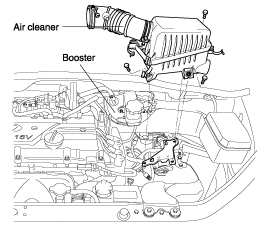
Remove the air cleaner.
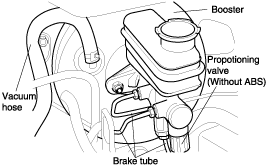
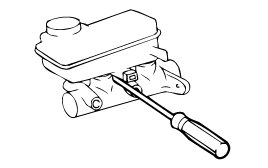
Remove the brake fluid level switch connector.
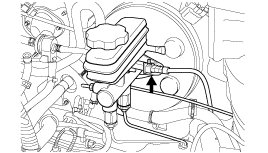
Disconnect the brake tube from the master cylinder and install the plug.
Be careful not to bend or damage the brake lines when removing the master cylinder.
Do not spill brake fluid on the vehicle; it may damage the paint; if brake fluid does contact the paint, wash it off immediately with water.
To prevent spills, cover the hose joints with rags or shop towels.
Remove master cylinder mounting nuts and then lift out the master cylinder.
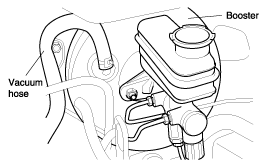
Install the master cylinder to the brake booster.
Connect the brake tubes to the master cylinder.
Check the brake tube for bend and twist.
After filling the brake reservoir with brake fluid, bleed the system. (Refer to "Air bleeding in adjustment procedure)
Remove the reservoir cap and drain the brake fluid into a suitable container.
After disconnecting the mounting screws, pry the reservoir free from the master cylinder.
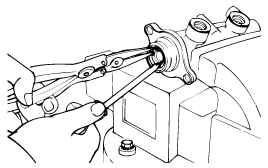
Using snap ring pliers, remove the retainer ring.
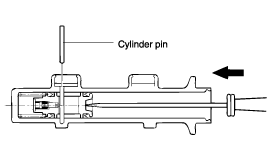
Remove the primary piston. Push the secondary piston with a screwdriver and remove the cylinder pin. Remove the secondary piston assembly.
Do not disassemble the primary and secondary piston assembly.
Check the master cylinder bore for rust or scoring.
Check the master cylinder for wear or damage. If necessary, clean or replace the cylinder.
If the cylinder bore is damaged, replace the master cylinder assembly.
Wash the contaminated parts in alchohol.
Apply genuine brake fluid to the rubber parts of the cylinder kit and grommets.
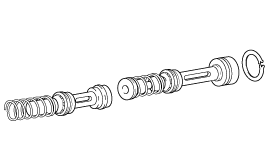
Carefully insert the springs and pistons in the proper direction.
Press against the pistons with a screwdriver and install the retainer ring.
With the piston pushed completely by a screwdriver, install the cylinder pin.
Mount two grommets.
Install the reservoir on the cylinder.

