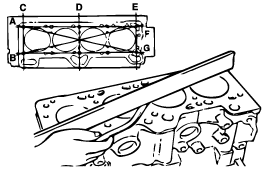
Using a straight edge and feeler gauge, check the block top surface for warpage. Make sure that the surface is free from gasket chips and other foreign matter.
Standard : 0.05 mm (0.0020 in.) or less
Limit : 0.1 mm (0.0039 in.)

Visually check the engine block for scores, rust and corrosion. Also check for cracks or any other defects.
Repair or replace the block if defective.
Using a straight edge and feeler gauge, check the block top surface for warpage. Make sure that the surface is free from gasket chips and other foreign matter.
Standard : 0.05 mm (0.0020 in.) or less
Limit : 0.1 mm (0.0039 in.)

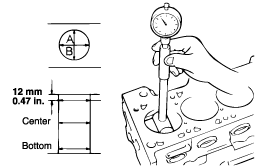
Measure the cylinder bore with a cylinder gauge at three levels in the directionjs A and B. If the cylinder bores show more than the specified out-of-round-ness or taper or if the cylinder walls are badly sucffed or scored, the cylinder block should be rebored and honed. New oversize pistons and rings must be fitted. Measuring points are as shown.
Cylinder I.D.
1.3 L : 71.5 mm (2.815 in.)
1.1 L : 67 mm (2.64 in.)
Cylinder I.D. taper
1.3 L : 0.02 mm (0.0008 in,.) or less
1.1 L : 0.05 mm (0.0019 in.) or less

If a cylinder ridge exists, cut away with a ridge reamer.
Oversize postons are available in four sizes
Piston service size and mark mm (in.)
0.25 (0.010) O.S. : 25
0.50 (0.020) O.S. : 50
0.75 (0.030) O.S. : 75
1.00 (0.039) O.S. : 100
When boring the cylinder bore to oversize, keep the specified clearance between the oversize piston and the bore, and make sure that all pistons used are of the same oversize.
Piston-to-cylinder wall clearance :
1.3 L / 1.1 L : 0.02 ~ 0.04 mm (0.0008 ~ 0.0016 in.)