3.
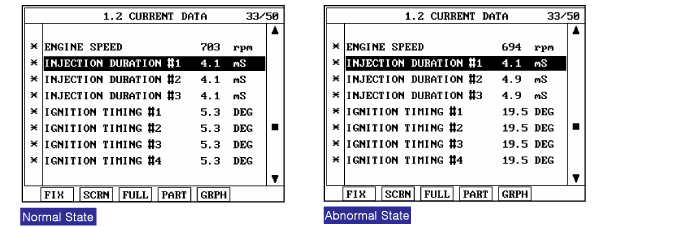
Monitor the "Parameters related to Ignition and Misfire" on the scantool.
Misfires can be caused by lack of combustion in a cylinder due to absence of spark, poor fuel metering, poor compression, or many other causes. Even a small number of misfires may result in excessive exhaust emissions due to the unburned mixture. Increased misfire rates cause damage to the catalytic converter. The PCM monitors the crankshaft speed variation to determine if any misfiring generated. The PCM identifies the specific cylinder in which the misfire has occurred and counts individual misfire events by monitoring changes in the crankshaft rotation for each cylinder. A random misfire indicates two or more cylinders are misfiring.
If there happen misfires over the threshold value at #1 cylinder, PCM sets DTC P0301.
Item | Detecting Condition | Possible Cause | |
DTC Strategy | ● Engine roughness through crankshaft speed fluctuation | ● Poor connection ● Ignition system ● Fuel system ● Intake/exhaust air system ● Ignition timing ● Injector ● ECM | |
Enable Conditions | ● Engine speed 400~6000rpm ● Engine load > Zero torq. ● Eng. load change < Max. ● Eng. speed change < Max. ● Time after engine start >25 sec ● Intake air temperature > -7.5℃ | ||
Case1 | Threshold Value | ● Misfire rate for FTP(Federal Test Procedure) emission thresh 〉5% | |
Diagnostic Time | ● 1000 revs | ||
MIL | ● ON | ||
Case2 | Threshold Value | ● 4% 〈 Misfire rate for catalyst damage 〈 22% | |
Diagnostic Time | ● 200 revs | ||
MIL | ● Immediately (Blink) | ||
Items | Resistance |
Primary coil | Secondary coil |
0.87 ± 10% at 20℃ (68℉) | 13.0 ± 10% at 20℃ (68℉) |
Connect scantool to Data Link Connector(DLC).
Warm up the engine to normal operating temperature.
Monitor the "Parameters related to Ignition and Misfire" on the scantool.
Are the parameters displayed correctly?

▶ Fault is intermittent caused by poor contact in the sensor’s and/or ECM’s connector or wasrepaired and ECM memory was not cleared. Thoroughly check connectors for looseness, poorconnection, bending, corrosion, contamination, deterioration, or damage. Repair or replace as necessary and go to "Verification of vehicle Repair" procedure.

▶ Go to "Terminal and Connector Inspection" procedure
Many malfunctions in the electrical system are caused by poor harness and terminals. Faults can also be caused by interference from other electrical systems, and mechanical or chemical damage.
Thoroughly check connectors for looseness, poor connection, bending, corrosion, contamination, deterioration, or damage.
Has a problem been found?
▶ Repair as necessary and go to "Verification of vehicle Repair" procedure.
▶ Go to "System inspection" procedure.
Spark cable check
Do visual inspect
▶ Check contamination or damage on spark cable.
Measure the resistance of spark cable.
Specification : 5.6kΩm ± 20%
Is the measured resistance within specifications?
▶ Go to "Check Spark Plug" as below.
▶ Repair or replace as necessary and go to "Verification of Vehicle Repair" procedure.
Spark plug check.
Remove cylinder’s spark plugs.
Visually/physically inspect the following items:
Damaged insulation, Worn electrodes, Oil or fuel fouled, Loose terminals and cracks
Check for plug gap : 1.0 - 1.1 mm (0.039 - 0.043 in.)
Check if the spark plug for the relevant cylinder is lighter in color than the other plugs.
Has a problem been found in any of the above areas?
▶ Repair or replace as necessary and go to "Verification of Vehicle Repair" procedure
▶ Go to "Compression pressure check" procedure.
Compression pressure check.
Warm up the engine to normal operating temperature.
Disconnect the spark plug cables. And remove the spark plugs and fuel pump relay.
Crank the engine to remove any foreign material in the cylinders.
Put compression pressure gauge into spark pulg hole.
Check compression pressure at each cylinder.
Specification : Approx. 15 kg/cm²
Is compression pressure for each cylinder displayed within specifications?
▶ Go to "Ignition system check" procedure.
▶ Add a small amount of oil through the spark plug hole, and repeat above steps.
▶ If the addition of oil causes the compression to rise, the cause is a worn or damaged piston ring or cylinder inner surface.
▶ If the compression remains the same, the cause is a burnt or defective valve seat, or pressure is leaking from the gasket.
▶ Repair as necessary and go to "Verification of Vehicle Repair" procedure.
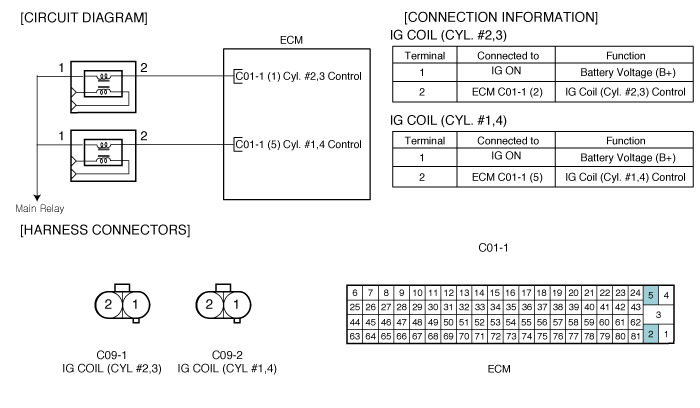
Ignition system check
Key "OFF".
Disconnect Ignition coil connector.
Do visual inspection.
▶ Check contamination or damege on ignition coil.
Key "ON" & ENG "OFF".
Measure the voltage between terminal 1 of ignition coil #2 harness connector and chassis ground.
Specification : Approx. B+
Is the measured voltage within specifications?
▶ Go to "Ignition coil check" procedure.
▶ Repair Open or Short to ground in power circuit, and go to "Verification of Vehicle Repair" procedure.
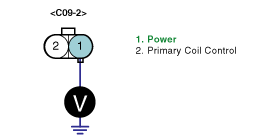
Ignition coil check
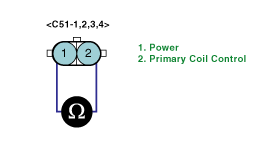
Measure the resistance between terminal 1 and 2 of ingnition coil connector #2.
(Component side / Primary coil)
Measure the resistance between terminal for cylinder #1 and terminal for cylinder #4.
(Component side / Secondary coil)
Items | Resistance |
Primary coil | Secondary coil |
0.87 ± 10% at 20℃ (68℉) | 13.0 ± 10% at 20℃ (68℉) |
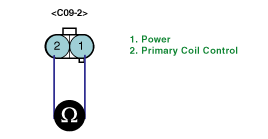
Is the measured resistance within specifications?
▶ Go to "Timing mark check" procedure.
▶ Substitute with a known - good ignition coil and check for proper operation.
▶ If the problem is corrected, replace ignition coil and go to "Verification of Vehicle Repair" procedure.
Timing mark check.
Key "OFF".
Check the timing mark.
Is the timing mark normal?
▶ Go to "Air leakage check" procedure.
▶ Repair and go to "Verification of Vehicle Repair" procedure.
Air leakage check.
Visually/physically inspect the air leakage in intake/exhaust system as following items,
Vacuum hoses for splits, kinks and improper connections.
Throttle body gasket
Gasket between intake manifold and cylinder head
Seals between intake manifold and fuel injectors
Exhaust system between HO2S and Three way catalyst for air leakage.
Has a problem been found in any of the above areas?
▶ Repair or replace as necessary and go to "Verification of Vehicle Repair" procedure.
▶ Go to "PCV(Positive Crankcase Ventilation) valve check" procedure.
PCV(Positive Crankcase Ventilation) valve check.
Key "OFF".
Disconnect PCV valve.
Check the movement of plunger by putting in and out a thin stick.
Is the movement of plunger normal?
▶ Go to "Injector check" procedure.
▶ Substitute with a known - good PCV valve and check for proper operation.
▶ If the problem is corrected, replace PCV valve and go to "Verification of Vehicle Repair" procedure.
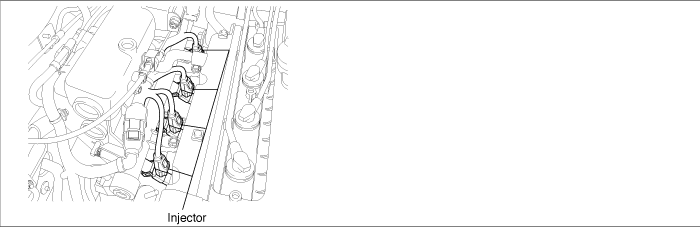
Injector check.
Key "OFF".
Remove injectors.
Check leakage or clog on injectors.
Measure the resistance between terminal 1 and 2. (Component side)
ITEM | Specification |
Coil Resistance | 13.8 ~ 15.2Ω at 20℃ (68℉) |
Is the measured resistance within specification?
▶ Go to "Fuel line check" procedure.
▶ Substitute with a known - good injector and check for proper operation.
▶ If the problem is corrected, replace injector and go to "Verification of Vehicle Repair" procedure.
Fuel line check.
Check clog, contamination and damage on fuel line.
Splits, kinks and improper connections of fuel line pipe.
Interference, damage and improper connections of vacuum hose on fuel line.
Improper connection of connectors on fuel line.
Is the fuel line normal?
▶ Go to "Fuel pressure check" procedure.
▶ Repair as necessary and go to "Verification of Vehicle Repair" procedure.
Fuel pressure check.
Key "OFF".
Disconnect a fuel pump relay.
Engine start and wait until engine stop. and then key "OFF".
Connect a fuel pump relay.
Connect a fuel pressure guage to a fuel filter by a fuel pressure guage adaptor.
Engine start and measure a fuel pressure.
Specification : Approx. 3.5 kg/cm²
Is the fuel pressure normal?
▶ Substitute with a known - good ECM and check for proper operation.
▶ If the problem is corrected, replace ECM and go to "Verification of Vehicle Repair" procedure.
▶ Check clogging on the fuel filter.
▶ Check the valve in a fuel pressure regulator.
(If it has a problem, fuel happen to be leaked to a return line.)
▶ Check the fuel supply and return line.
▶ Repair as necessary and go to "Verification of vehicle Repair" procedure.
After a repair, it is essential to verify that the fault has been corrected.
Connect scan tool and select "Diagnostic Trouble Codes(DTCs)" mode.
Clear the DTCs and Operate the vehicle within DTC Enable conditions in General information.
Are any DTCs present ?
▶ Go to the applicable troubleshooting procedure.
▶ System is performing to specification at this time.
