1.
Remove the lower bolt and lift the caliper assembly up and secure it with a wire or some other retaining method.
Remove the lower bolt and lift the caliper assembly up and secure it with a wire or some other retaining method.
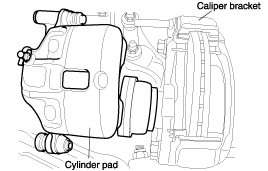
Remove the pads.
Do not depress the brake pedal while disassembling the pads.
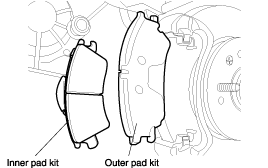
Check the pads for wear or oil contamination and replace, if necessary.
The pads for the right and left wheels should be replaced at the same time. Never "drop" or intermix brake pad sets.
All four pads must be replaced as a complete set.
When replacing the brake pad, check for deformation. When replacing the guide spring, use a new one or the used one after cleaning away foreign material.
Check the pad for damage or deformation.
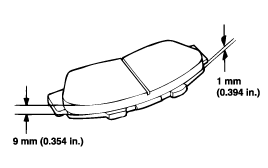
Brake pad thickness :
Standard value : 9 mm (0.354 in.)
Service limited value : 1 mm (0.0394 in.)
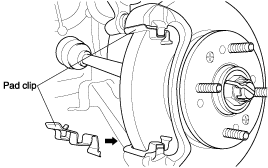
Install the pad clips.
Install the pads onto each pad clip.
Position the pad with its pad wear indicator upward on the piston side.
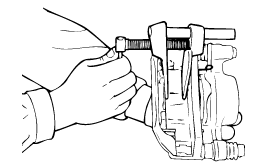
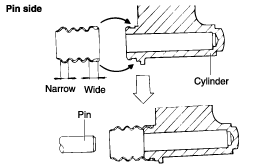
Insert the piston in the cylinder using the Special Tool (09581-11000).
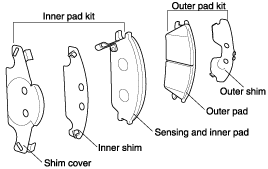
Install the new pads. The shims are attached to the each pad as illustrated.
Be careful so that the disc or pad isn't contaminated by grease.
Install the bolt and tighten to the specified value.
Tightening torque
Guide rod bolt : 22~32 Nm(220~320 kgf·cm, 16~24 lb·ft)
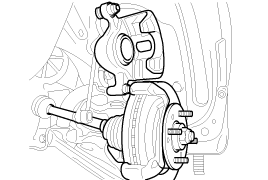
Remove the wheel and tire.
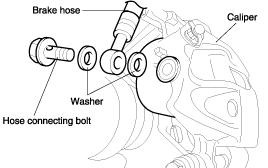
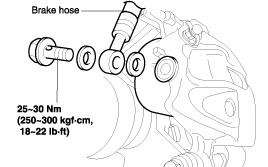
Disconnect the brake hose.
Do not spell brake fluid on the vehicle; it may damage the paint; if brake fluid does contact the paint, wash it off immediately with water.
To prevent spills, plug the hose inlets with rags or shop towels.
Remove the cylinder mounting bolt.
Remove cylinder and pads from the caliper bracket.
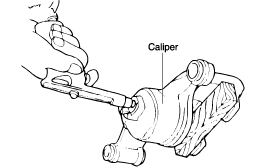
Remove the caliper mounting bolts from the knuckle.
Remove the caliper mounting bracket.
Be careful not to spill grease or oil on the pad and brake disc contact surface.
Tighten the caliper mounting bolt to the specified torque.
Install the brake hose.
Bleed the system. (Refer to "Air bleeding of adjustment procedure)
Check the caliper for wear, damage, cracks and dust.
Check the piston for dust, damage, cracks and wear on the outer surface.
Check the sleeve and pin for damage and dust.
Check the pad spring and boots for damage.
Check the carrier for damage, dust, wear and cracks.
Do not use sand paper on the piston surface.
All rubber parts must be replaced with new parts.
Inspect the disc by using a caliper and a dial gauge.
Thickness of disc mm (in.)
Standard value : 19 (0.75)
Service limit : 17 (0.67)
: 0.04 (0.002)
: 0.01 (0.0004)
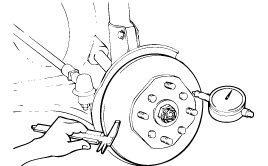
Using a micrometer, measure the disc thickness at eight positions approximately 10mm from the outer edge of the disc and at 45° intervals.
If you substract the minimum of measurements from the maximum, you get the difference of the disc thickness.
When measuring the disc runout, fix a dial gauge approximately 5mm from the outer edge of the disc, and rotate the disc 360°.
At this time, if you subtract the minimum of measurements from the maximum, you get the disc runout.
If necessary, replace the brake disc.
Remove the piston boot.
Remove the piston using compressed air.
Do not put your fingers in front of the piston when using compressed air.
Be careful not to splatter the brake fluid.
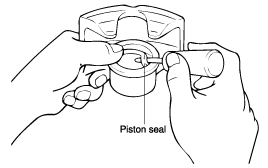
Remove the piston seal from the caliper by using a screwdriver.
Take care not to damage the piston wall surface.
Clean all components except the pads and shims with isopropyl alcohol.
Apply rubber grease on the piston seal and install the piston seal in the cylinder.
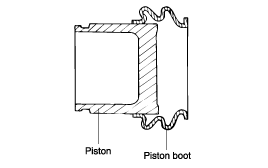
Assemble the piston and piston boots according to the following procedure.
Apply rubber grease to the caliper bore, the outside surface of the piston and the piston boot.
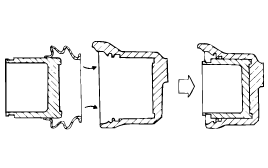
Install the piston boot on the piston as illustrated.
Insert the piston boot in the inner groove of the caliper and push the piston into the caliper.
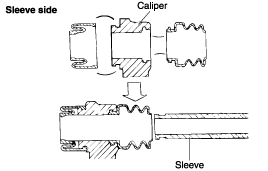
Assemble the sliding parts according to the following procedure.
Apply rubber grease to the outside surface of the sleeve and pin, pin and sleeve bore of the caliper, pin boot and sleeve boot.
Insert the boot into the groove of the caliper.
Install the pads.
Be careful so that the disc or pad is not contaminated by grease.
