1.
Install the spacer.
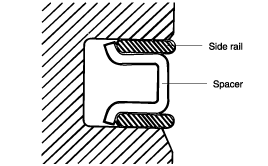
Install the spacer.
Install upper side rail. To install side rail, first put one end of side rail between piston ring groove and spacer, hold it down firmly, then press down the portion to be inserted with your finger into groove as illustrated.
Do not use piston ring expander when installing side rail.
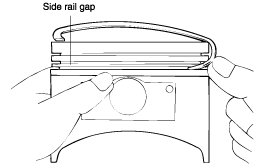
Install lower side rail using same procedure as Step 2.
Using piston ring expander, install No. 2 piston ring.
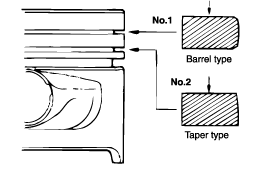
Install No. 1 piston ring.
Apply engine oil around piston and piston rings.
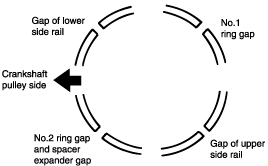
Position each piston ring end gap as far apart from neighboring gaps as possible. Make sure that gaps are not positioned in side rail thrust and pin directions.
Hold piston rings firmly in a piston ring compressor as you insert them into cylinder.
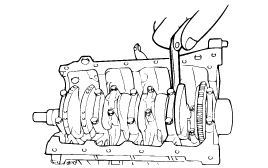
Make sure that the front mark of piston and the front mark (identification mark) of connecting rod are directed toward frront of engine.
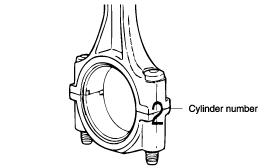
When connecting rod cap is installed, make sure that cylinder numbers put on rod and cap at disassembly match each other.
When new connecting rod is installed, make sure that notches for holding bearing in place are on same side.
Tighten the connecting rod cap nuts.
Tightening torque
Connecting rod cap nuts
1.3 L : 32 ~ 35 Nm (320 ~ 350 kg.cm, 24 ~ 26 lb.ft)
1.1 L : 20 ~ 23 Nm (200 ~ 230 kg.cm, 15 ~ 17 lb.ft)
Check connecting rod side clearance.
Connecting rod side clearance
Standard value : 0.10 ~ 0.25 mm (0.004 ~ 0.0098 in.)
Limit : 0.4 mm (0.0157 in.)