2.
Cut plastic gauge to the same length as the width of the bearing and place ot parallel with the journal, off from the oil holes.
Remove the transaxle and clutch.
Remove the flywheel.
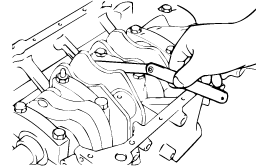
Remove the timing belt train, front case, flywheel cylinder head assembly and oil pan. For details, refer to respective chapters.
Remove the rear plate and the rear oil seal.
Remove the connecting rod caps.
Remove the main bearing caps and remove the crankshaft. Keep the bearings in order according to the cap number.
Remove the crankshaft position sensor wheel.
Mark the main bearing caps topermit reassembly in the original position and direction.
Check the clutch disc contacting surface of the fly wheel for damage and wear. Replace the flywheel if excessively damaged or worn.
Check the clutch disc contacting surface of the fly wheel for runout.
Standard value
Flywheel run-out : 0.1 mm (0.004 in.)
Check the ring gear for damage, crack and wear, and replace if necessary.
Check the crankshaft journals and pins for damage, uneven wear and cracks. Also check oil holes for clogging. Correct or replace any defective part.
Inspect out-of-roundness and taper of crankshaft journal and pin.
Standard value
Crankshaft journal O.D.
1.3 L : 50 mm (1.9685 in.)
1.1 L : 42 mm (1.654 in.)
Crankshaft pin O.D.
1.3 L : 45 mm (1.7717 in.)
1.1 L : 38 mm (1.496 in.)
Crankshaft journal, pin out-of-roundness and taper :
0.01 mm (0.0004 in.) or less
1.3 L
Standard value
Journal oil clearance No. 1, 2, 4, 5 :
0.028 ~ 0.046 mm (0.0011 ~ 0.0018 in.)
Journal oil clearance No. 3 (center) :
0.034 ~ 0.52 mm (0.0013 ~ 0.002 in.)
Pin oil clearance :
0.024 ~ 0.042 mm (0.0009 ~ 0.0017 in.)
1.1 L
Standard value
Journal oil clearance No. 1, 2, 3, 4, 5 :
0.020 ~ 0.038 mm (0.0007 ~ 0.0014 in.)
Pin oil. clearance :
0.012 ~ 0.041 mm (0.0005 ~ 0.0016 in.)
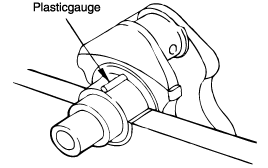
Remove oil, greass and any other dirt from bearings and journals.
Cut plastic gauge to the same length as the width of the bearing and place ot parallel with the journal, off from the oil holes.
Install the crankshaft , bearings, and caps. Tighten them to the specified torques. During this operation, do not turn the crankshaft. Remove the caps.
Measure the width of the plastic gauge at the widest point using the scale printed on the gauge package.
If the clearance exceeds the repair limit, replace the bearing.
Should the standard clearance not be obtained even after bearing replacement, the journal should be fround to a recommended undersize, and a bearing of the same size should be installed.
Remove the crankshaft position sensor wheel.
Check the crankshaft position sensor wheel for damage, cracks and wear, and replace if necessary.
Check the clearance between the crankshaft position sensor wheel and the crankshaft position sensor with a depth gage.
Standard value
Clearance between the crankshaft position sensor wheel and crankshaft position sensor :
0.5 ~ 1.5 mm (0.0020 ~ 0.059 in.)
Measure the depth of the top of the crankshaft position sensor wheel teeth and the outside of transaxle housing.
Measure the difference between the crankshaft position sensor length and depth.
The crankshaft position sensor length is the distance between the end of crankshaft position sensor and inner point of contacting face.
Install the flywheel assembly and tighten the bolts to the specified forque.
Tightening torque Flywheel bolt 1.3L : 130~140Nm (1300~1400 kg.cm, 96~103 lb.ft) 1.1L : 80~80Nm (700~800 kg.cm, 52~59 lb.ft) |
Install the upper main bearing inserts in the cylinder block.
Install the crankshaft. Apply engine oil to the journals.
Install bearing caps and tighten cap bolts to the specified torque in the sequence of the center, No.2, 4, front and rear caps.
Cap bolts should should be tightened evenly in 2 to 3 stages before they are tightened to the specified torque.
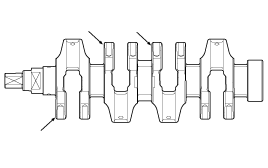
The caps should be installed with the arrow mark directed toward the crank pulley side of engine. Cap numbers must be correct.
Tightening torque
Main bearing cap bolt
1.3 L : 55 ~ 60 Nm (550 ~ 600 kg.cm, 41 ~ 44 lb.ft)
1.1 L : 50 ~ 55 Nm ( 500 ~ 550 kg.cm, 37 ~ 41 lb.ft)
Connecting rod cap bolt
1.3 L : 32 ~ 35 Nm (320 ~ 350 kg.cm, 24 ~ 26 lb.ft)
1.1 L : 20 ~ 23 Nm (200 ~ 230 kg.cm, 15 ~ 17 lb.ft)
Make certain that the crankshaft turns freely and has the proper clearance between the center main bearing thrust flange and the connecting rod big end bearing.
Standard value
Crankshaft end play
1.3 L : 0.05 ~ 0.175 mm (0.002 ~ 0.005 in.)
1.1 L : 0.05 ~ 0.25 mm (0.002 ~ 0.010 in.)
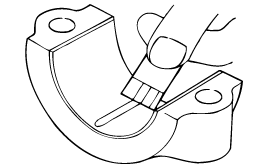
Install the oil seal in the crankshaft rear oil seal case.
Use the Special Tool, Crankshaft Rear Oil Seal installer (09231 - 21000) as shown. Press and fit the oil seal in all the way, being careful not to misalign it.
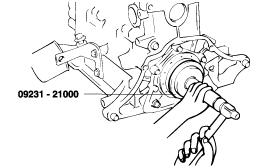
Install the rear oil seal case and gasket. Tighten the five bolts.
Apply engine oil to the oil seal lips and crankshaft of the time of installation.
Install the rear plate and tighten the bolts.
Install the connecting rod caps. Refer to the "Piston and Connecting Rods" section.
Install the flywheel, front case, oil pan and timing belt.
For further details, refer to the respective chapters.
Check the cylinder block stamping crankshaft bore size code.
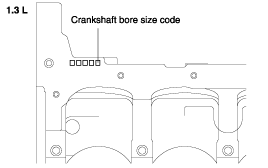
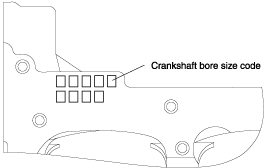
Record the cylinder block crankshaft bore size code letters on cylinder block as shown.
Reading order is from left to right with front crankshaft bore size code shown first.
Cylinder block crankshaft bore diameter
Class | Cylinder block crankshaft bore diameter | Size code. |
a | 54 ~ 54.006 mm (2.1259 ~ 2.1262 in.) | Λ |
b | 54.006 ~ 54.012 mm (2.1262 ~ 2.1264 in.) | b |
c | 54.012 ~ 54.016 mm (2.1264 ~ 2.1266 in.) | c |
Class | Cylinder block crankshaft bore diameter | Size code. |
a | 46 ~ 46.006 mm (1.811 ~ 1.8112 in.) | A |
b | 46.006 ~ 46.012 mm (1.8112 ~ 1.8115 in.) | B |
c | 46.012 ~ 46.018 mm (1.8115 ~ 1.8117 in.) | C |
Check the crankshaft main journal
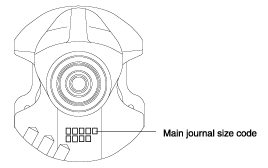
Record the main journal size code letters on the crankshaft blance weight.
Reading order is from left to right as shown, with no.1 main journal size code shown first.
Class | Main journal diameter | Size code. |
I | 49.968 ~ 49.962 mm (1.9672 ~ 1.9670 in.) | Λ |
II | 49.962 ~ 49.956 mm (1.9670 ~ 1.9667 in.) | b |
III | 49.956 ~ 49.950 mm (1.9667 ~ 1.9665 in.) | c |
MAIN JOURNAL BEARING THICKNESS
Color | Main journal bearing thickness |
Yellow | 2.002~2.005mm (0.0788~0.0789in.) |
Green | 2.005~2.008mm (0.0789~0.0790in.) |
No color | 2.008~2.011mm (0.0790~0.0791in.) |
Black | 2.011~2.014mm (0.0791~0.0793in.) |
Blue | 2.014~2.017mm (0.0793~0.0794in.) |
Color | Main journal bearing thickness |
Yellow | 1.999~2.002mm (0.0787~0.0788in.) |
Green | 2.002~2.005mm (0.0788~0.0789in.) |
No color | 2.005~2.008mm (0.0789~0.0790in.) |
Black | 2.008~2.011mm (0.0790~0.0791in.) |
Blue | 2.011~2.014mm (0.0791~0.0793in.) |
1.1 L
Record the main jouranl size code painted on the crankshaft as shown.
Class | Main journal diameter | Classification code |
I | 42 ~ 41.994 mm (1.6535 ~ 1.6533 in.) | Yellow |
II | 41.994 ~ 41.988 mm (1.6533 ~ 1.6530 in.) | None |
III | 41.988 ~ 41.982 mm (1.6530 ~ 1.6528 in.) | White |
Color | Main journal bearing thickness |
Blue | 2.002~1.999mm (0.0788~0.0787in.) |
No color | 1.999~1.996mm (0.0789~0.0790in.) |
Yellow | 1.996~1.993mm (0.0790~0.0791in.) |
Green | 1.993~1.990mm (0.0785~0.0783in.) |
Pink | 1.990~1.987mm (0.0783~0.0782in.) |
Choose proper main journal bearing in table.
