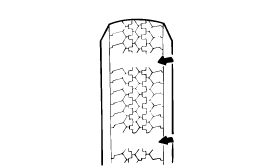
If the remaining tread depth is less than the limit, replace the tire.
When the tread depth of the tires is less than 1.6 mm (0.06 in.) the wear indicators will appear.

Standard value
Toe-in
Total : 0˚±0.2˚
Individual : 0°±0.1°
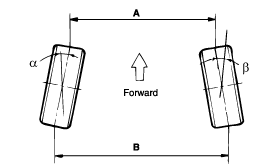
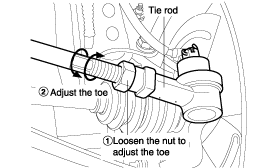
Toe-in adjustment should be made by turning the right and left tie rods at the same amount.
When adjusting toe-in, loosen the outer bellows clip to prevent twisting the bellows.
After the adjustment, tighten the tie rod end lock nuts firmly and reinstall the bellows clip.
Adjust each toe-in to be the range of ± 0.15°.
Tightening torque
Tie rod end lock nuts :
50~55 Nm (500~550 kgf·cm, 37~41 lb·ft)
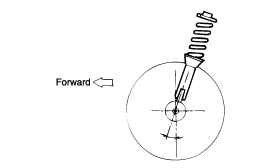
Camber : 0˚±0.5˚
Power steering | Manual steering | |
General arear | 2.4˚ ± 0.5˚ | 1.9˚ ± 0.5˚ |
Euroupe / Australia | 2.3˚ ± 0.5˚ | 1.6˚ ± 0.5˚ |
(Max. difference between LH and RH : 0.5°)
Replace the worn loose or damaged parts of the front suspension assembly prior to measuring front wheel alignment
Use commercially-available computerized four wheel alignment equipment to measure the wheel alignment.
Camber and caster are pre-set to the specified value at the factory and don't need to be adjusted
If the camber and caster are not within specifications, replace the bent or damaged parts.
The difference between the left and right wheels of the camber and the caster must be within the range of 0° ± 0.5°.
TOE-IN
Measure the tread depth of the tires.
Tread depth of tire [Limit] : 1.6mm (0.06 in.)
If the remaining tread depth is less than the limit, replace the tire.
When the tread depth of the tires is less than 1.6 mm (0.06 in.) the wear indicators will appear.
