2.
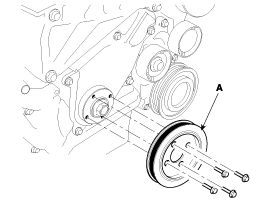
Remove the damper pulley(A).
Drain the engine oil.
Remove the damper pulley(A).
Remove the timing belt assembly.
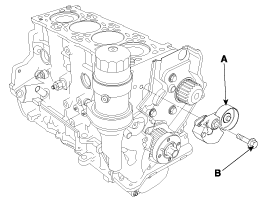
Remove the timing belt tensioner(A).
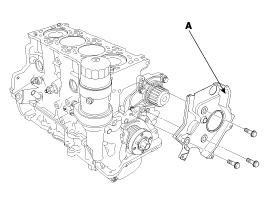
Remove the timing rear cover(A).
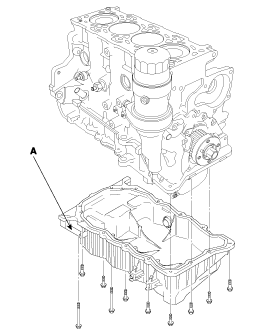
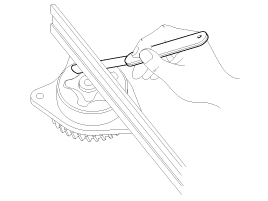
Separate oil pan(A) from the engine block with an oil pan seal cutter.
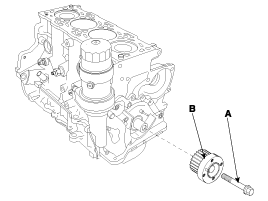
Remove the crankshaft sproket(B) with bolt(A).
Remove the oil screen.
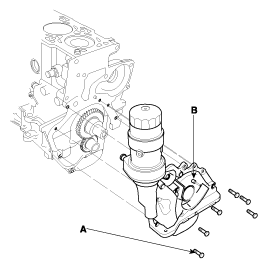
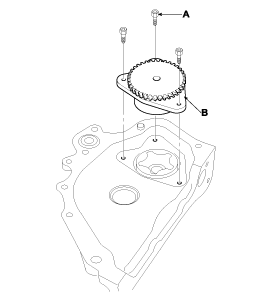
Remove the mounting bolts(A) and the oil pump assembly(B).
There are two kinds of oil filters. One is for Eurpe LHD and the orther is for the rest area except Eurpe LHD (Left Hand Drive).
For Eurpe LHD :
Remove the oil filter upper cap from lower case with SST(09263-2E000 the oil filter wrench.).
Inspect the threads and rubber packing. Wipe off the seat on the oil pump assembly, then apply a light coat of oil to the oil pump assembly upper cap packing.
Install the new oil filter by hand to the upper cap.
After the rubber seal seats, tighten the oil filter clockwise with the special tool.
For the rest area except Eurpe LHD :
Remove the oil filter(A) with the SST(09263-27000, the oil filter wrench).
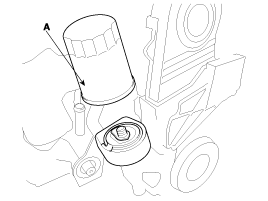
Inspect the threads and the packing on the apply a light coat of oil new filter. Wipe off the seat.
Install the new oil filter by hand.
After the packing seats, tighten the oil filter clockwise with the SST(09263-27000).
Under normal conditions, the oil filter should be replaced at every other oil change. Use severe conditions, the oil filter should be replaced at each oil change.
Warm up the engine.
Remove the drain bolt, and drain the engine oil.
Reinstall the drain bolt with a new washer.
Tightening torque
35 ~ 45N.m (3.5 ~ 4.5kgf.m, 25.8 ~ 33.2lb-ft)
Refill with the recommended oil.
RECOMMENDED ACEA classification : C3
RECOMMENDED SAE viscosity grades :
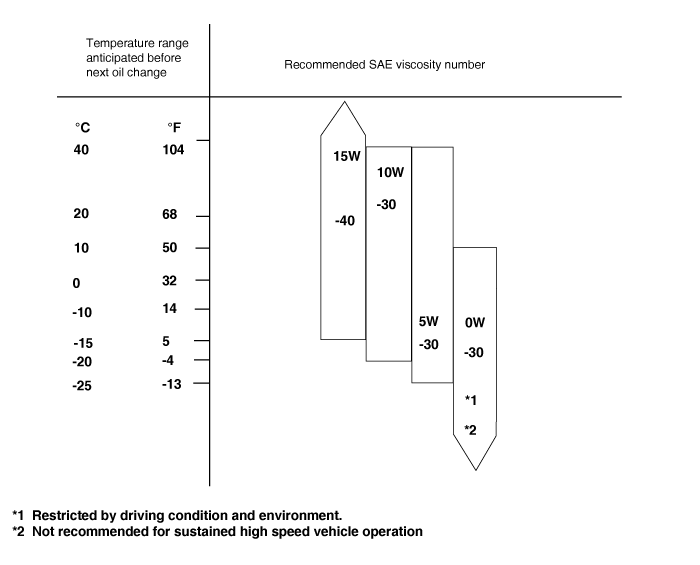
For best performance and maximum protection of all types of operation, selection only those lubricants which :
Satisfy the requirement of the ACEA classification.
Have the proper SAE grade number for expected ambient temperature range.
Lubricants which do not have both SAE grade number and an API or ACEA service classification on the container should not be used.
Install the oil pump case(B) and the oil pan on the engine block.
Tightening torque
20 ~ 27N.m (2.0 ~ 2.7kgf.m, 15 ~ 20lb-ft)
Standard liquid gasket : LOCTITE 5900, or equivalent.
Fill the engine oil in the room below the oil cooler (50cc)
Tightening the oil filter fitting, install the oil cooler and hose assembly.
Before assembling the oil cooler. Apply SAE 20w oil on the O rings.
Tightening torque
48 ~ 52N.m (4.8 ~ 5.2kgf.m, 35.4 ~ 38.14lb.ft)
Install the oil filter for Eurpe LHD.
Install the non return valve assy of the oil filter lower case to the oil filter fitting.
Tightening torque
34 ~ 36N.m (3.4 ~ 3.6kgf.m, 25.08 ~ 26.55lb-ft)
After fixing the filter, tighten the oil filter upper cap.
Tightening torque
23 ~ 25N.m (2.3 ~ 2.5kgf.m, 16.96 ~ 18.44lb-ft)
Install the oil filter for the rest areas except Europe LHD.
Torque the oil filter assy with the SST(09263-27000).
Install the oil screen.
Tightening torque
10 ~ 12N.m (1.0 ~ 1.2kgf.m, 7 ~ 9lb-ft)
Install the oil pan(A).
Tightening torque
10 ~ 12N.m (1.0 ~ 1.2kgf.m, 7 ~ 9lb-ft)
Standard liquid gasket : LOCTITE 5900
Assemble the oil pan in 5 mimutes after applying the liquid gasket.
Apply liquid gasket in a 3mm wide bead without stopping.
The clearance between the liquid gasket and the flange inner end should be 2 ~ 3mm.
Install the crankshaft sprocket(B) with bolt(A).
Tightening torque
196.1 ~ 205.9N.m (20.0 ~ 21.0kgf.m, 144.7 ~ 151.9lb-ft)
Install the timing belt rear cover(A).
Tightening torque
8 ~ 12N.m (0.8 ~ 1.2kgf.m, 6 ~ 9lb-ft)
Install the auto tensioner(A).
Tightening torque
50 ~ 55N.m (5.0 ~ 5.5kgf.m, 37 ~ 40.5lb-ft)
Install the timing belt.
Install the crankshaft pulley(A).
Tightening torque
30 ~ 34N.m (3.0 ~ 3.4kgf.m, 22 ~ 25lb-ft)
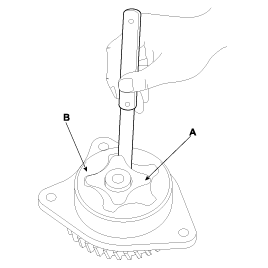
Remove the three hexagon socket head bolts(A) from the oil pump cover(B).
Remove the oil pump cover with the inner rotor and the drive gear.
Remove the outer rotor from the oil pump case.
Remove the old oil seals from the oil pump case.
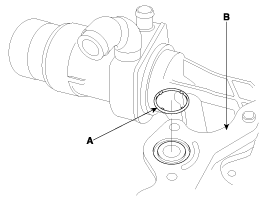
Remove the O ring(A) from the oil pump case(B).
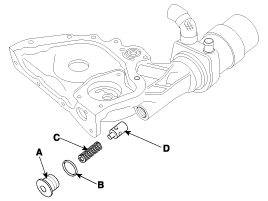
Remove the relief cap(A), relief cap washer(B), relief spring(C) and relief plunger(D).
Remove the oil filter. Refer to the engine oil filter replacement.
Remove the oil cooler and hose assembly after seperating the oil filter fitting.
Check the inner-to-outer rotor tip clearance between the inner rotor(A) and outer rotor(B). If the inner-to-outer rotor clearance exceeds the service limit, replace the inner and outer rotors.
Inner Rotor-to-Outer Rotor tip Clearance
Standard (New)
0.12 ~ 0.20mm (0.0047 ~ 0.0079in.)
Check the housing-to-rotor axial clearance between the rotor and oil pump cover housing. If the housing-to-rotor axial clearance exceeds the service limit, replace the set of inner and outer rotors and/or the pump housing.
Housing-to-Rotor Axial Clearance
Standard (New)
0.020 ~ 0.070mm (0.00079 ~ 0.00276in.)
Inspect both rotors and the oil pump cover housing for scoring or other damage. Replace parts if necessary.
On Vehicle :
Remove the wire from the engine oil pressure switch(B).
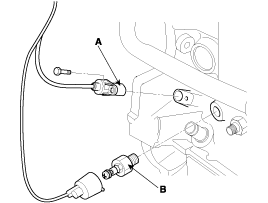
Check for continuity between the positive terminal and the engine(ground). There should be continuity with the engine stopped. There should be no continuity with the engine running.
If the switch fails to operate, check the engine oil level. If the engine oil level is OK, check the engine oil pressure.
After diassembling engine :
Remove the oil pressure switch(A) from the engine block.
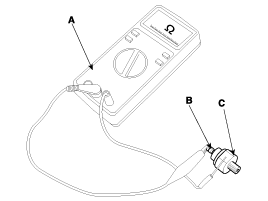
Connect a tester (ohm range) between the terminal(B) and the body(C) of the switch to check for continuity. The switch is normal if there is continuity. If they is no continuity, replace the switch.
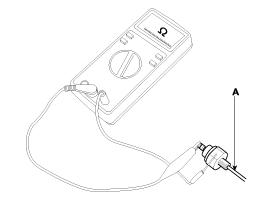
Insert a thin rod(A) in the oil hole of the switch and push it in lightly. The switch is normal of no continuity as detected (infinite resistance on the tester). If there is continuity, replace the switch.
Insert the relief plunger(D), the relief spring(C) and the relief cap washer(B). Then torque the relief cap(A).
Tightening torque
42 ~ 52N.m (4.2 ~ 5.2kgf.m, 30.98 ~ 38.35lb-ft)
Install the O ring(A) to the oil pump case(B)after applying engine oil.
Assemble the inner/outer rotors with engine oil the drive gear and the oil pump cover.
Install the oil pump cover(B)assembly to the oil pump case with the three hexagon socket head bolts(A).
Tightening torque
7.8 ~ 9.8N.m (0.8 ~ 1.0kgf.m, 5.8 ~ 7.2lb-ft)
The oil seal which was disassembled in 'Disassembly' step is recommended to be installed after the installation of the crankshaft.
