3.
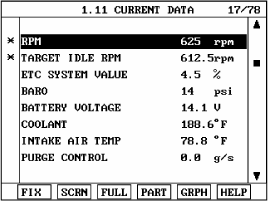
Monitor engine speed item on the service data.
Specification :
650 ± 100 rpm (D-range)
720 ± 100 rpm (N-range)
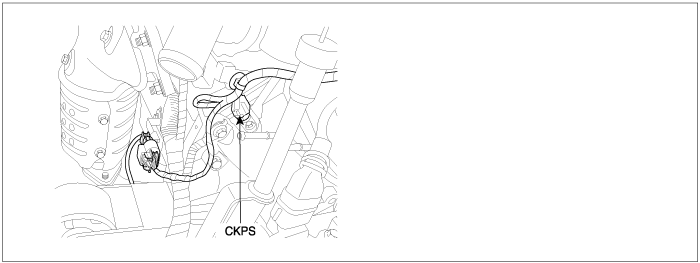
Crankshaft Position Sensor (58X) derives its name from the fact that current systems utilize a Crankshaft Position Sensor, coupled with a 58-tooth crankshaft wheel, to determine crankshaft angular position. Each edge of the wheel corresponds to a change in crank sensor output voltage as a tooth edge passes the sensor. The sensor will produce 58 pulses with one rotation of the crankshaft.
Checking output signals from CKPS every 7.8 sec. under detecting condition, if an output signal is missing or redundant for more than 1.56 sec., PCM sets P0336. MIL(Malfunction Indication Lamp) turns on when the malfunction lasts till consecutive 2 driving cycle.
Item | Detecting Condition | Possible cause | |||||
DTC Strategy | ● Detecting extra/missing pulses between consecutive 58X reference pulses | ● Poor connection ● Noise ● Short in harness ● Target wheel ● PCM | |||||
Enable Conditions | ● Engine running state | ||||||
Threshold value | ● Extra/ missing pulses 〉 2 pulse | ||||||
Diagnosis Time | ● Continuous (More than 1.56 sec.failure for every 7.8 sec.test) | ||||||
MIL On Condition | ● 2 driving cycles | ||||||
Resistance | 700 ± 70Ω |
IG "OFF" & connect scantool.
ENG "ON" and warm -up the engine to normal operating temperature.
Monitor engine speed item on the service data.
Specification :
650 ± 100 rpm (D-range)
720 ± 100 rpm (N-range)
Is the service data displayed correctly ?

▶ Fault is intermittent caused by poor contact in the sensor’s and/or PCM’s connector or was repaired and PCM memory was not cleared. Thoroughly check connectors for looseness, poor connection, ending, corrosion, contamination, deterioration, or damage. Repair or replace as necessary and go to "Verification of Vehicle Repair" procedure

▶ Go to "Terminal and Connector Inspection" procedure
Many malfunctions in the electrical system are caused by poor harness and terminals. Faults can also be caused by interference from other electrical systems, and mechanical or chemical damage.
Thoroughly check connectors for looseness, poor connection, bending, corrosion, contamination, deterioration, or damage.
Has a problem been found?
▶ Repair as necessary and go to "Verification of Vehicle Repair" procedure
▶ Go to "Signal Circuit Inspection" procedure.
Check voltage
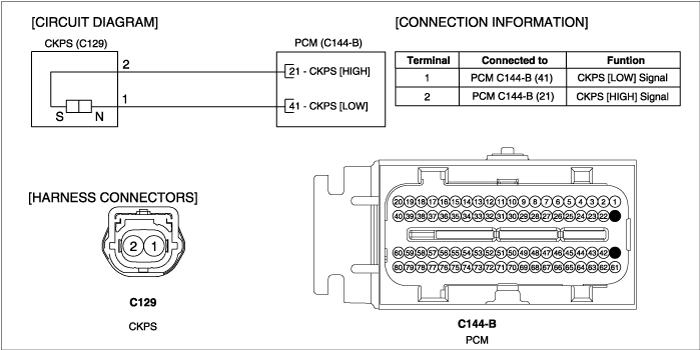
IG "OFF" and disconnect CKPS connector.
IG "ON" and ENG "OFF"
Measure voltage between terminal 1 of CKPS harness connector and chassis ground.
Measure voltage between terminal 2 of CKPS harness connector and chassis ground.
Specification : Approx. 1.4V
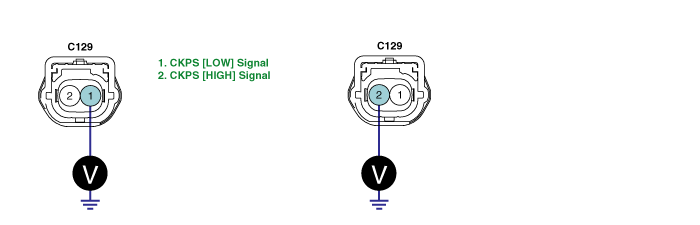
Is the measured voltage within specification?
▶ Go to "Component Inspection" procedure.
▶ Go to "Check short in harness" as follows.
Check short in harness
IG "OFF" and disconnect CKPS connector and PCM connector.
Measure resistance between terminal 1(2) of CKPS harness connector and chassis ground.
Measure resistance between terminals 1 and 2 of CKPS harness connector.
Specification : Infinite
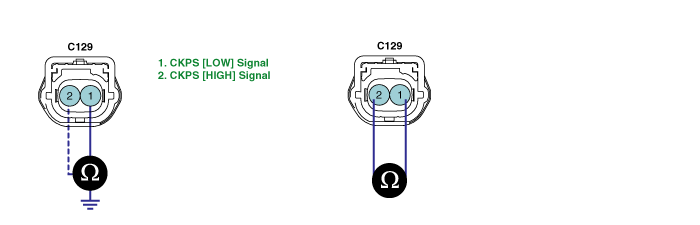
Is the measured resistance within specification?
▶ Go to "Component Inspection" procedure.
▶ Repair short in harness, and go to "Verification of Vehicle Repair" procedure.
Visually check CKPS and Target wheel
IG "OFF"
Check CKPS and target wheel for deformation or damage visually
Is the above items normal ?
▶ Go to "Check CKPS resistance" as follows.
▶ Repair or replace it, and go to "Verification of Vehicle Repair" procedure.
Check CKPS resistance
IG "OFF" and disconnect CKPS connector.
Measure resistance between terminals 1 and 2 of CKPS connector. (Component side)
Resistance | 700 ± 70Ω |
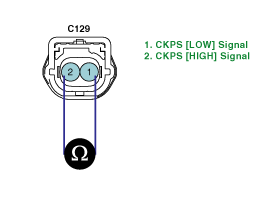
Is the measured resistance within specification?
▶ Go to "Check signal waveform of CKPS" as follows.
▶ Substitute with a known - good CKPS and check for proper operation. If the problem is corrected, replace CKPS and go to "Verification of Vehicle Repair" procedure.
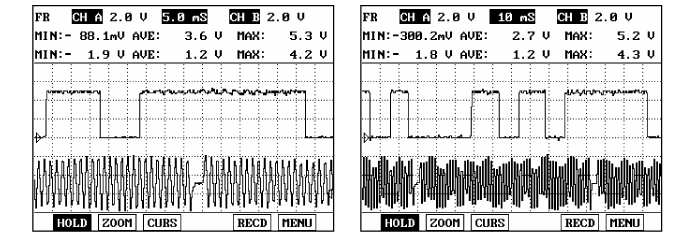
Check signal waveform of CKPS
IG "OFF" and connect scantool.
ENG "ON" and Measure signal waveform at terminal 1 or 2 of CKPS.
Is the measured siganl waveform normal?
▶ Thoroughly check connectors for looseness, poor connection, bending, corrosion, contamination, deterioration, or damage. Repair or replace as necessary, and go to "Verification of Vehicle Repair" procedure.
▶ Substitute with a known - good PCM and check for proper operation. If the problem is corrected, replace PCM and go to "Verification of Vehicle Repair" procedure.
There is a memory reset function on scantool that can erase optional parts automatically detected and memorized by PCM. After testing PCM on the vehicle, use this function to reuse the PCM on the others
After a repair, it is essential to verify that the fault has been corrected.
Monitor and record the Freeze Frame Data for the Diagnostic Trouble Code(DTC) which has been diagnosed.
Using a Scantool, Clear the DTCs
Operate the vehicle within conditions noted in the freeze frame data or enable conditions
Monitor that all rediness test have been verified as " Complete "
Are any DTCs present ?
▶ Go to the applicable troubleshoooting procedure.
▶ System is performing to specification at this time.
