2.
Connect the battery as shown. If the starter pinion pops out, it is working properly. To avoid damaging the starter, do not leave the battery connected for more than 10 seconds.
The air temperature must be between 59 and 100°F (15 and 38°C) before testing.
Recommended procedure :
Use a starter system tester.
Connect and operate the equipment in accordance with the manufacturer's instructions.
Test and troubleshoot as described.
Alternate Procedure :
Use the following equipment :
- Ammeter, 0~400A
- Voltmeter, 0~20V (accurate within 0.1 volt)
- Tachometer, 0~1,200 rpm
Hook up a voltmeter and ammeter as shown.
After this test, or any subsequent repair, reset the ECM/PCM to clear any codes.
Check the Starter Engagement :
Remove the ECM(B+) fuse from the fuse/relay box.
Turn the ignition switch to START (III) with the shift lever in N or P position (A/T) or with the clutch pedal depressed (M/T). The starter should crank the engine.
If the starter does not crank the engine, go to step 3.
If it cranks the engine erratically or too slowly, go to "Check for Wear and Damage" on the next page.
Check the battery, battery positive cable, ground, starter cut relay, and the wire connections for looseness and corrosion. Test again.
If the starter still does not crank the engine, go to step 4.
Unplug the connector from the starter.
Connect a jumper wire from the battery positive (+) terminal to the solenoid terminal.
The starter should crank the engine.
If the starter still does not crank the engine, remove it, and diagnose its internal problem.
If the starter cranks the engine, go to step 6.
Check the ignition switch.
Check the starter relay (see page EE-54).
Check the A/T gear position switch (A/T) or the clutch interlock switch (M/T).
Check for an open in the wire between the ignition switch and starter.
The starter should crank the engine smoothly and steadily. If the starter engages, but cranks the engine erratically, remove it, and inspect the starter drive gear and torque converter ring gear for damage.
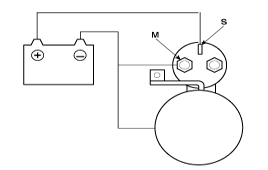
Disconnect the wires from the Sterminal and the M terminal.
Connect the battery as shown. If the starter pinion pops out, it is working properly. To avoid damaging the starter, do not leave the battery connected for more than 10 seconds.
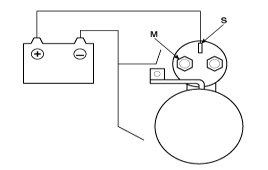
Disconnect the battery from the M terminal.
If the pinion does not retract, the hold-in coil is working properly. To avoid damaging the starter, do not leave the battery connected for more than 10 seconds.

Disconnect the battery also from the body. If the pinion retracts immediately, it is working properly.
To avoid damaging the starter, do not leave the battery connected for more than 10 seconds.
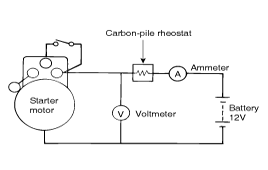
Place the starter motor in a vise equipped with soft jaws and connecta fully-charged 12-volt battery to starter motor as follows :
Connect a test ammeter (100-ampere scale) and carbon pile rheostatas shown is the illustration.
Connect a voltmeter (15-volt scale) across starter motor.
Rotate carbon pile to the off position.
Connect the battery cable from battery's negative post to the starter motor body.
Adjust until battery voltage shown on the voltmeter reads 11 volts.
Confirm that the maximum amperage is within the specifications and that the starter motor turns smoothly and freely :
: Max. 120 Amps
: Min. 4,000 rpm
Do not immerse parts in cleaning solvent. Immersing the yoke assembly and/or armature will damage the insulation. Wipe these parts with a cloth only.
Do not immerse the drive unit in cleaning solvent. The overrun clutch is pre-lubricated at the factory and solvent will wash lubrication from the clutch.
The drive unit may be cleaned with a brush moistened with cleaning solvent and wiped dry with a cloth.
