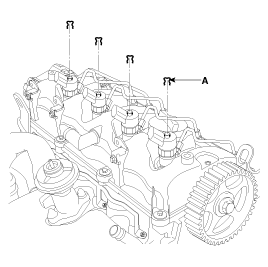
Disconnect the fuel return hose after removing the clips(A).
Before removing the cylinder head, the timing belt should be removed first. Refer to the timing belt 'removal' step.
Disconnect the fuel return hose after removing the clips(A).

Remove the fuel tube. (See FL- groub- fuel pump)
Remove the connector.
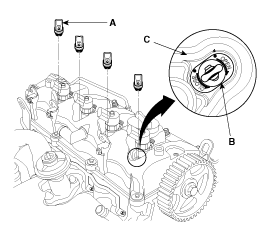
Remove the plugs(A).
Pull the plug up slightly. (more than 1mm)
Rotate the plug 90° clockwise.
Remove the plug with inserting a (-)driver between the plug assy(B) and the cylinder head cover(C).
Remove the injector hoder bolt using the torx wrench.
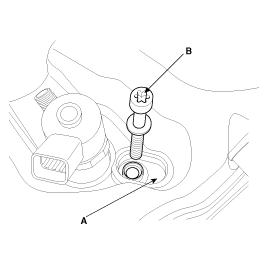
Pull the injector holders with the bolts.
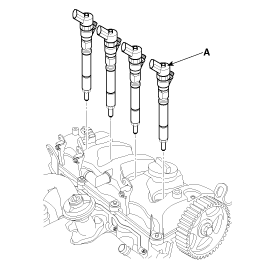
Remove the injectors(A).
Disconnector the position sensor.
Remover the wiring bracket.
Remove the pipe between the oil pan.
Remove the fuelline hose bolt.
Remove the cylinder head cover mounting bolts(A,B).
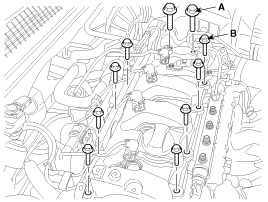
Remove the cylinder head cover.
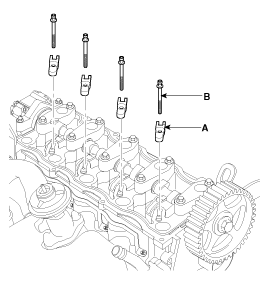
Remove the injector holders(A) with the bolts(B).
Remove the metal tube(A) between the fuel pump(B) and the common rail(C).
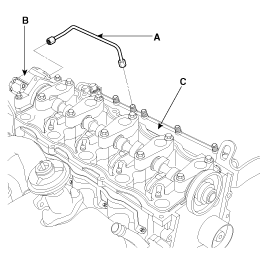
Remove the fuel pressure ragulator(C).
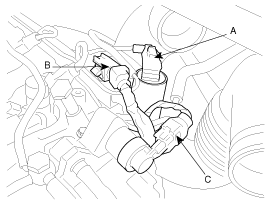
Remove the fuel hose(A) and fuel temperature sensor(B).
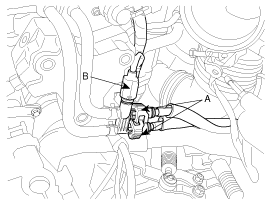
Remove the fuel pump(A) after removing the three bolts(B).
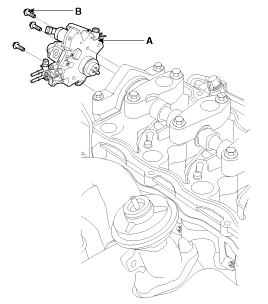
Remove the exhaust manifold.
Remove the intake manifold.
Remove the cylinder head bolts(A), then remove the cylinder head(B).
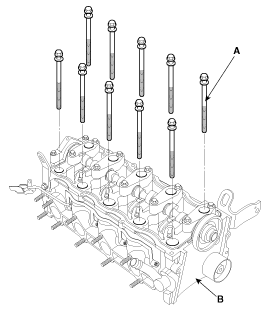
To prevent warpage, unscrew the bolts in sqience 1/3 turn at a time:repeat the sequence until all bolts are loosened.
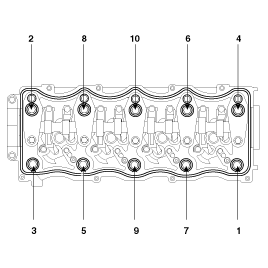
Install the cylinder head in the reverse order of removal :
Always use a new head gasket.
Cylinder head and cylinder block surface must be clean.
Turn the crankshaft so the No.1 piston is at TDC(Top Dead Center).
Cylinder head dowel pins must be aligned.
Select the cylinder head gasket.
Measure the piston protrusion from the upper cylinder block face (I) on 8 places (A ~ H) at T.D.C. Measure on the crankshaft center line considering the piston migration.
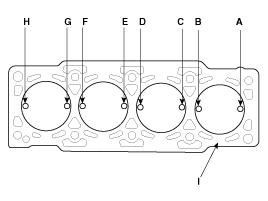
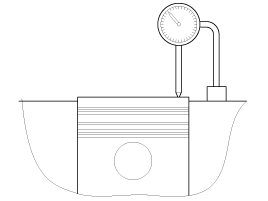
Select the gasket in the table below using the average value of piston protrusions.
Although even the only 1 point is over than the each rank limit, use 1 rank upper gasket than specified in the table below.
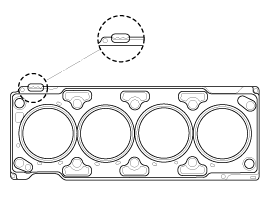
Displacement | 2.2 L | ||
Average of pisston protrusion | 0.194 ~ 0.337mm (0.0079 ~ 0.013in.) | 0.337 ~ 0.440mm (0.013 ~ 0.017in.) | 0.440 ~ 0.542mm (0.017 ~ 0.021in.) |
Gasket thickness | 1.1 ± 0.05mm (0.0433 ± 0.0020in.) | 1.2 ± 0.05mm (0.0472 ± 0.0020in.) | 1.3 ± 0.05mm (0.0512 ± 0.0020in.) |
Limit of each rank extant | 0.43mm (0.0169in.) | 0.53mm (0.0208in.) | - |
Identification code |  |  |  |
c. Install the gasket so that the identification mark faces toward the flywheel side.
Position the cylinder head assembly over the gasket.
Tighten the cylinder head bolts slightly.
Install the camshaft sprocket, aligning the timing mark.
Tightening torque
125 ~ 140N.m (1250 ~ 1400kgf.cm, 92.19 ~ 103.26lb-ft)
Tighten the bolts to the specified torque
Tightening torque
50N.m (500kgf.cm, 36.9lb-ft) + 120° + 120°
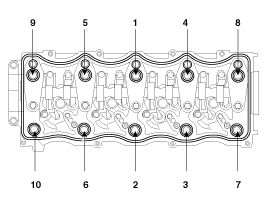
Tightening sequence of cylinder head bolt should be confirmed to the upper drawing.
Cylinder head bolt must be replaced.
Install the fuel pump assembly.
Install the intake/exhaust manifold assemblies.
Install the hose between the vacuum pump and the cylinder head.
If it is necessary to replace the oil seals on the cylinder head cover for injectors, use the SST(09351-27401).
Install the camshaft oil seal with use the SST(09212 - 27100)
Install the injector holder(A).

Install the head cover gasket in the groove of the cylinder head cover.
Cylinder head cover gasket must be replaced.
Before installing the head cover gasket, throughly clean the seal and the groove.
Apply liquid gasket to the head cover gasket at the four corners of the recesses.
Use liquid gasket LOCTITE 5699 or TH1212D.
Check that the mating surface are clean and dry before applying liquid gasket.
Do not install the parts if five minutes or more have elapsed since applying liquid gasket.
Instead, reapply liquid gasket after removing old residue.
After assembly, wait at least 30 minutes before filling the engine with oil.
Install the sylinder head cover bolts(A, B).
Tighten torque
(A) : 21 ~ 25N.m (2.2 ~ 2.6kgf.m, 15.9 ~ 18.8lb-ft)
(B) : 8 ~ 10N.m (0.8 ~ 1.0kgf.m, 5.9 ~ 7.38lb-ft)

After assembly, wait at least 30 minutes before filling the engine with oil.
Insert the injectors(C), moving back the injector holders(A) with the bolts(B).
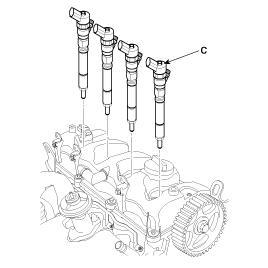

Install the injector holder bolts useing the torx wrench.
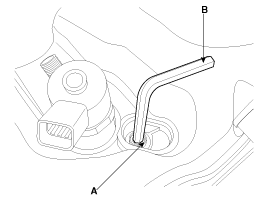
Install the injector plug(A).
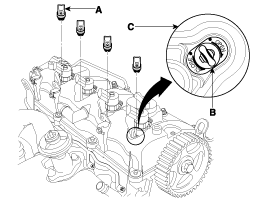
Make sure that the stopper of the plug faces 'OPEN' side. Otherwise pull and rotate the plug clockwise so the stopper should face 'OPEN' side.
Apply the engine oil on the head cover mating surface or the gasket of the plug.
Insert the plugs in the head cover.
Rotate the plug inserted counterclockwise 90˚.
After installation, rotate the plug clockwise. If it is rotated, repeat the step a ~ d.
Plug gasket must be replaced.
Install the fuel tube.(See FL group - injector)
Install the timing belt.
Identify parts as they are removed to ensure reinstallation in original locations.
Inspect camshafts.
Remove the engine hangers, the knock bushes and the studs.
Remove the camshaft bearing caps(A).
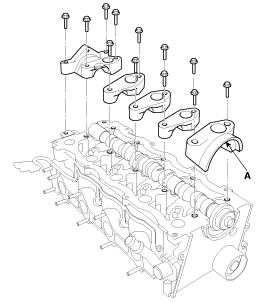
Remove the camshaft(A) with the oil seal(B).
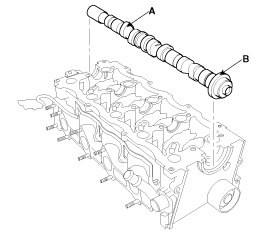
Remove the Intake/Exhaust cam followers(A, B).
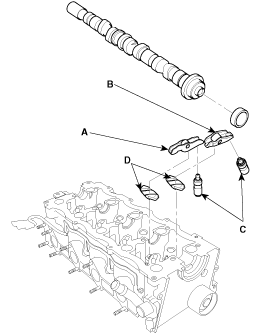
Remove the lash adjusters(C).
Remove the valve caps(D).
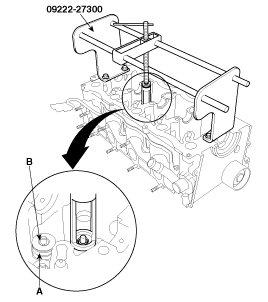
Using an appropriate-sized socket and plastic mallet, lightly tap the valve retainer to loosen the valve retainer locks before installing the valve spring compressor.
Identify valves and valve springs as they are removed so that each item can be reinstalled in its original position.
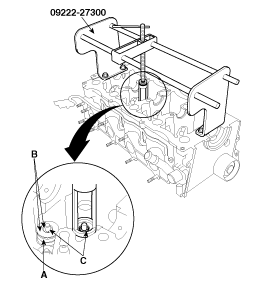
Using the SST(09222-27300), compress the valve spring(A) in order to remove the valve spring retainer locks(B).
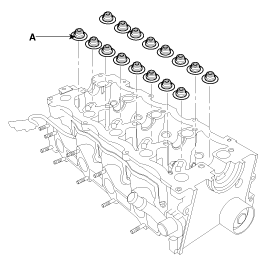
Remove the valve stem seals(A).
Do not rotate the camshaft during inspection.
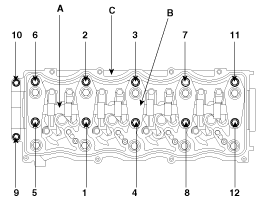
Put the camshaft(A) and the camshaft bearing caps(B) on the cylinder head(C), then tighten the bolts to the specified torque with the following sequence below.
Specified torque
26.5 ~ 29.5N.m (265 ~ 295kgf.cm, 20 ~ 22lb-ft)
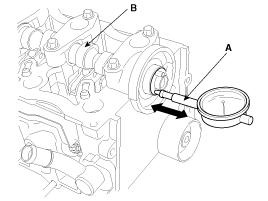
Seat the camshaft by pushing it toward the rear of the cylinder head.
Zero the dial indicator(A) against the end of the camshaft(B).
Push the camshaft(B) back and forth, and read the end play.
Camshaft End Play
Standard (New) : 0.05 ~ 0.15mm (0.002 ~ 0.006in.)
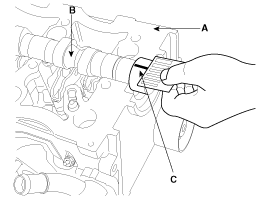
Remove the bolts, then remove the camshaft bearing caps from the cylinder head(A).
Lift the camshaft(B) out of the cylinder head(A), wipe it clean. Replace the camshaft if any lobes are pitted, scored, or excessively worn.
Clean the camshaft bearing surfaces in the cylinder head, then set the camshaft back in place.
Place a plastigauge strip(C) across each journal.
Install the camshaft bearing caps and tighten the bolts to the specified torque.
Remove the camshaft bearing caps, then measure the widest portion of the plastigage(C) on each journal.
Camshaft-to-Camshaft bearing cap oil clearance
Standard (New)
0.040 ~ 0.074mm (0.0020 ~ 0.0029in.)
If the camshaft-to-camshaft bearing cap oil clearance is out of tolerance :
And the camshaft(A) has already been replaced, you must replace the cylinder head.
If the camshaft has not been replaced, first check the total runout with the camshaft supported on V-blocks.
Camshaft Total Runout
Standard (New)
0.035mm (0.0014in.) for No.2 and4
0.050mm (0.0019in.) for No.3
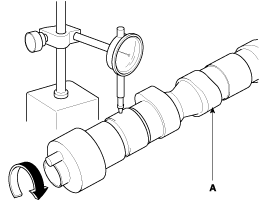
If the total runout of the camshaft is within tolerance, replace the cylinder head.
If the total runout is out of tolerance, replace the camshaft and recheck the camshaft-to-camshaft bearing cap oil clearance. If the oil clearance is still out of tolerance, replace the cylinder head.
Check the cam height wear.
[Standard]
Intake : 34.697mm (1.366in.)
Exhaust : 34.570mm (1.361in.)
[Limit]
Intake : 34.197mm (1.346in.)
Exhaust : 34.070mm (1.341in.)
Check the cylinder head(A) for warpage.
If warpage is less than 0.03mm (0.0012in.) for width, 0.09mm (0.0035in.) for length and 0.012mm (0.0035in) for 51mm ×51mm, cylinder head is in good condition.
If warpage is over the standard value, replace the cylinder head.
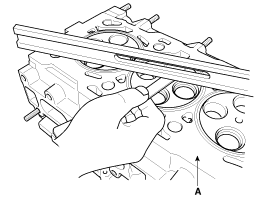
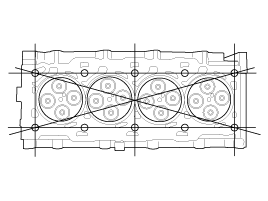
Measure along edges, and three ways across center.
Prior to reassembling, cylinder head assembly shall be cleaned sufficiently to remove scrap and clust. (Clean holes with special care.)
Using the SST(09222-27200) insert the valve stem seals(A).
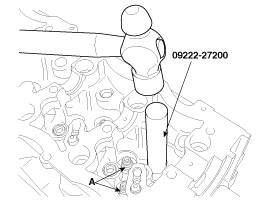
Insert the valves through the valve stem seals.
Make sure the valves move up and down smoothly.
Install the valve spring(A) and valve spring retainer(B), then install the SST (09222-27300, the valve spring compressor). Compress the spring(A) and install the valve spring retainer lock(C).
Lightly tap the end of each valve stem two or three times with a plastic mallet to ensure proper seating of the valve and valve spring retainer locks.
Tap the valve stem only along its axis so you do not bend the stem.
Assembly of lash adjuster.
Until installing, lash adjuster shall be held upright so that gas oil in lash adjuster should not spill and assured that dust does not adhere to adjuster.
Lash adjust shall be inserted tenderly to the cylinder head not to spill gas oil from lash adjuster. In case of spilling air bent shall be done in accordance with the air bent procedure below.
Air bent procedure
In case of lash adjuster alone.
Stroke lash adjuster in gas oil 4~5 times by pushing its cap while pushing the ball down slightly by hard steel wire.
Take care not to severely push hard steel wire down since ball is several grams.
After installed on engine
Lash adjuster might give out unusual noise if air is mingled. Apply slow racing from idle to 3,000rpm (Approximately one minute per one racing) and the air shall be removed from adjuster.
Therefore noise can be extinguished.
Install the valve-caps.
Put the cam followers on the lash adjusters and valve caps.
After wiping down the camshaft and camshaft seal in the cylinder head, lubricate both surfaces and install the camshaft with engine oil.
Confirm that cam followers are located on lash adjusters and their rollers are in touch with camshaft.
In assembly camshaft bearing cap, to the cylinder head with the cylinder block, all pistons should be in the middle position between TDC(Top Dead Center) and BDC(Bottom ead Center) because valves come out of the bottom surface of the cylinder head.
Install the bolts loosely.
Tighten each bolt two turns at a time in the sequence shown below to ensure that the cam followers do not bind on the valves.
Tightening torque
26.5 ~ 29.5N.m (26.5 ~ 29.5kgf.m, 20 ~ 22lb-ft)
