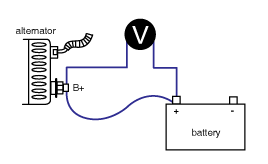
COMPONENT LOCATION
GENERAL DESCRIPTION

Normally, battery voltage fluctuates from 11.5V to 14.5V. Especially at cranking, voltage can drop to 9.8V. Therefore, actuators which require 12V power supply meet fluctuation of power by 5V.A little change of voltage supply can shift controlling characteristic of actuators, such as injectors, RPCV and EGR actuator, which should be controlled delicately. To correct controlling characteristic change arrised from voltage fluctuation, ECM performs actuator operating correction according to voltage change as detecting battery voltage change.

DTC DESCRIPTION

P0562 is set when battery voltage below 5.8V is detected for more than 5 sec. Check charging system.(charging circuit, alternator component)

▶ ECM senses battery voltage as monitoring the voltages in ECM(C244-K) connector terminal 1,3,5 which are transmitted from main relay.

DTC DETECTING CONDITION

Item

Detecting Condition

Possible Cause

DTC Strategy

Voltage monitoring

Charging circuit

Alternator component

Enable Conditions

IG KEY "ON"

Threshold Value

when battery voltage is below 5.8V

Diagnostic Time

5 sec.

Fail Safe

Fuel cut

NO

Battery voltage is considered as 12V.

EGR Off

NO

Fuel Limit

NO

Check Lamp

NO

SIGNAL WAVEFORM AND DATA
SCHEMATIC DIAGRAM
MONITOR SCANTOOL DATA
1.

Connect Scantool to Data Link Connector (DLC).

2.

Warm engine up to normal operating temperature.

3.

Turn "OFF" electrical devices and A/C.

4.

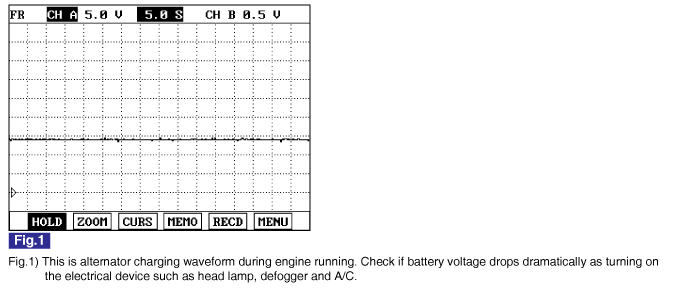
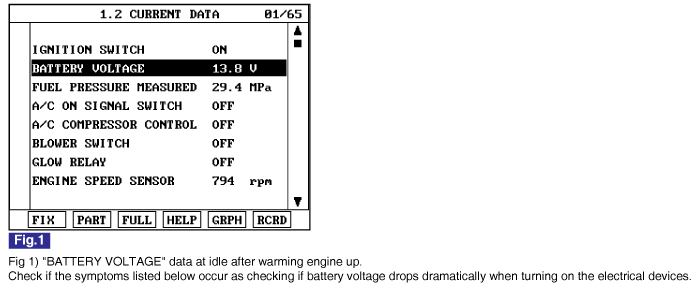
Monitor "BATTERY VOLTAGE" parameter on the Scantool.

specification :12.5V~14.5V at idle without any load(800RPM)

※ The vehicles with the alternator of poor charging efficiency

1. Lamps are dim at idle, while lamps are bright at acceleration.

2. Intermitently RPM drops excessively or engine shut down at low RPM close to idle state at times.

3. Smooth cranking happens rarely. (Warning lamps in cluster turn dimmer excessively at cranking and poor crankinghappen.)

4. Charging lamp turns on during driving.

TERMINAL AND CONNECTOR INSPECTION
1.

Electrical systems consist of a lot of harness and connectors, poor connection of terminals can cause various problems and damge of component.

2.

Perform checking procedure as follows.

(1)

Check damage of harness and terminals : Check terminals for contact resistance, corrosion and deformation.

(2)

Check connecting condition of ECM and component connector : Check terminal seperation, damage of locking device and connecting condition between terminal and wiring.

note

Disconnect the pin which requires checking at male connector and insert it to the terminal at female connector for checking connecting condition. ( after checking, reconnect the pin at correct position. )

3.

Is the problem found?

▶ Repair the trouble causing part and go to "Verification of Vehicle Repair".

▶ Go to "Power Circuit Inspection".

POWER CIRCUIT INSPECTION
1.

Check power supply in alternator connector (Sensing)

(1)

IG KEY "ON", Turn engine "OFF".

(2)

Disconnect alternator connector.

(3)

Measure the voltage of terminal 1 of alternator connector.

Specification : 11.5V~13.0V

(4)

Is the measured voltage within the specification?

▶ Go to "2. Check power supply in alternator connector (Charging lamp)".

▶ Repair E/R JUNCTION BOX 10A ECU FUSE and related circuit and go to "Verification of Vehicle Repair".

2.

Check power supply in alternator connector (Charging lamp)

(1)

IG KEY "ON", Turn engine "OFF".

(2)

Disconnect alternator connector.

(3)

Measure the voltage of terminal 2 of alternator connector.

Specification : 10.5V~12.0V

(4)

Is the measured voltage within the specification?

▶ Go to "3. Check charging lamp operation".

▶ Check charging lamp on cluster, M21 charging lamp resistor and related circuit and go to "Verification of Vehicle Repair".

3.

Check charging lamp operation

(1)

IG KEY "ON", ENGINE "OFF".

(2)

Disconnect alternator connector.

(3)

Ground alternator connector terminal 2 to chassis ground using jump wire.

specification : charging lamp "ON" when grounded to chassis ground.

(4)

Does charging lamp turn ON?

▶ Go to "4.Check voltage drop of aternator B+ cable".

▶ Replace lamp and go to "Verification of Vehicle Repair".

4.

Check voltage drop of aternator B+ cable

(1)

IG KEY "ON", Turn engine "ON".

(2)

Measure the voltage difference between alternator B+ terminal and battery + terminal.

(connect + terminal of multimeter to alternator B+ and connect - terminal of multimeter to battery +terminal. )

specification : below 0.2V (below 200mV)

(3)

Is the measured voltage within the specification? (Is the voltage drop in alternator B+ cable normal? )

▶ Go to "Component Inspection".

▶ After checking corrosion and deformation of alternator B+ cable and replace it if needed and go to "Verification of Vehicle Repair".

COMPONENT INSPECTION
1.

IG KEY "OFF", ENGINE "OFF".

2.

Check belt tension which operates alternator .

3.

Check battery terminal and fusible link, poor connection or corrosion of alternator B+ terminal.

4.

Turn Engien "ON".

5.

Operate the electrical device such as head lamp,defroster and blower motor.

6.

Check battery voltage at above 2000 RPM.

Specification : 12.5V~14.5V

7.

Is the measured voltage within the specification?

▶ Alternator is performing within the specification.

▶ Replace alternator and go to "Verification of Vehicle Repair" .

VERIFICATION OF VEHICLE REPAIR

After a repair, it is essential to verify that the fault is corrected.

1.

After connecting Scantool select "DIAGNOSTIC TROUBLE CODES(DTCs)" mode.

2.

Clear recorded DTC using Scantool.

3.

Drive the vehicle within DTC "Enable conditions" in "General information".

4.

After selecting "DIAGNOSTIC TROUBLE CODES(DTCs)" mode and check if DTC is recorded again.

5.

Are any DTCs recorded ?

▶ Go to the DTC guide of recorded NO. in Scantool.

▶ System operates within specification.

Яндекс.Метрика