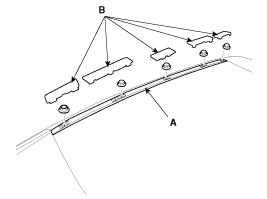
After loosening the mounting nuts, then remove the roof side molding (A).
Tightening torque :
3.9 ~ 4.4N.m (0.4 ~ 0.45kgf.m, 2.9 ~ 3.3lb-ft)
When prying with a flat-tip screwdriver, wrap itwith protective tape, and apply protective tapearound the related parts, to prevent damaged
Put on gloves to protect your hands.
Take care not to scratch the body surface.
Using a screwdriver or remover, remove the roof side molding caps (B).
After loosening the mounting nuts, then remove the roof side molding (A).
Tightening torque :
3.9 ~ 4.4N.m (0.4 ~ 0.45kgf.m, 2.9 ~ 3.3lb-ft)

Install in the reverse order of removal.
Replace any damage clips.
When prying with a flat-tip screwdriver, wrap itwith protective tape, and apply protective tapearound the related parts, to prevent damaged
Put on gloves to protect your hands.
Take care not to scratch the body surface.
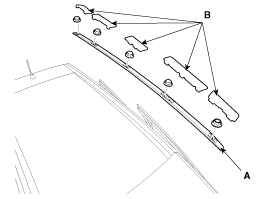
Using a screwdriver or remover, remove the roof side molding caps (B).
After loosening the mounting nuts, then remove the roof side molding (A).
Tightening torque :
3.9 ~ 4.4N.m (0.4 ~ 0.45kgf.m, 2.9 ~ 3.3lb-ft)
Using a screwdriver or remover, remove the roof side garnish (A).
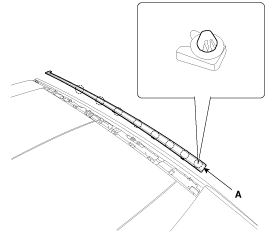
Install in the reverse order of removal.
Replace any damage clips.
When prying with a flat-tip screwdriver, wrap itwith protective tape, and apply protective tapearound the related parts, to prevent damaged
Put on gloves to protect your hands.
Take care not to scratch the body surface.
Using a screwdriver or remover, remove the roof side garnish (A).
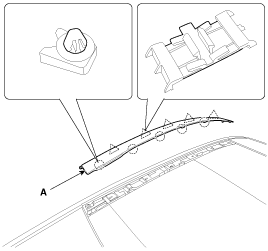
Install in the reverse order of removal.
Replace any damage clips.
When prying with a flat-tip screwdriver, wrap itwith protective tape, and apply protective tapearound the related parts, to prevent damaged
Put on gloves to protect your hands.
Take care not to scratch the body surface.
Using a screwdriver or remover, remove the delta garnish (A).
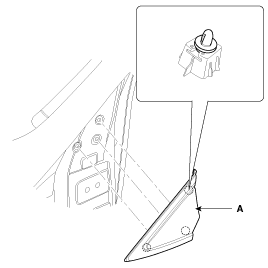
Install in the reverse order of removal.
Replace any damage clips.
When prying with a flat-tip screwdriver, wrap itwith protective tape, and apply protective tapearound the related parts, to prevent damaged
Put on gloves to protect your hands.
Take care not to scratch the body surface.
Remove the following items:
Rear seat cushion assembly
(Refer to the BD group - "Rear Seat")
Rear seat side back assembly
(Refer to the BD group - "Rear Seat")
Luggage cover board
(Refer to the BD group – “Interior Trim”)
Rear transverse trim
(Refer to the BD group – “Interior Trim”)
Luggage side trim
(Refer to the BD group – “Interior Trim”)
Rear pillar trim
(Refer to the BD group – “Interior Trim”)
After loosening the mounting nuts, then remove the quarter fixed glass & molding (A).
Tightening torque :
3.9 ~ 4.4N.m (0.4 ~ 0.45kgf.m, 2.9 ~ 3.3lb-ft)
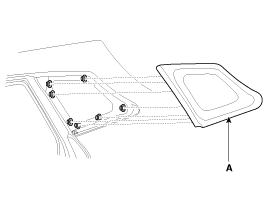
Install in the reverse order of removal.
Replace any damage clips.
When prying with a flat-tip screwdriver, wrap itwith protective tape, and apply protective tapearound the related parts, to prevent damaged
Put on gloves to protect your hands.
Take care not to scratch the body surface.
Remove the following items :
Tail gate upper trim
(Refer to the BD group - "Tail Gate")
Loosen the rear spoiler mounting nuts.
Disconnect the high mounted stop lamp connector (A) and washer nozzle (B).
Tightening torque :
3.9 ~ 4.4N.m (0.4 ~ 0.45kgf.m, 2.9 ~ 3.3lb-ft)
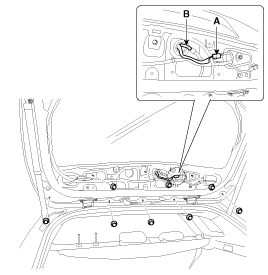
Remove the rear spoiler assembly (A).
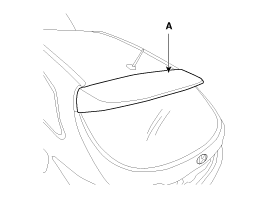
Install in the reverse order of removal.
Make sure the connector is connected properly.
Replace any damage clips.
When prying with a flat-tip screwdriver, wrap itwith protective tape, and apply protective tapearound the related parts, to prevent damaged
Put on gloves to protect your hands.
Take care not to scratch the body surface.
Remove the front tire.
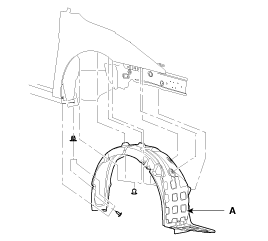
After loosening the mounting clips and screws, then remove the front wheel guard (A).
Install in the reverse order of removal.
Replace any damage clips.
When prying with a flat-tip screwdriver, wrap itwith protective tape, and apply protective tapearound the related parts, to prevent damaged
Put on gloves to protect your hands.
Take care not to scratch the body surface.
Remove the rear tire.
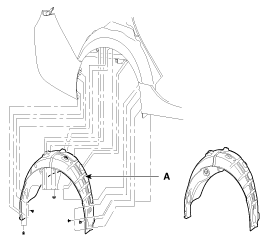
After loosening the mounting clips and screws, then remove the rear wheel guard (A).
Install in the reverse order of removal.
Replace any damage clips.
When prying with a flat-tip screwdriver, wrap itwith protective tape, and apply protective tapearound the related parts, to prevent damaged
Put on gloves to protect your hands.
Take care not to scratch the body surface.
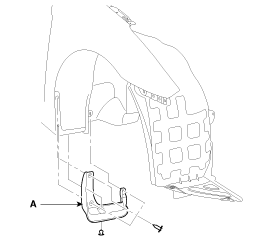
After loosening the mounting screws and clip, then remove the front mud guard (A).
Install in the reverse order of removal.
Replace any damage clips.
When prying with a flat-tip screwdriver, wrap itwith protective tape, and apply protective tapearound the related parts, to prevent damaged
Put on gloves to protect your hands.
Take care not to scratch the body surface.
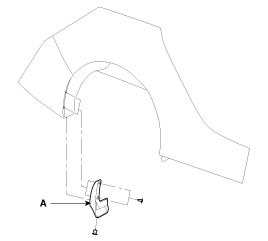
After loosening the mounting screws and clip, then remove the rear mud guard (A).
[Sedan]
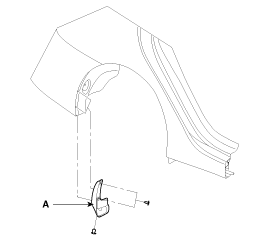
[Wagon]
Install in the reverse order of removal.
Replace any damage clips.
When prying with a flat-tip screwdriver, wrap itwith protective tape, and apply protective tapearound the related parts, to prevent damaged
Put on gloves to protect your hands.
Take care not to scratch the body surface.
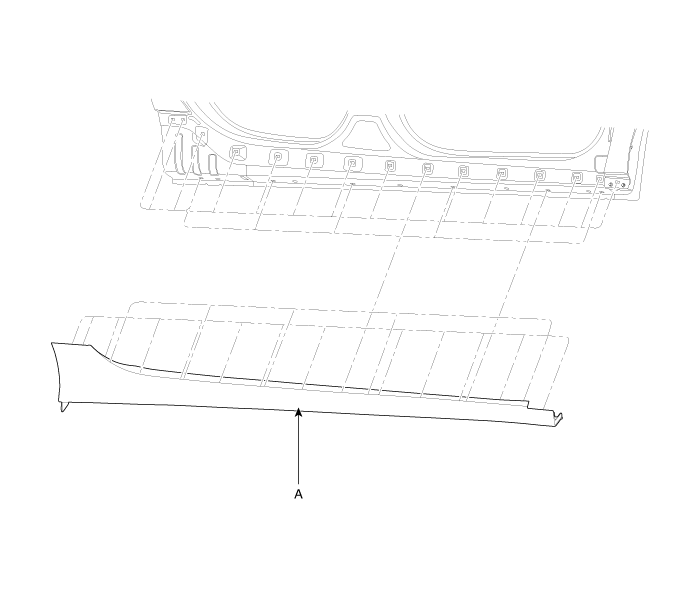
Loosen the side sill molding mounting screws.
Using a screwdriver or remover, remove the side sill molding (A).
Install in the reverse order of removal.
Replace any damage clips.
When prying with a flat-tip screwdriver or use a prying trim tool, wrap it with protective tape, and apply protective tape around the related parts, to prevent damage.
Take care not to scratch the body surface.
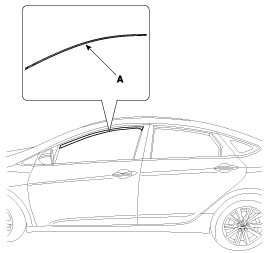
Using a screwdriver or remover, remove the front door frame molding (A).
Always replace the front door frame molding to a new one.
[Wagon]
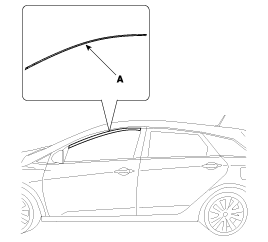
[Sedan]
Install in the reverse order of removal.
When prying with a flat-tip screwdriver or use a prying trim tool, wrap it with protective tape, and apply protective tape around the related parts, to prevent damage.
Take care not to scratch the body surface.
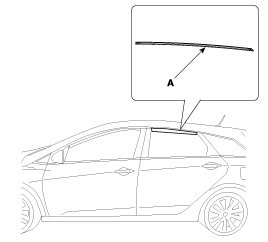
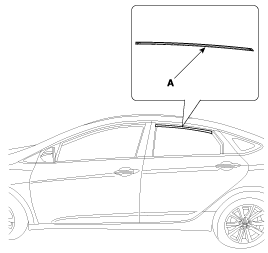
Using a screwdriver or remover, remove the rear door frame molding (A).
Always replace the rear door frame molding to a new one.
[Wagon]
[Sedan]
Install in the reverse order of removal.
When prying with a flat-tip screwdriver or use a prying trim tool, wrap it with protective tape, and apply protective tape around the related parts, to prevent damage.
Take care not to scratch the body surface.
Remove the cowl top cover.
(Refer to the BD group – “Cowl Top Cover”)
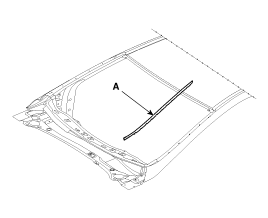
Using a screwdriver or remover, remove the windshield glass side molding (A).
Install in the reverse order of removal.
When prying with a flat-tip screwdriver or use a prying trim tool, wrap it with protective tape, and apply protective tape around the related parts, to prevent damage.
Take care not to scratch the body surface.
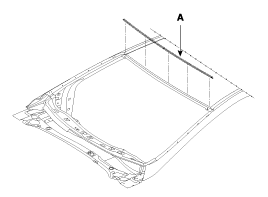
Using a screwdriver or remover, remove the windshield glass upper molding (A).
Install in the reverse order of removal.