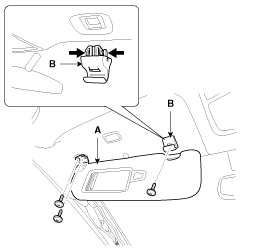
After loosening the mounting screws, then remove the sunvisor (A) and retainer (B).
Use a plastic panel removal tool to remove interior trip pieces to without marring the surface.
Put on gloves to protect your hands.
After loosening the mounting screws, then remove the sunvisor (A) and retainer (B).

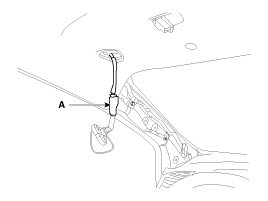
Disconnect the connector (A).
Install in the reverse order of removal.
Make sure the connector is connected properly.
Use a plastic panel removal tool to remove interior trip pieces to without marring the surface.
Put on gloves to protect your hands.
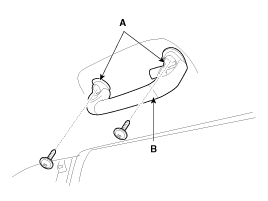
Open the covers (A).
After loosening the mounting screws, then remove the assist handle (B).
Install in the reverse order of removal.
Use a plastic panel removal tool to remove interior trip pieces to without marring the surface.
Put on gloves to protect your hands.
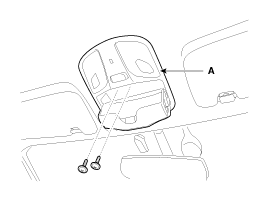
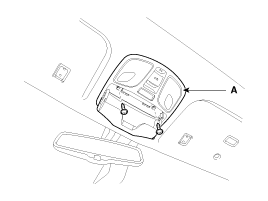
After loosening the mounting screws, then remove the overhead console assembly (A).
[General Type]
[Panoramaroof Type]
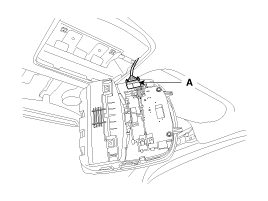
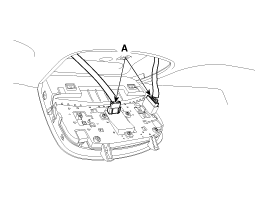
Disconnect the connectors (A).
[General Type]
[Panoramaroof Type]
Install in the reverse order of removal.
Make sure the connector is connected properly.
Use a plastic panel removal tool to remove interior trim pieces to protect from marring the surface
Put on gloves to protect your hands.
Using a screwdriver or remover, remove the room lamp cover (B).
After loosening the mounting screws, then remove the room lamp (A).
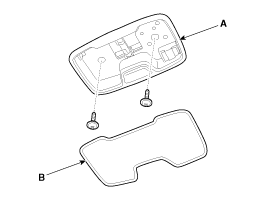
Disconnect the connector (A).
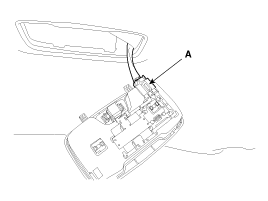
Install in the reverse order of removal.
Make sure the connector is connected properly.
Replace any damaged clips.
Use a plastic panel removal tool to remove interior trim pieces to protect from marring the surface
Put on gloves to protect your hands.
Using a screwdriver or remover, remove the room lamp (A).
Disconnect the connector (B).
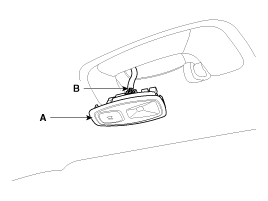
Install in the reverse order of removal.
Make sure the connector is connected properly.
Replace any damaged clips.
Use a plastic panel removal tool to remove interior trip pieces to without marring the surface.
Put on gloves to protect your hands.
Using a screwdriver or remover, remove the vanity lamp (A).
Disconnect the connector (B).
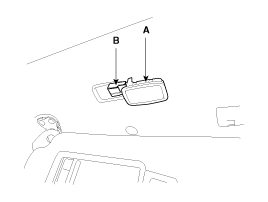
Install in the reverse order of removal.
Make sure the connector is connected properly.
Put on gloves to protect your hands.
Use a plastic panel removal tool to remove interior trim pieces to protect from marring the surface.
Take care not to bend or scratch the trim and panels.
Remove the following items.
Front seat assembly
(Refer to the BD group - "Front Seat")
Rear seat assembly
(Refer to the BD group - "Rear Seat")
Rear seat side back assembly
(Refer to the BD group - "Rear Seat")
Floor console
(Refer to the BD group - "Console")
Shift lever assembly
(Refer to the TM group - "Shift Lever")
Sunvisor & Retainer
Vanity lamp
Room lamp
Assist handle
Overhead console
Front pillar trim
(Refer to the BD group - " Interior Trim")
Front door scuff trim & Rear door scuff trim
(Refer to the BD group - " Interior Trim")
Canter pillar lower trim
(Refer to the BD group - " Interior Trim")
Canter pillar upper trim
(Refer to the BD group - " Interior Trim")
Luggage side trim
(Refer to the BD group - " Interior Trim")
Rear pillar trim
(Refer to the BD group - " Interior Trim")
Rear seat belt
(Refer to the BD group - "Rear Seat Belt")
Remove the ECM mirror cover (A).
Disconnect the ECM mirror connector (B).
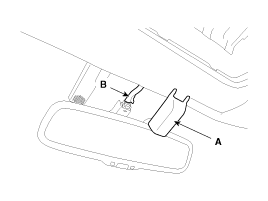
Remove the auto defog sensor cover (A).
Disconnect the auto defog sensor connector (B).
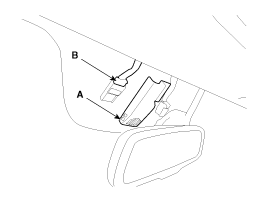
Remove the LKAS unit & rain sensor cover (A).
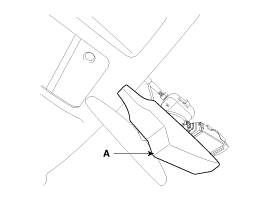
Disconnect the LKAS unit connecror (A) and rain sensor connector (B).
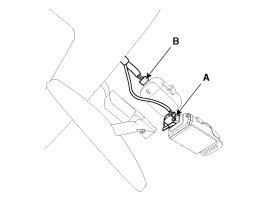
After loosening the mounting bolts, then remove the rear seat back folding bracket assembly (A).
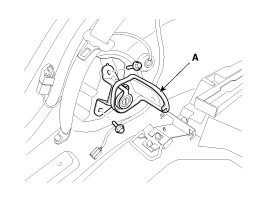
After loosening the mounting bolts, then remove the rear seat back striker assembly (A).
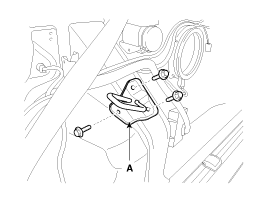
Disconnect the roof trim main connector (A).
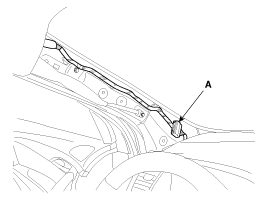
Detach the mounting clips, remove the roof trim (A).
Remove the roof trim (A) without wrinkle.
[General Type]
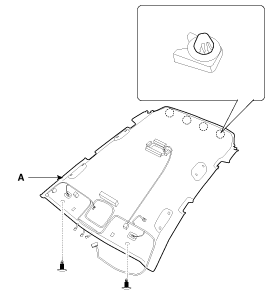
[Panoramaroof Type]
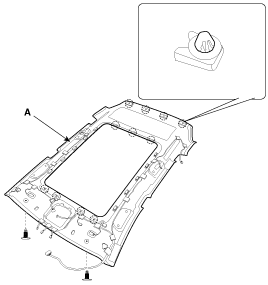
Install in the reverse order of removal.
Make sure the connector is plugged in properly.
Replace any damaged clips.
Put on gloves to protect your hands.
Use a plastic panel removal tool to remove interior trim pieces to protect from marring the surface.
Take care not to bend or scratch the trim and panels.
Remove the following items :
Front seat assembly
(Refer to the BD group - "Front Seat")
Rear seat assembly
(Refer to the BD group - "Rear Seat")
Rear seat side back assembly
(Refer to the BD group - "Rear Seat")
Floor console
(Refer to the BD group - "Console")
Shift lever assembly
(Refer to the TM group - "Shift Lever")
Sunvisor & Retainer
Vanity lamp
Room lamp
Assist handle
Overhead console
Front pillar trim
(Refer to the BD group - " Interior Trim")
Front door scuff trim & Rear door scuff trim
(Refer to the BD group - " Interior Trim")
Canter pillar lower trim
(Refer to the BD group - " Interior Trim")
Canter pillar upper trim
(Refer to the BD group - " Interior Trim")
Rear pillar trim
(Refer to the BD group - " Interior Trim")
Rear end trim
(Refer to the BD group - " Interior Trim")
Remove the ECM mirror cover (A).
Disconnect the ECM mirror connector (B).

Remove the auto defog sensor cover (A).
Disconnect the auto defog sensor connector (B).

Remove the LKAS unit & rain sensor cover (A).

Disconnect the LKAS unit connecror (A) and rain sensor connector (B).

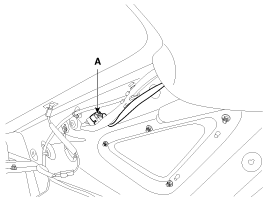
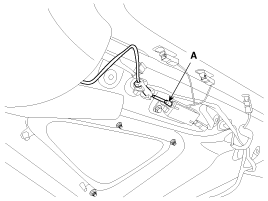
Disconnect the connectors (A) and the mounting clips in the rear pillar.
[LH]
[RH]
Disconnect the roof trim main connector (A).

Detach the mounting clips, remove the roof trim (A).
Remove the roof trim (A) without wrinkle.
[General Type]

[Panoramaroof Type]

Install in the reverse order of removal.
Make sure the connector is plugged in properly.
Replace any damaged clips.