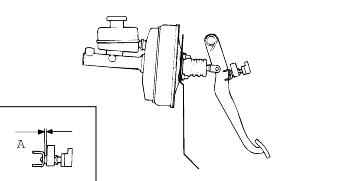
SERVICE BRAKE PEDAL INSPECTION AND ADJUSTMENT
1.

Turn the stop lamp switch until the clearance between the outer case of the stop lamp switch and pedal arm reaches the standard value, and thensecure the stop lamp switch with the lock nut.

Clearance between pedal and stop lamp switch "A" :

0.5-1.0 mm (0.02-0.039 in.)

2.

Adjust the stop lamp switch until the free play of the brake pedal reaches the standard value.

Brake pedal free play "B" :

3-8 mm (0.12-0.32 in.)

BRAKE BOOSTER OPERATION TEST WITHOUT A TESTER
1.

Run the engine for one or two minutes, and then shut it off. Depress the brake pedal several times at normal foot pressure. If the pedal goes down further the first time, but gradually rises after the second or third time,the brake booster is functioning properly. Go to step 2.

2.

With the engine stopped, depress the brake pedal several times. Depress the brake pedal and start the engine. If the pedal goes down slightly, thebooster is in good condition. Go to step 3.

3.

With the engine running, depress the brake pedal and then stop the engine. Hold the pedal depressed for 30 seconds. If the pedal height does not change,the booster is in good condition. If the pedal rises up, it is damaged.

If one of the above three tests is not OK, check the vacuum hoses, the check valve and the brake booster. Make any necessary corrections. If alltests are OK, the unit is in good condition.

BLEEDING THE BRAKE SYSTEM
1.

Remove the reservoir cap and fill the brake reservoir with brake fluid.

caution

Do not allow brake fluid to remain on a painted surface. Wash it off immediately.

note

When bleeding by pressurized fluid, do not depress the brake pedal.

2.

Connect a vinyl tube to the wheel cylinder bleeder plug, and insert the other end of the tube in a container of brake fluid which is half full.

3.

Start the engine.

4.

Slowly depress the brake pedal several times.

5.

While depressing the brake pedal fully, loosen the bleeder plug until fluid starts to run out. Then close the bleeder screw.

6.

Repeat steps 3 and 4 until there are no more bubbles in the fluid.

7.

Tighten the bleeder plug screw.

Bleeder screw tightening torque :

7-9 Nm (70-90 kg·cm, 5-7 lb·ft)

8.

Repeat the above procedure for each wheel in the sequence shown in the illustration.

caution

In case of RHD vehicles, after air bleeding the wheel cylinder system, necessarily bleed the master cylinder after looseningthe air bleeder screw.

Яндекс.Метрика