Check the cylinder head surface for flatness with a straight edge and feeler gauge as shown in the illustration.
Cylinder head flatness |
Standard dimensions : Max. 0.03mm(0.0059 in.) |
Service limit : 0.05mm(0.0020 in.) |
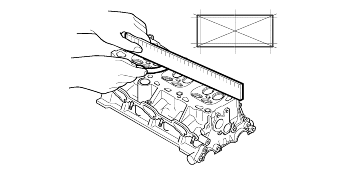
Remove scale, sealing compound and carbon deposits. After cleaning oil passages, apply compressed air to make certain that the passages are notclogged.
Visually check the cylinder head for cracks, damage or water leakage.
Check the cylinder head surface for flatness with a straight edge and feeler gauge as shown in the illustration.
Cylinder head flatness |
Standard dimensions : Max. 0.03mm(0.0059 in.) |
Service limit : 0.05mm(0.0020 in.) |

Valve stem-to-guide clearance |
Standard value |
Intake : 0.02 - 0.05 mm (0.0009 - 0.0020 in.) |
Exhaust : 0.050 - 0.085 mm (0.0020 - 0.0033 in.) |
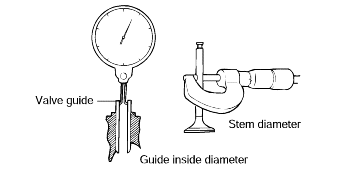
Replace the valve if its stem is bent, worn or damaged. Also replace it if the stem end (the surface contacting the hydraulic-lash adjuster) ishollowed out.
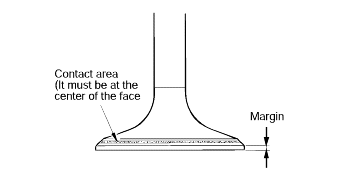
Check the valve face contact area, and recondition or replace as necessary.
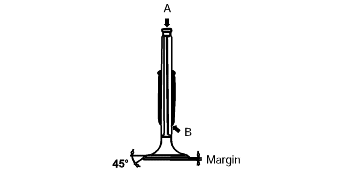
Replace the valve if the width of the margin (thickness of the valve head) is less than the minimum specified.
Valve margin |
Standard value |
Intake : 1.0mm(0.0394 in.) |
Exhaust : 1.3mm(0.0512 in.) |
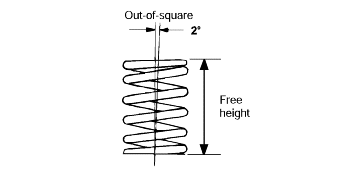
Check the free height of each valve spring and replace if necessary.
Using a square, test the squareness of each valve spring. If the spring is excessively out-of-square, replace it.
Valve spring |
Standard value |
Free height : 46.4 mm (1.8268 in.) |
Load : 24 kg / 37.9 mm (53 lb / 1.492 in.) |
Out - of - square : Max. 2° |
Service limit |
Free height : .45.4 mm (1.787 in.) |
Out - of - square : Max. 4° |
Before reconditioning, check the valve guide for wear. Replace worn guides if necessary and then recondition the valve seats.
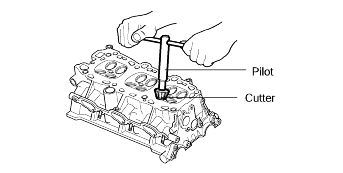
Recondition the valve seat using the Valve Seat Cutter and Pilot.
After reconditioning, the valve and valve seat should be lapped lightly with a lapping compound.
Using the special tool (09222 - 22000 B), withdraw the old valve guide out the bottom of the cylinder head.
Recondition the valve guide hole so that it can receive the newly press-fitted oversize valve guide.
Size mm (in.) | Size Mark | Oversize valve guide hole size mm (in.) |
0.05 (0.002) O.S. | 5 | 12.05 - 12.068 (0.474 - 0.475) |
0.25 (0.010) O.S. | 25 | 12.25 - 12.268 (0.482 - 0.483) |
0.50 (0.020) O.S. | 50 | 12.50 - 12.518 (0.492 - 0.493) |
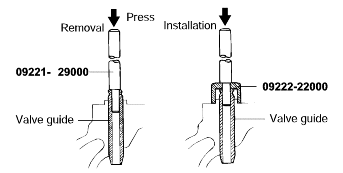
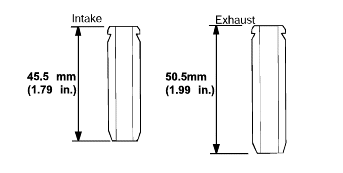
Using the special tool (09221-29000(A), 09222-22000(B)) press-fit the valve guide. The valve guide must be press-fitted from the upper side of the cylinder head. Keep in mind that the intake and exhaust valve guidesare different in length.
After the valve guide is press-fitted, insert a new valve and check for proper clearance.
After the valve guide is replaced, check that the valve is fully seated. Recondition the valve seats as necessary.
Do not install a valve guide unless it is oversize.
Cut away the inner face of the valve seat to reduce the wall thickness.
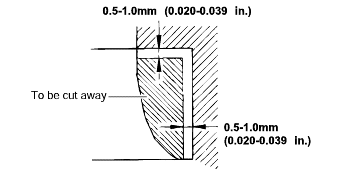
Enlarge the diameter of the valve seat so that it matches the specified hole diameter of the new valve seat ring.
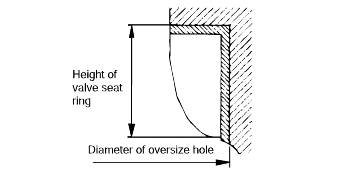
Description | Size mm (in.) | Size Mark | Seat ring height H mm (in.) | Oversize hole diameter I.D. mm (in.) |
Intake valve seat ring | 0.3 (0.012) O.S. | 30 | 7.9 - 8.1 (0.311 - 0.319) | 36.300 - 36.325 (1.429 - 1.430) |
0.6 (0.024) O.S. | 60 | 8.2 - 8.4 (0.323 - 0.331) | 36.600 - 36.625 (1.441 - 1.442) | |
Exhaust valve seat ring | 0.3 (0.012) O.S. | 30 | 7.9 - 8.1 (0.311 - 0.319) | 33.30 - 33.325 (1.311 - 1.312) |
0.6 (0.024) O.S. | 60 | 8.2 - 8.4 (0.323 - 0.331) | 33.600 - 33.625 (1.323 - 1.324) |
Heat the cylinder head to about 250°C (480°F) and press-fit an oversize seat ring for the bore in the cylinder head.
Using lapping compound, lap the valve to the new seat.
Valve seat contact width |
Intake : 0.9 - 1.3 mm (0.035 - 0.051 in.) |
Exhaust : 0.9 - 1.3 mm(0.035 - 0.051 in.) |