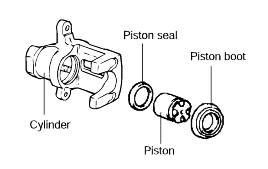
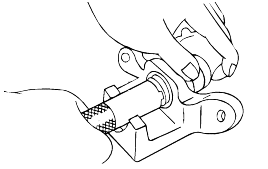
REMOVAL
INSTALLATION
CALIPER
DISASSEMBLY
1.

Remove the caliper mounting bolts, and the caliper assembly.

2.

Remove the carrier bolt, and the carrier with the brake pad.

3.

Remove the piston boot.

4.

Remove the piston assembly.

5.

Remove the piston seal with finger tip.

caution

Do not use sharpened tools to prevent damage to the inner surface of the cylinder.

INSPECTION
1.

Check the pads for wear or oil contamination and replace if necessary.

note

The pads for the right and left wheels should be replaced at the same time.

Pad thickness wear limit : 2.0mm (0.08 in.)

2.

Check the leading and trailing shoe keys and retaining screw for damage, or wear. Replace the keys and retaining screw at the same time when the padsare replaced.

3.

Check for worn or damaged dust boots if dust or mud has entered the caliper assembly through this seal, the caliper assembly must be replacedor rebuilt.

REASSEMBLY
1.

Check for worn, damaged, or rusted piston bore and piston. Replace the damaged parts if necessary.

2.

Check for damaged piston seal, boot and pin insulators.

3.

Apply the recommended fluid to the following parts.

Parts

Recommended fluid

Quantity

Piston seal

Brake fluid

(Dot 3 or Dot 4)

As required

Cylinder inner side

Brake fluid

(Dot 3 or Dot 4)

As required

Piston boot

Brake fluid

(Dot 3 or Dot 4)

As required

Piston outer surface

Brake fluid

(Dot 3 or Dot 4)

As required

Guide-rod insulators

Rubber grease

As required

4.

Push the piston into the caliper.

5.

Position the piston matchmars on the upper side so that they are located in a straight line with the piston.

Яндекс.Метрика