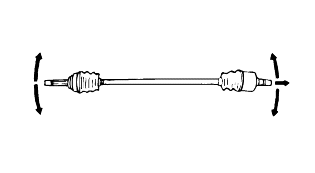
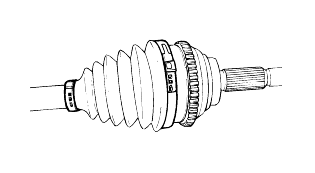
3.
Remove the split pin and driveshaft castle nut from the front hub.
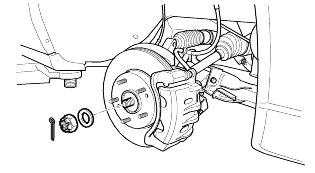
Remove the wheel and tire.
Drain the transaxle fluid.
Remove the split pin and driveshaft castle nut from the front hub.
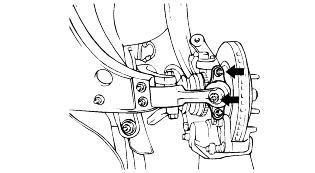
Remove the 2 bolts and disconnect the ball joint from the knuckle.
Using a plastic hammer, disconnect the driveshaft from the axle hub.

Push the axle hub toward the outside of the vehicle, and separate the driveshaft from the axle hub.
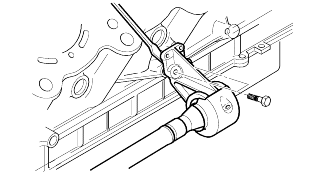
Insert a pry bar between the center bearing bracket and the driveshaft, and then pry the driveshaft from the transaxle.
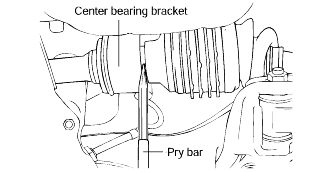
Use a pry bar so you do not damage the joint.
If you pull the driveshaft by excessive force, components inside the joint can be displaced causing the boot to be torn and the bearing tobe damaged.
Plug the transaxle case opening with an oil seal cap in order to avoid contamination.
Support the driveshaft properly.
Replace the retainer ring each time the driveshaft is removed from the transaxle case.
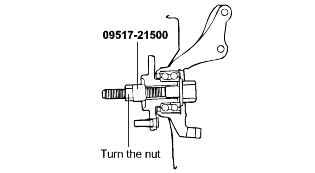
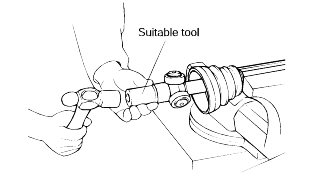
While loosening the driveshaft nut, do not allow vehicle weight to be concentrated on the wheel bearing. If the vehicle moves, hold the wheelbearing using the special tool
Remove the center bearing bracket mounting bolts. Insert the pry bar between the center bearing bracket and the cylinder block to disconnectthe bracket from the cylinder block.
Remove the inner shaft from the transaxle.
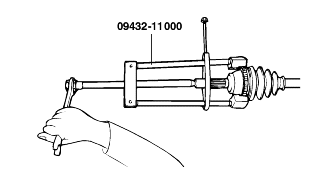
Using the special tool (09432-11000), remove the tone wheel.
Apply gear oil on the driveshaft splines and differential case contacting surface.
Before installing the driveshaft, set the opening side of the circlip so that it faces downward.
Replace the circlip with new ones after removal.
After installation, check that the driveshaft cannot be removed by hand.
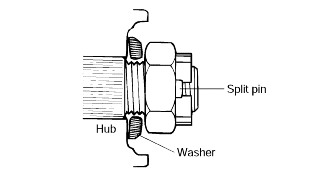
Position the washer so that the convex side faces outside and install the castle nut and split pin.
Replace the self-locking nuts and split pin with new ones after removal.
Tighten the following parts to the specified torque.
Driveshaft castle nut : 200~280 (2000~2800, 148~207) |
Lower arm ball joint to knuckle : 100~120 (1000~1200, 74~88) |
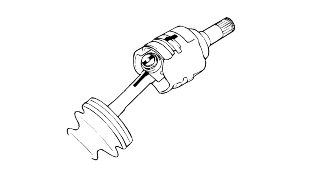
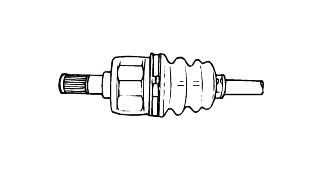
Check the driveshaft boots for damage and deterioration.
Check the splines for wear and damage.
Check the ball joints for wear and operating condition.
Check the driveshaft spline part for wear or damage.
Check for entry of water and/or foreign material into B.J.
Check the spider assembly for roller rotation, wear or corrosion.
Check the groove inside T.J. case for wear or corrosion.
Check the drivshaft spline part for wear or damage.
Check for entry of water and/or foreign material into A.C.
Check the tripod assembly for roller rotation, wear or corrosion.
Check the groove inside tulip for wear or corrosion.
The driveshaft joint requires special grease. Do not substitute with another type of grease.
The boot band should be replaced with new one.
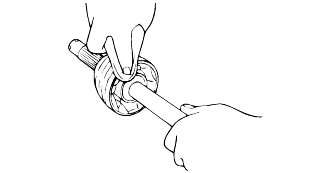
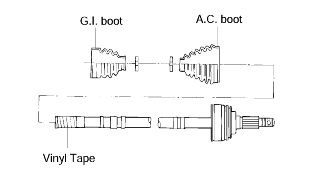
Remove the D.O.J. and B.J. boot bands.
Be careful not to damage the boot.
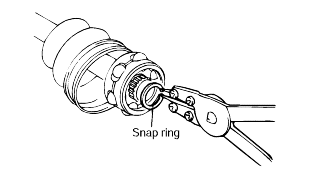
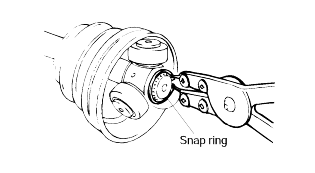
Remove the circlip, then remove the D.O.J. outer race.
Remove the snap ring, then remove the D.O.J. inner race, the D.O.J. cage, and the balls as a unit.
Clean the D.O.J. inner race, the D.O.J. cage, and the balls, without disassembling them.
Be careful that the balls do not drop out of the cage.
If the balls drop out, press them back into the D.O.J. cage with the D.O.J. inner race.
Wipe the grease off the spline portion.
Remove the D.O.J. boot and B.J. boot.
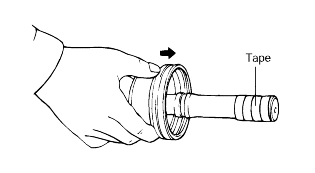
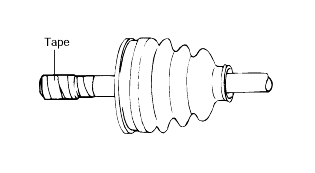
If the boots can be reused, wrap vinyl tape around the driveshaft splines so that the boots are not damaged when they are removed.
Do not disassemble the B.J.
Do not disassemble the spider assembly.
The driveshaft joint requires special grease. Do not substitute with another type of grease.
The boot band should be replaced with a new one.
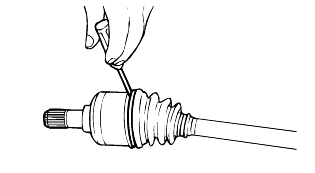
Remove the T.J. boot bands and pull the T.J. boot from the T.J. case.
Be careful not to damage the boot.
Remove the snap ring and spider assembly from the driveshaft.
Clean the spider assembly.
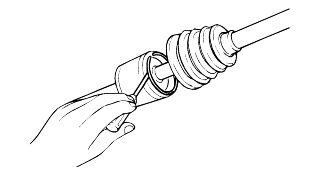
Remove the B.J. boot bands and pull out the T.J. boot and B.J. boot.
If the boot is to be reused, wrap tape around the driveshaft splines to protect boot.
Do not disassemble the tripod assembly.
Special grease must be applied to the driveshaft joint.
The boot clamp should be replaced with a new one.
The boot should be replaced with a new one.
Using a side cutter, cut the G.I. and A.C. big clamps and remove them.
Using a brass bar and hammer, remove the G.I. and A.C. small clamps.
Place matchmarks on the tripod and tulip.
Do not punch the mark.
Remove the tulip assembly from the driveshaft.
Using a snap ring expander, remove the snap ring.
Place matchmarks on the tripod and joint shaft.
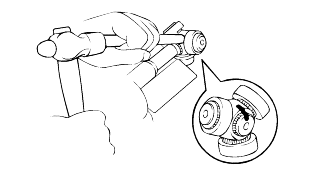
Using a brass bar and hammer, remove the tripod from the joint shaft.
Remove the A.C boot clamps and pull out the G.I. boot and A.C. boot.
Wrap tape around the driveshaft splines (T.J. side) to prevent damage to the boots.
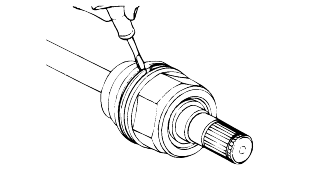
Apply grease to the driveshaft and install the boots.
Recommended lubricant : |
B.J. Boot grease : CENTOPLEX 278M/136K T.J. Boot grease : KLK TJ41-182 |

Apply grease into the T.J. boot and install the boot.
T.J. boot grease gr. : |
2.0L A/T |
In the joint : 75 ± 3 |
In the boot : 45 ± 3 |

Add specified grease to the B.J. as much as wiped away at the time of inspection.
Install the boots.
Tighten the B.J. boot bands.
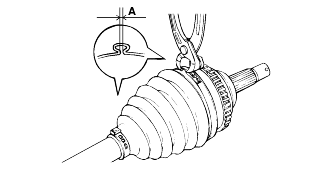
To control the air in the T.J. boot, keep the specified distance between the boot bands when they are tightened.
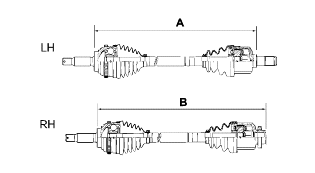
Standard value (A) | mm (in.) |
LH side : 524.2 ± 2 (20.64 ± 0.08) RH side : 542.7 ± 2 (21.37 ± 0.08) | |
Tighten the T.J. boot bands.
Wrap tape around the driveshaft splines (G.I. side) to prevent damage to the boots.
Before installing the boots, place a new clamps to the small boot ends and install them to the driveshaft.
After aligning the matchmark, place the beveled side of the tripod axial spline toward the A.C. joint.
Using suitable tool and hammer, tap in the tripod to the driveshaft.
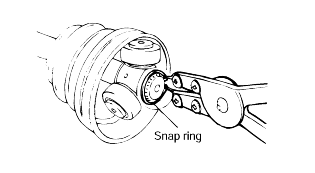
Install new snap ring.
Add specified grease to the A.C. joint and boot, as much as was removed at the time of inspection.
CENTURY |
Grease quantity (gr.) : 185 |
Apply specified grease to the G.I. joint and boot.
One luber GKN |
Grease quantity (gr.) : 175 |
Align the matchmarks and install the G.I. joint to the shaft.
Install the boots.
Make sure that 2 boots are on the shaft groove.
Make sure that the 2 boots are not stretched.
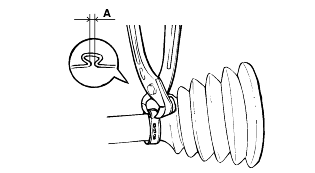
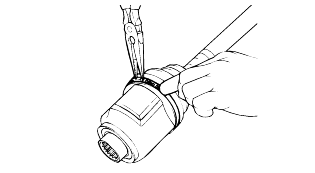
Position the holes in the clamp's free end to the closing hooks.
Using pliers, secure the clamps.
Clearance (A) A.C. big clamp : 2.0 mm (0.079 in.) or less A.C. small clamp : 1.8 mm (0.071 in.) or less |
To control air in the G.I. boot, keep the specified distance between the boot clamps when they are tightened.
Standard value (A, B) | mm (in.) | |||
LH side | RH side | |||
2.5L A/T | 524.1 (20.63 ± 0.08) | 543.6 (21.4 ± 0.08) | ||
3.0L A/T / 3.5L A/T | 517.5 (20.39 ± 0.08) | 533.6 (21.01 ± 0.08) | ||
Holding the G.I. big clamp near the closing hook, using long noise pliers, position the hole in the clamps free end over the closing hook.
Secure the clamp by drawing the closing hooks together.
Using pliers, secure the G.I. small clamp.
Clearance (A) G.I. small clamp : 1.6 mm (0.063 in.) or less |