Control item | Input | Output | Remarks |
Required discharge temperature control | Auto SW, A/C SW, TEMP SW, INCAR sensor, AMB sensor, Photo sensor, Water temperature sensor, thermo sensor, TEMP actuator. | TEMP actuator | |
Mode control | AUTO SW, MODE SW, TEMP SW, DEF SW, Blower SW, OFF SW, INCAR sensor, AMB sensor, Photo sensor, Water temperature sensor, thermo sensor, Power TR. | Blower motor Power TR HI-blower relay | Blower Switch Manual selection Control in priority |
Mode door control | AUTO SW, MODE SW, DEF SW, Blower SW, OFF SW, TEMP SW, INCAR sensor, AMB sensor, Photo sensor. | Mode actuator | |
Intake control | AUTO SW, A/C SW, DEF SW, TEMP SW, OFF SW, Intake SW, INCAR sensor, AMB sensor, Photo sensor, Power TR. | Mode actuator | |
Compressor control | AUTO SW, A/C SW, DEF SW, TEMP SW, OFF SW, IN-CAR sensor, AMB sensor, Photo sensor | Compressor relay |
During mode control, the A/C may operate during DEF or MIX mode. In order to enable dehumidification, the driver may select A/C OFF during theA/C on condition.
Control item | Control features | Remarks |
Required discharge temperature | Required temperature determined by the set temperature and the inputted sensor value. | |
Auto control | Required discharge temperature is determined by the set temperature and the inputted sensor value. The feature will use the required discharge temperature to perform the auto control of temp. actuator, mode actuator, intake actuator, blower motor and compressor, and maintain the set temperaturestably. | |
IN-CAR temperature correction | Upon detecting rapid changes of temperature from the INCAR sensor, it will gradually correct the incar temperature value. | - 1°C UP/4sec delay - 1°C DOWN/4sec delay |
AMB temperature correction | Upon detecting rapid changes of temperature from the AMB sensor, it will gradually correct the ambient temperature value. | - 1°C UP/3min delay - 1°C DOWN/4sec delay |
Photo correction | Upon detecting rapid changes of photo intensity from the PHOTO sensor, it will gradually correct the photo intensity value. | - 350→1000(W/m²)/1min delay - 350→1000(W/m²)/5min delay |
TEMP door control | It does the automatic control to maintain the optimum TEMP door opening (0%-100%). It will be computed by the temperature set and the input signalfrom each sensor. | The set temperature range 17°C→32°C, 0.5°C step (62°F→90°F, 1°F step) |
Blower speed | Automatic control of the blower speed. The target value will be computed by the set temperature and the input signal from each sensor. (7 levels maybe selected in case of manual selection.) | - Auto mode blower low voltage (Manual low voltage: 3.8) - Auto mode heater blower HI speed: 10.6V |
Electro-motive mode control | During auto control, it will raise the permitted voltage of blower motor gradually in order to improve comfortability. | 6 seconds for shifting LO→MAX HI |
Photo compensation | During auto control, it will compensate the blower level and the discharge temperature according to the photo intensity detected from the PHOTO sensor.PHOTO compensation will begin after 5 seconds when ignition on. | |
Mode door control | Automatic control of air discharge based on the required discharge temperature. It will be computed by the temperature setting and the input signal from each sensor. (VENT→B/L→FLOOR→VENT) In case of manual selection (VENT→B/L→FLOOR→MIX→VENT) | - At OFF, MODE door will fix the current condition. - At OFF in manual mode, MODE door will maintain the manual control condition. |
MIX mode control (in auto control) | If the ambient temperature is -13°C or less in AUTO mode, discharge mode will be controlled at MIX. (When front window glass is defogged.) | Entering MIX mode, A/C will operate. |
INTAKE door control | Auto control of intake mode based on the required discharge temperature that will be computed by the temperature setting and the input signal fromeach sensor. | - Shift to REC when selecting REC button at FRE condition (LED on). - Shift to FRE when selecting FRE button at REC condition (LED off). |
INTAKE control at OFF | The intake door will fix to the FRE. position when switching the system off. | - FRE./REC. manual selection will be enabled at OFF - REC indicator will come out at OFF. |
Compressor auto control | Control automatically the compressor on/off state corresponding to the set temperature and the input signal from each sensor. | - When selection the AUTO SW, the compressor is controlled to ON/OFF. - When selection the DEF SW, the compressor is controlled to "ON". |
Compressor clutch on/off control based on refrigerant temperature | If EVAP sensor temperature is below than 0.5°C, the compressor will be ON and the temperature is 3°C, or higher, with the compressorOFF. | |
MAX HOT | When selecting the set temperature 32°C at AUTO mode, MAX HOT will be performed. It will prevail over MIX mode control. | - TEMP door: MAX HOT - MODE door: FLOOR mode - INTAKE door: FRE mode - Compressor: OFF - Blower speed: AUTO HI(10.6V) |
MAX COOL | When selecting the set temperature 17°C at AUTO mode, MAX COOL will be performed. | - TEMP door: MAX COOL - MODE door: FLOOR mode - INTAKE door: REC mode - Compressor: On - Blower speed: MAX HI |
Electromotive heating control | If the ambient temperature is 5°C or more and the in-car temperature is 10°C or less than the ambient temperature at B/L or FLOOR in AUTO mode, it will effect the electromotive heating control to prevent outside cold airfrom flowing toward the feet of passengers. | - Blower speed: Controlled at AUTO LOW (4.5V) |
As the coolant temperature rises, the MODE door will shift to DEF→AUTO. | Operation release ● In-car temp. > ambient +10°C ● Max cool ● In pressing MODE switch. ● In pressing DEF switch. | |
MODE: Manual selection is enabled. INTAKE door: At AUTO control or at manual selection mode. | ||
Blower speed: Manual selection is enabled (No re-entry). | ||
Electromotive cooling control | In order to prevent hot air from the VENT or B/L in AUTO mode (A/C on mode blower auto ), the blower speed will be operated at LOW for approx. 9 seconds before entering the AUTO control if the EVAP sensor detectionis temperature 30°C or higher. | |
MAX HOT | If the above condition is satisfied, electromotive cooling control will operate at any time. | |
Air Quality System (AQS) | The AQS system will detect the hazardous elements and odors contained in the air. If the harmful element concentration is higher than standard,the system will output a LOW signal (1.0V or less) to the FATC. | - When the initial battery connection and ignition is ON, it will operate at AUTO mode. (AQS will not operate.) |
If the concentration is within the standard value, the system will output a HI signal (4V) the FATC. | - When IGN 2 ON, the AQS assembly will be preheated for 34.5±5seconds. | |
Corresponding to the signal from the AQS, it will control the INTAKE door as follows to prevent the inflow of harmful gas in FATC: | - IGN2 ON: It will check circuit break on the AQS assembly's signal line for approx. 7 seconds during the preheating, irrespective to the AQS switchcondition. | |
Condition | INTAKE door position | - When AQS is selected prior to IGN2 OFF and IGN2 is turned OFF→ON: AQS indicator will come on, and the system will operate at AQS mode. (Storethe previous condition before IGN 2 OFF) |
LOW | REC | |
HI | FRE | |
Initialization Upon battery-on | When supplying the initial power, it will operate in the initial condition. | - When the initial ignition ON after battery connection, the system will operate at the set temperature 25°C and at AUTO mode. |
Memory | When removing ignition key, it will store FATC's operating condition | - When IGN ON after IGN OFF during FATC operation, the system will operate at the previous before the ignition off. |

A/C system is turned OFF during self diagnosis. The result of self diagnosis is displayed using 2 digits of the temperature display.
Diagnostic trouble codes are displayed during self diagnosis. However, after diagnosis is complete, relevant data is not stored in memory.
Self diagnosis of photo sensor is performed using a light bulb over 60W placed within 40cm with sun load applied.
Without sun load, photo sensor error code displays.
DTC code | Detection item | Trouble area |
00 | Normal | ● Incar sensor ● Harness or connector between incar sensor and A/C control assembly ● A/C control assembly |
11 | Open INCAR Sensor circuit | |
12 | Shorted INCAR Sensor circuit | |
13 | Open Ambient sensor circuit | ● Ambient sensor ● Harness or connector between ambient sensor and A/C control assembly. ● A/C control assembly. |
14 | Shorted Ambient sensor circuit | |
17 | Open evap. sensor | ● Evap. sensor ● Harness or connector between evap. sensor and A/C control assembly ● A/C control assembly |
18 | Shorted evap. sensor | |
19 | Open or shorted temp. door potentiometer | ● Harness or connector between temp. door potentiometer and A/C control assembly |
20 | Defective temp. door potentiometer | ● Temp. door potentiometer |
NO. | Item | Description | Fail-safe |
1 | INCAR SENSOR | Short/open circuit of IN CAR SENSOR | Once diagnosis is occurs, system is regarded as 25°C constant |
2 | AMBIENT SENSOR | Short/open circuit of AMBIENT SENSOR | Once diagnosis is occurs, system is regarded as 20°C constant. |
3 | EVAPORATOR TEMP. SENSOR | Short/open circuit of EVAPORATOR TEMP. SENSOR | Once diagnosis is occurs, system is regarded as -2°C constant |
4 | TEMP. DOOR POTENTIOMETER | Short/open circuit of TEMP. DOOR POTENTIOMETER | ● 17°C constant → when 24.5°C : MAX COOL ● 25°C constant → when 32°C : MAX HOT |
Symptoms | Causes | How to check |
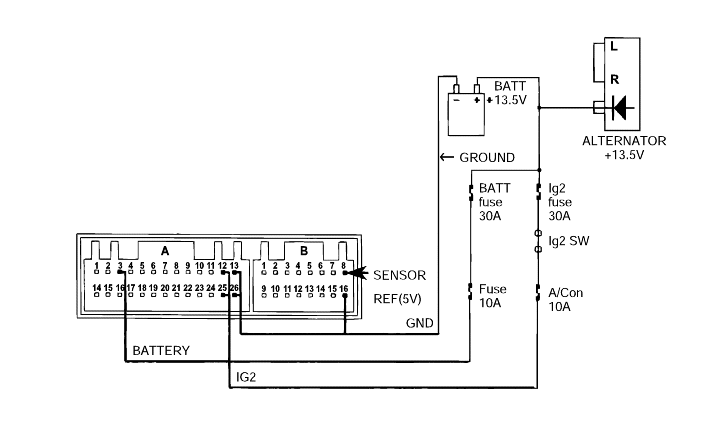
When IF is ON, memory function error occurs | Battery power supply error | Check voltage of battery after turning off IG. If 10V and more, check FATC connector and if no problem, check the inside of controller. If 10V andless, check fuse or wiring state of battery power source. |
When IG is ON, system running error occurs. | IG2 power supply error | Check voltage of IG2 after turning on IG. If 10V and more, check FATC connector and if no problem, check the inside of controller. If 10V and less,check fuse or wiring state of IG2 power source. |
Symptoms | Causes | How to check |
When light switch is ON, partial error occurs in back light. | Light bulb lighting error in FATC | |
When light switch is ON, entire error occurs in back light. | Light power supply error | Measure voltage of tail light shown in the above figure after switching on light. If 10V and more, check FATC connector and if no problem, measure signal voltage of reostart shown in the above figure. If 8V and more, checkreostart wiring and reostart. |
If tail light is below 1V, check tail light wiring. |

Symptoms | Causes | How to check |
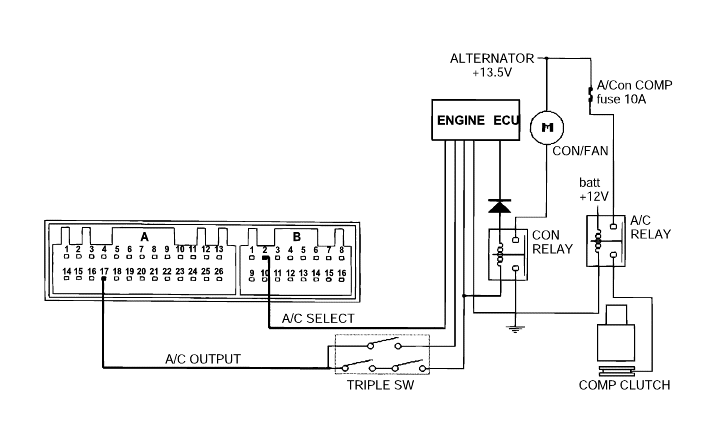
Wind of air conditioner isn't discharged into vehicle despite switching on air conditioner. | Signal output error of air conditioner | Switch on air conditioner and measure voltage of FATC connector A-17 terminal as shown in the above figure. If 9V and more, check triple switch,air conditioner relay and ECM. |
Switch on air conditioner and measure voltage of FATC connector A-17 terminal as shown in the above figure. If 1V and less, check input value ofevaporator sensor. | ||
Input error of evaporator sensor | If evaporator sensor is disconnected or short or voltage of its input source is more than 3.0V (below 0.5°C), output of air conditioner isn'tmade. |
Symptoms | Causes | How to check |
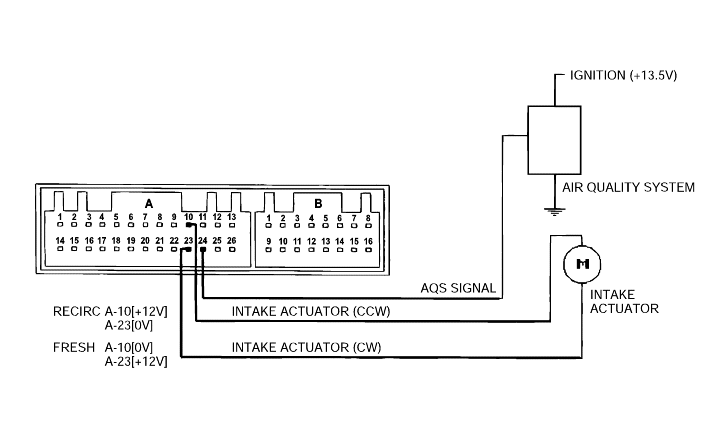
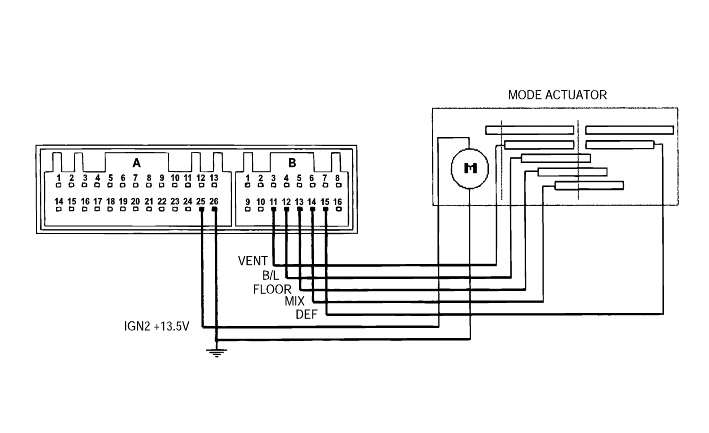
Outdoor mode running error | Power supply error in actuator | Separate connector linked with actuator, select outdoor mode with indoor switch and measure voltage of FATC connector A-23 terminal. If 8V and more, check actuator or wiring state and if 9V and less, check the inside of controller. |
Indoor mode running error | Power supply error in actuator | Select indoor mode in the above method and measure voltage of FATC connector A-10 terminal. If 8V and more, check actuator or wiring state and if 9V andless, check the inside of controller. |
Fixed in outdoor or indoor mode at AQS selection. | AQS signal terminal output error | Select AQS switch and measure AQS signal terminal as shown in the above figure. If there is no change of voltage over 10 min, check AQS. |
Symptoms | Causes | How to check |
Specific mode isn't selected. | Signal transmission error of selected mode | Measure voltage of selected mode wiring without separating connector linked with actuator. If 8V and more, check the inside of controller. |
Mode actuator running error | If 1V and less at measuring in the above method, check mode actuator and wiring state. | |
Mode selection is impossible | Internal error of mode actuator | If motor driver IC built in mode actuator is bad, mode selection is impossible. When mode isn't selected though GND(0V) is supplied for selected mode wiring after selecting mode in controller, its cause is internal failureof mode actuator. |
If setup temperature is 17°C to 24.5°C, set to MAX COOL.
If setup temperature is 25°C to 32.0°C, set to MAX WAR.
Symptoms | Causes | How to check |
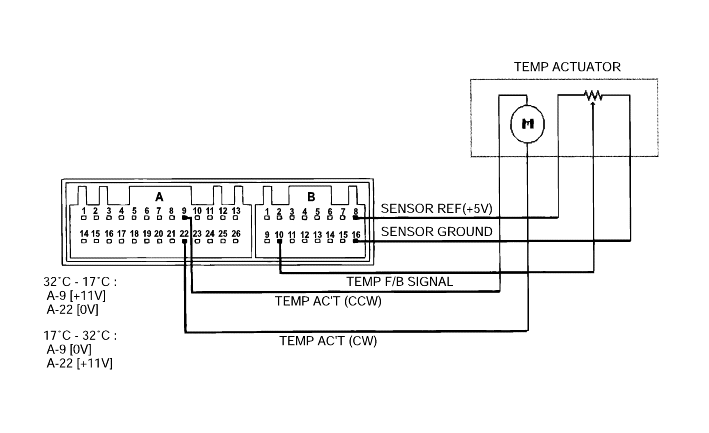
Temp actuator running error | Power supply error in temp actuator | After altering 17°C to 32°C and adversely, measure voltage of A-22 terminal. If Both of them are 9V and more, check temp actuator and peripheral wiring state and if one or both of them are 5V and less, its cause is internalfailure of FATC. |
Sensor (+5) power supply error | If automatic control isn't operated smoothly, measure voltage of FATC connector B- 8 terminal. If under 4.8V or over 5.2V, its cause is internalfailure of FATC. | |
Driver error of temp actuator | If No. 20 is outputted as a result of self-diagnostic, check temp actuator driver. |
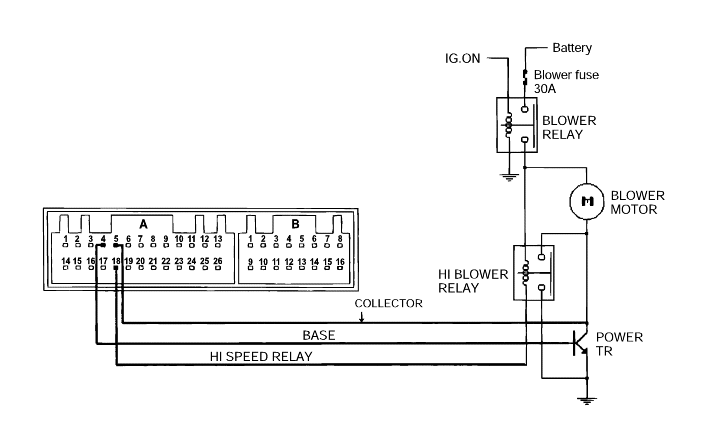
Symptoms | Causes | How to check |
Amount of wind is wrong at manual selection of blower. | Power TR error | Check voltage of blower motor's both ends. (Level 1 : 3.8V, Level 2 : 5.2V, Level 3 : 6.5V, Level 4 : 7.9V, Level 5 : 9.2V, Level 6 : 10.6V,Level 7 :13.5V [high-relay operation]) Measure voltage of each terminal and if there is difference more than ±0.6V, check power TR. |
Blower wind is discharged despite pressing OFF switch. | Power TR error | Power TR change |