5.
Read "DTC Status" parameter.
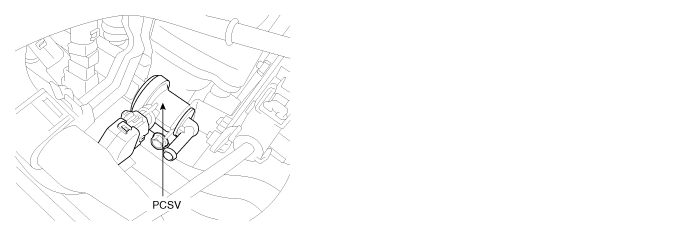
The purge solenoid is a pneumatic device that meters the air and fuel (purge) vapor flow to the purge port. In a sense, the purge solenoid is comparable to a fuel injector, because the metered purge flow follows the same slope and offset characteristics. However, the purge solenoid normally runs with a duty cycle at a fixed frequency because the opening response is significantly slower than a fuel injector. It would not practical to run the solenoid synchronously with engine events except perhaps at very low RPM. The normal frequencies for the purge solenoid are between 8 and 20 Hz.
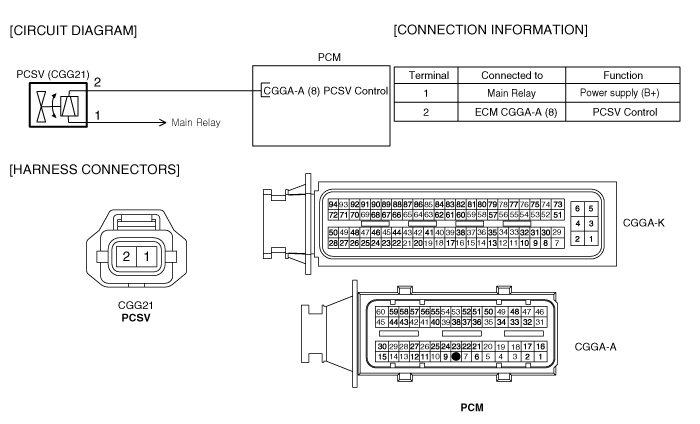
If there is Open in PCSV circuit, PCM sets DTC P0444.
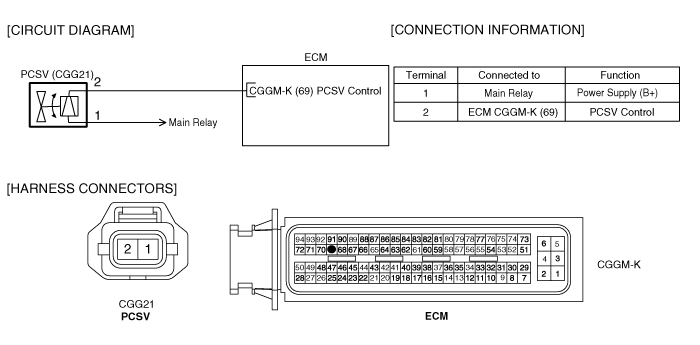
Item | Detecting Condition | Possible Cause |
DTC Strategy | ● Circuit continuity check, open | ● Poor connection ● Open or Short to ground in power circuit ● Open in control circuit ● PCSV |
Enable Conditions | ||
Threshold Value | ● Disconnected | |
Diagnostic Time | ● Continuous | |
MIL ON Condition | ● 2 driving cycle |
Temperature [℃ (℉)] | Coil Resistance (Ω) |
20 (68) | 16.0 |
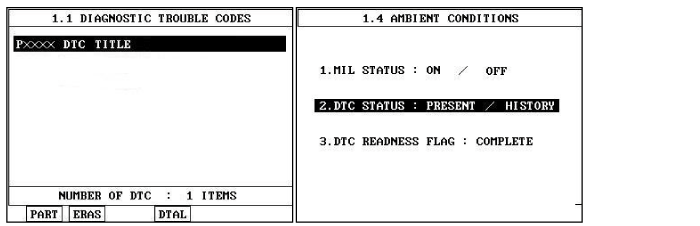
Connect scantool to Data Link Connector(DLC).
IG "ON".
Select "Diagnostic Trouble Codes(DTCs)" mode, and then Press F4(DTAL) to check DTC'sinformation from the DTCs menu
Confirm that "DTC Readiness Flag" indicates "Complete". If not, drive the vehicle within conditionsnoted in the freeze frame data or enable conditions noted in the DTC detecting condition.
Read "DTC Status" parameter.
Is parameter displayed "History(Not Present) fault"?
History fault : DTC occurred but has been cleared.
Present fault : DTC is occurring at present time.

▶ Fault is intermittent caused by poor contact in the sensor’s and/or ECM’s connector or wasrepaired and ECM memory was not cleared. Thoroughly check connectors for looseness,poor connection, bending, corrosion, contamination, deterioration, or damage.Repair or replace as necessary and then go to "Verification of Vehicle Repair" procedure.

▶ Go to "Terminal & Connector Inspection" procedure
Many malfunctions in the electrical system are caused by poor harness and terminals. Faults can also be caused by interference from other electrical systems, and mechanical or chemical damage.
Thoroughly check connectors for looseness, poor connection, bending, corrosion, contamination, deterioration, or damage.
Has a problem been found?
▶ Repair as necessary and go to "Verification of vehicle Repair" procedure.
▶ Go to "PCSV circuit inspection" procedure.
Key "OFF".
Disconnect PCSV connector.
key "ON".
Measure the voltage between terminal 1 of PCSV harness connector and chassis ground.
Specification : B+
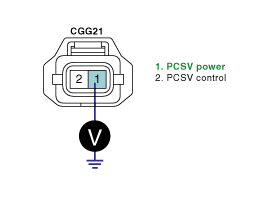
Is the measured voltage within specification ?
▶ Go to "Control circuit inspection" procedure.
▶ Repair Open or Short to ground circuit and then, go to "Verification of Vehicle Repair" procedure.
Key "OFF".
Disconnect PCSV connector.
Key "ON".
Measure the voltage between terminal 2 of PCSV harness connector and chassis ground.
Specification : Approx 3.5V
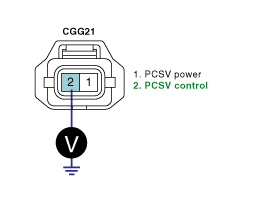
Is the measured voltage within specification?
▶ Go to "Component inspection" procedure.
▶ Repair Open circuit and then, go to "Verification of Vehicle Repair" procedure.
PCSV check.
Key "OFF".
Disconnect PCSV harness connector.
Measure the resistance between terminal 1 and 2 of PCSV harness connector.(Component side)
Temperature [℃ (℉)] | Coil Resistance (Ω) |
20 (68) | 16.0 |
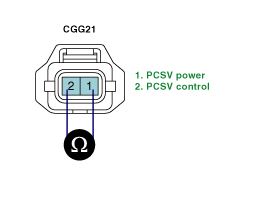
Is the measured resistance within specification?
▶ Many malfunctions in the electrical system are caused by poor harness(es) and terminals. Faults can also be caused by interference from other electrical systems, and mechanical or chemical damage. So, check poor connections and the related circuit between ECM and component thoroughly. Repair as necessary and go to "Verification of Vehicle Repair" procedure.
▶ Substitute with a known-good PCSV and check for proper operation. If the problem is corrected, replace PCSV and then go to "Verification of Vehicle Repair" procedure
After a repair, it is essential to verify that the fault has been corrected.
Connect scan tool and select "Diagnostic Trouble Codes(DTCs)" mode.
Press F4(DTAL) and confirm that "DTC Readiness Flag" indicates "Complete".
If not, drive the vehicle within conditions noted in the freeze frame data or enable conditions.
Read "DTC Status" parameter.
Is parameter displayed "History(Not Present) fault"?
▶ System performing to specification at this time. Clear the DTC.
▶ Go to the applicable troubleshooting procedure.
