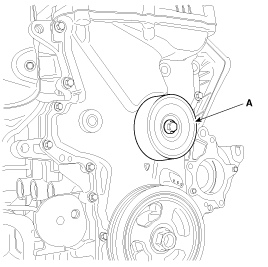
Installation
1.

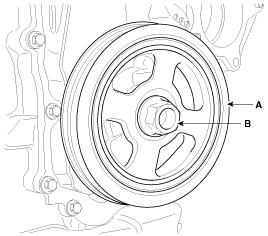
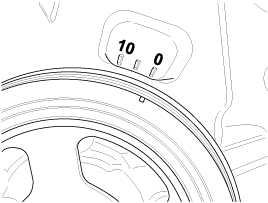
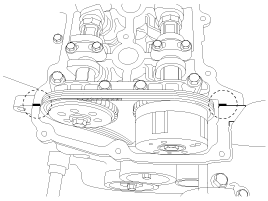
Align the timing marks of the camshaft sprocket with the upper sureface of the cylinder head to make No.1 cylinder be positioned at TDC.
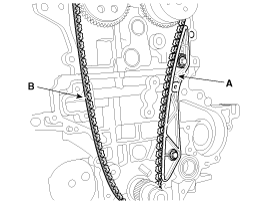
(1)

Check the dowel pin of the crankshaft for facing upside of the engine at this monent.
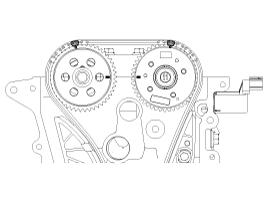
(2)

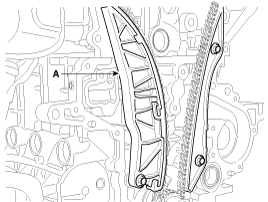
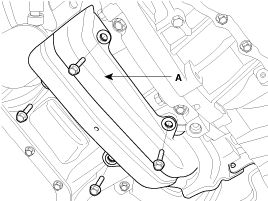
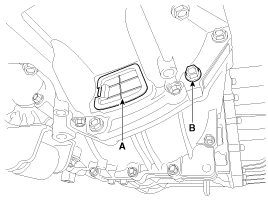
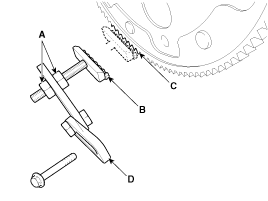
Install the timing chain guide (A).

Tightening torque :

9.8 ~ 11.8 N.m (1.0 ~ 1.2 kgf.m, 7.2 ~ 8.7 lb-ft)

(3)

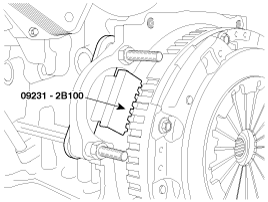
When installing a timing chain, align the timing marks on the sprockets with paint marks of the chain.

Order : Crankshaft sprocket → Timing chain guide → Intake camshaft sprocket → Exhaust camshaft sprocket.

2.

Install the chain tensioner arm (A).

Tightening torque :

9.8 ~ 11.8 N.m (1.0 ~ 1.2 kgf.m, 7.2 ~ 8.7 lb-ft)

3.

Install the hydraulic tensioner (A) and remove the pin (B).

Tightening torque :

9.8 ~ 11.8 N.m (1.0 ~ 1.2 kgf.m, 7.2 ~ 8.7 lb-ft)

note

Recheck the top dead center(TDC) marks on the crankshaft and camshaft.

4.

Install the timing chain cover (A).

(1)

Before installing, remove the hardened sealant from the cylinder block and ladder frame surface.

(2)

Apply the liquid gasket (THREE BOND 1217H) on the mating surface of the cylinder head assembly and the cylinder block.

Width: 3.0 ~ 5.0mm (0.1181~0.1969in.)

(3)

Apply the liquid gasket (THREE BOND 1282B or THREE BOND 1216E) on the water pump contact parts of the timing chain cover (A) and THREE BOND 1217H or LOCTITE 5900H on the rest parts (B). Reassemble the cover within 5 minutes.

Width: 3.5 ~ 4.5mm (0.1378~0.1772in.)

(4)

Align the dowel pin of the cylinder block and the holes of the oil pump.

Tightening torque :

12mm bolts - 18.6 ~ 23.5 N.m (1.9 ~ 2.4 kgf.m, 13.7 ~ 17.4 lb-ft)

10mm bolts - 9.8 ~ 11.8 Nm (1.0 ~ 1.2 kgf.m, 7.2 ~ 8.7 lb-ft)

caution

After the installation, do not crank engine or apply pressure on the cover for half an hour.

5.

Using the SST(09455-21200), reassemble the timing chain oil seal (A).

6.

Install the crankshaft pulley (A).

Tightening torque :

127.5 ~ 137.3 N.m (13.0 ~ 14.0 kgf.m, 94.0 ~ 101.3 lb-ft)

note

There are two methods to hold the ring gear when installing or removing the crankshaft damper pulley.

Install the SST (09231-2B100) to hold the ring gear after removing the starter.

Install the SST (09231-3D100) to hold the ring gear after removing the dust cover.

1.

Remove the bracket (A).

2.

Remove the dust cover (A) on the bottom of the ladder frame and unfasten the transaxle mounting bolt (B).

3.

Adjust the length of the holder nuts (A) so that the front plate of the holder (B) puts in the ring gear (C) teeth.

4.

Adjust the angle of the links (D) so that the bolt 70mm (2.7559in.) can be fastened to the original mounted hole.

5.

Install the SST (09231-3D100) using the mounting bolts and spacers. Tighten the bolts and nuts of the holder and links securely.

note

When installing the pulley, the groove on the pulley should be positioned outside.

7.

Install side cover.

Tightening torque :

8.8 ~ 10.8 N.m (0.9 ~ 1.1 kgf.m, 6.5 ~ 8.0 lb-ft)

8.

Install the front right wheel and tire.

9.

Before installing the cylinder head cover, remove oil, dust or hardened sealant from the timing chain cover and the cylinder head upper surface.

10.

After applying the liquid gasket, THREE BOND 1217H or LOCTITE 5900H on the cylinder head cover, reassemble the cover within five minutes.

Width: 2.0 ~ 2.5mm (0.0787~0.0984in.)

11.

Install the cylinder head cover (A) with a new gasket (B).

caution

Do not reuse the disassembled gasket.

12.

Tighten the cylinder head cover bolts with the order and steps.

Tightening torque :

1st step - 3.9 ~ 5.9 N.m (0.4 ~ 0.6 kgf.m, 2.9 ~ 4.3 lb-ft)

2nd step - 7.8 ~ 9.8 N.m (0.8 ~ 1.0 kgf.m, 5.8 ~ 7.2 lb-ft)

13.

Install the ignition coils (A).

Tightening torque :

9.8 ~ 11.8 N.m (1.0 ~ 1.2 kgf.m, 7.2 ~ 8.7 lb-ft)

14.

Install the positive crankcase ventilation(PCV) hose (A) and the positive and PCSV hose (B).

15.

Connect the ignition coil connector (A) and the breather hose (B).

16.

Install the drive belt idler (A).

Tightening torque :

42.2 ~ 53.9 N.m (4.3 ~ 5.5 kgf.m, 31.1 ~ 39.8 lb-ft)

17.

Install the water pump (A) with a gasket.

Tightening torque :

9.8 ~ 11.8 N.m (1.0 ~ 1.2 kgf.m, 7.2 ~ 8.7 lb-ft)

18.

Install the water pump pulley (A).

Tightening torque :

9.8 ~ 11.8 N.m (1.0 ~ 1.2 kgf.m, 7.2 ~ 8.7 lb-ft)

19.

Install the engine support bracket (A).

Tightening torque :

29.4 ~ 41.2 N.m (3.0 ~ 4.2 kgf.m, 21.7 ~ 30.4 lb-ft)

20.

Install the alternator bracket.

Tightening torque :

19.6 ~ 26.5 N.m (2.0 ~ 2.7 kgf.m, 14.5 ~ 19.5 lb-ft)

21.

Supporting the engine with a jack, install the engine mounting bracket (A) and the ground line (B).

Tightening torque :

Bolt(C) - 58.8 ~ 83.4 N.m (6.0 ~ 8.5 kgf.m, 43.4 ~ 61.5 lb-ft)

Bolt, nuts(D,E) - 49.0 ~ 58.8 N.m (5.0 ~ 6.0 kgf.m, 36.2 ~ 43.4 lb-ft)

Bolt(F) - 9.8 ~ 11.8 N.m (1.0 ~ 1.2 kgf.m, 7.2 ~ 8.7 lb-ft)

22.

Install the alternator (A).

Tightening torque :

12mm bolts - 19.6 ~ 26.5 N.m (2.0 ~ 2.7 kgf.m, 14.5 ~ 19.5 lb-ft)

10mm bolts - 29.4 ~ 41.2 N.m (3.0 ~ 4.2 kgf.m, 21.7 ~ 30.4 lb-ft)

23.

Install the drive belt (A).

24.

Adjust tension by tightening the alternator tension adjust bolt (A). (Refer to Charging system in EE Group).

Tension

New belt: 882.6 ~ 980.7N (90 ~ 100kg, 198.4 ~ 220.5lb)

Used belt: 637.4 ~ 735.5N (65 ~ 75kg, 143.3 ~ 165.3lb)

Яндекс.Метрика