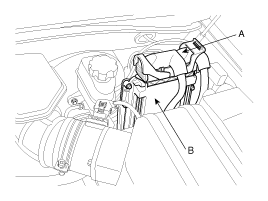
Disconnect the ECM connector (A).

After replacing ECM, MUST input the injector specific data (7 digits) of each cylinder into a new ECM with scan tool.
In the case of the vehicle equipped with immobilizer, perform "KEY TEACHING" procedure together (Refer to "IMMOBILIZER" in BE group).
Turn ignition switch OFF and disconnect the negative (-) battery cable.
Disconnect the ECM connector (A).

Unscrew the ECM bracket mounting bolts and then remove the ECM (B).
Install a new ECM.
ECM installation bolts (on bracket):
7.8 ~ 11.8 N.m (0.8 ~ 1.2 kgf.m, 5.8 ~ 8.7 lb-ft)
ECM bracket installation bolts/nuts:
3.9 ~ 5.9 N.m (0.4 ~ 0.6 kgf.m, 2.9 ~ 4.3 lb-ft)
Perform "Injector Specific Data Input" procedure (Refer to "INJECTOR" in this group).
Perform "Key Teaching" procedure (Refer to "IMMOBILIZER" in BE group).
TEST ECM GROUND CIRCUIT: Measure resistance between ECM and chassis ground using the backside of ECM harness connector as ECM side check point. If the problem is found, repair it.
TEST ECM CONNECTOR: Disconnect the ECM connector and visually check the ground terminals on ECM side and harness side for bent pins or poor contact contact pressure. If the problem is found, repair it.
If problem is not found in Step 1 and 2, the ECM could be faulty. If so, replace the ECM with a new one, and then check the vehicle again. If the vehicle operates normally then the problem was likely with the ECM.
RE-TEST THE ORIGINAL ECM : Install the original ECM (may be broken) into a known-good vehicle and check the vehicle. If the problem occurs again, replace the original ECM with a new one. If problem does not occur, this is intermittent problem (Refer to INTERMITTENT PROBLEM PROCEDURE in BASIC INSPECTION PROCEDURE)