1.
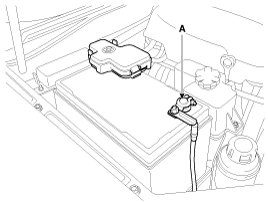
Disconnect the negative cable(A) from the battery.
Use fender covers to avoid damaging painted surfaces.
To avoid damage, unplug the wiring connectors carefully while holding the connector portion.
Mark all wiring and hoses to avoid misconnection.
Turn the crankshaft pulley so that the No.1 piston is at top dead center.
Disconnect the negative cable(A) from the battery.
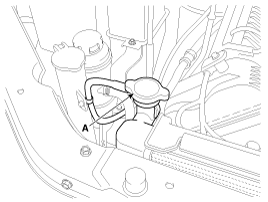
Loosen the drain plug and drain the engine coolant. Remove the radiator cap (A) to speed draining.
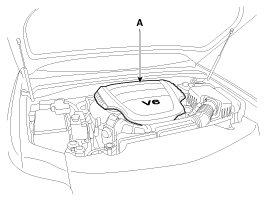
Remove the engine cover (A).
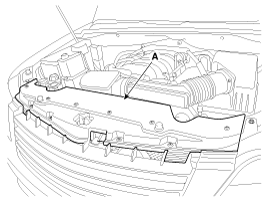
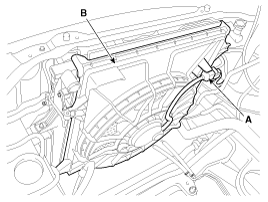
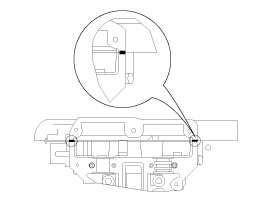
Remove the radiator grill upper guard (A).
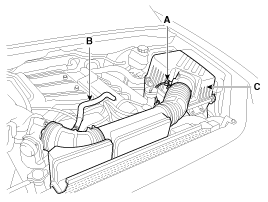
Disconnect the AFS connector (A) and breather hose (B) and then remove the air cleaner assembly (C).
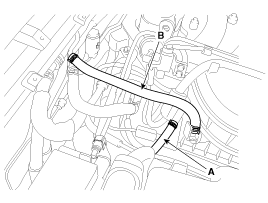
Disconnect the radiator upper hose (A) and lower hose (B).

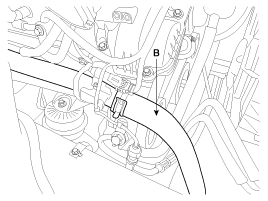
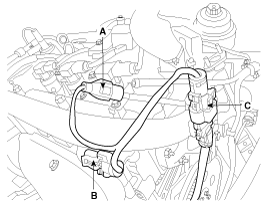
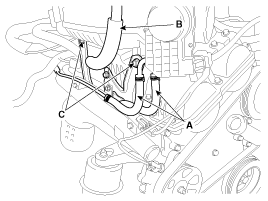
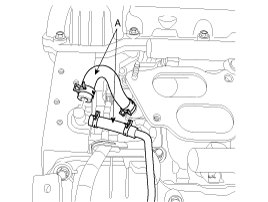
Disconnect the purge control solenoid valve (PCSV) hose (A) and the brake booster vacuum hose (B).
Disconnect the fan connector (A) and remove the cooling fan assembly (B).
Disconnect the engine wiring connectors.
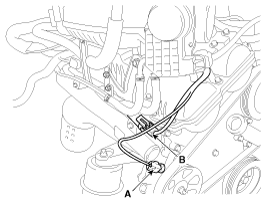
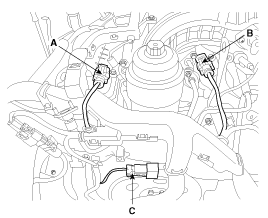
Disconnect the power steering oil pressure switch connector (A) and RH knock sensor connector (B).
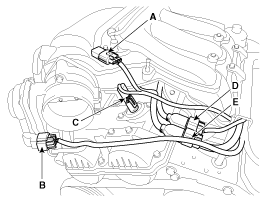
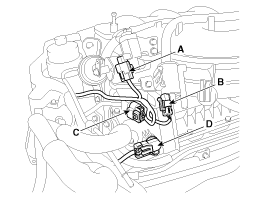
Disconnect the MAP sensor connector (A), ETC connector (B), RH exhaust OCV connector (C), RH injector connector (D) and RH ignition coil connector (E).
Disconnect the LH knock sensor connector (A), LH/RH intake OCV connector (B) and LH exhaust OCV connector (C).
Disconnect the LH injector connector (A) and LH ignition coil connector (B).
Disconnect the oil pressure switch connector (A) ,LH exhaust camshaft CMP sensor connector (B) and LH oxygen sensor connector (C).
Disconnect the LH intake camshaft CMP sensor connector (A), RH intake camshaft CMP sensor connector (B) and condenser connector (C).
Disconnect the VIS solenoid valve connector (A), PCSV connector (B), RH oxygen sensor connector (C) and the RH exhaust camshaft CMP sensor connector (D).
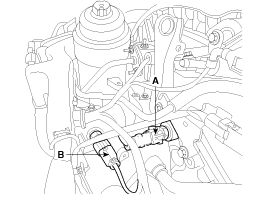
Disconnect the water temperature sensor connector (A) and oil temperature sensor connector (B).
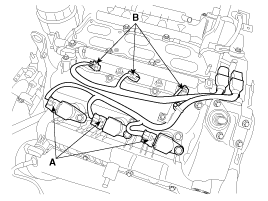
Disconnect the throttle body coolant hoses (A), breather hose (B) and loosen the surge tank stay bolts (C).
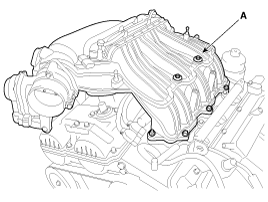
Remove the surge tank (A).
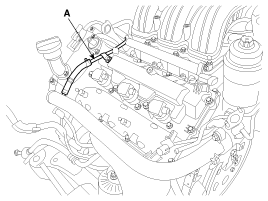
Remove the coolant pipe (A).
Disconnect the RH ignition coil connector (A) and the injector connector (B).
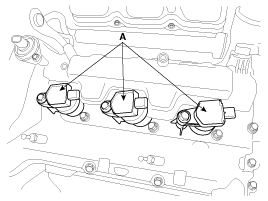
Remove the LH/RH ignition coils (A).
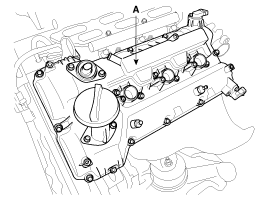
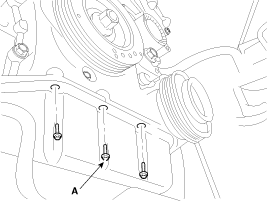
Remove the LH/RH cylinder head cover (A).
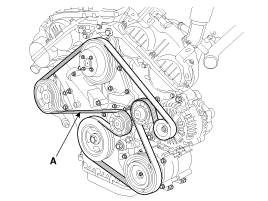
Remove the drive belt (A).
Remove the drive belt idler (A).
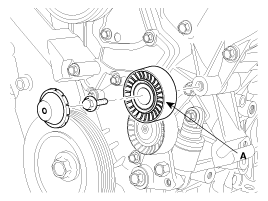
Remove the drive belt auto tensioner (A).
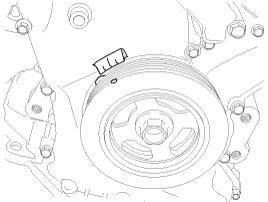
Remove the water pump pulley (A).

Set No.1 cylinder to TDC/compression.
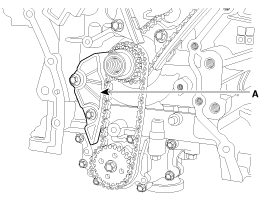
Turn the crankshaft pulley clockwise and align its groove with the timing mark "T" of the lower timing chain cover.
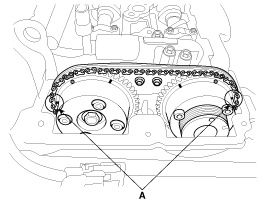
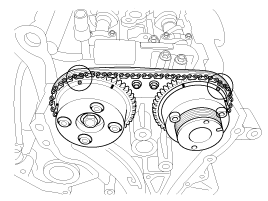
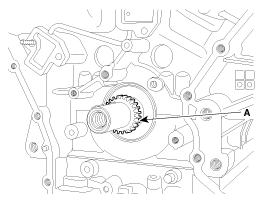
Check that the mark (A) of the camshaft timing sprockets are lined up on the cylinder head surface as shown in the illustration. If not, turn the crankshaft clockwise one revolution (360°).

Do not rotate engine counterclockwise.
Remove the lower oil pan (A).
Insert the blade of SST(09215-3C000) between the upper oil pan and lower oil pan. Cut off applied sealer and remove the lower oil pan.
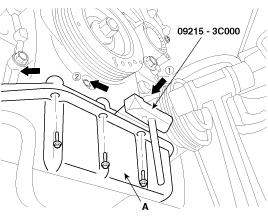
Insert the SST between the oil pan and the ladder frame by tapping it with a plastic hammer in the direction of arrow.
After tapping the SST with a plastic hammer along the direction of arrow around more than 2/3 edge of the oil pan, remove it from the ladder frame.
Do not turn over the SST abruptly without tapping. It be result in damage of the SST.
Be careful not to damage the contact surfaces of Upper oil pan and lower oil pan.
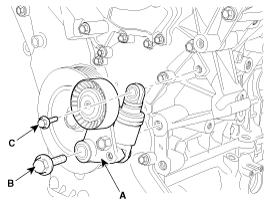
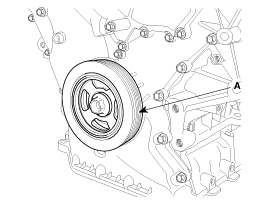
Remove the crankshaft pulley (A).
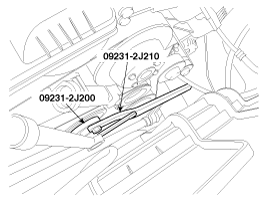
Use the SST(09231-2J200, 09231-2J210) to remove the crankshaft pulley bolt.
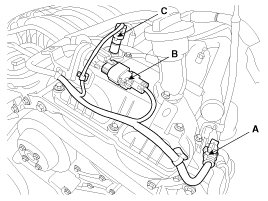
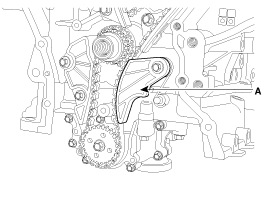
Remove the water vent hose (A) from the timing chain cover.
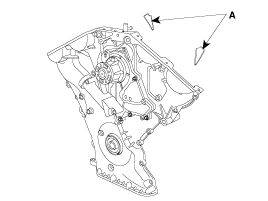
Remove the timing chain cover (A).
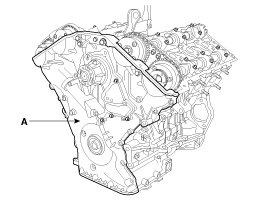
Be careful not to damage the contact surfaces of cylinder block, cylinder head and timing chain cover.
Before removing the timing chain, mark the RH/LH timing chain with an identification based on the location of the sprocket because the identification mark on the chain for TDC (Top Dead Center) can be erased.
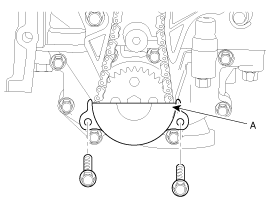
Remove the oil pump chain cover (A).
Remove the oil pump chain tensioner assembly (A).
Remove the oil pump chain guide (A).
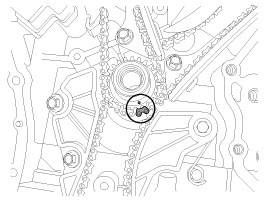
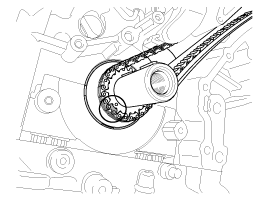
Install a set pin after compressing the RH timing chain tensioner.
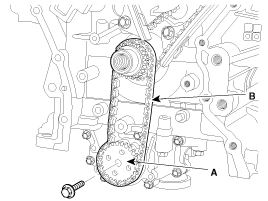
Remove the RH timing chain auto tensioner (A) and the RH timing chain tensioner arm (B).
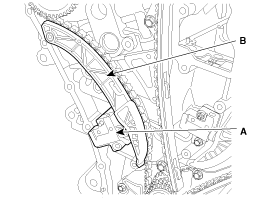
Remove the RH timing chain guide (A) and RH timing chain (B).
Remove the oil pump chain sprocket (A) and oil pump chain (B).
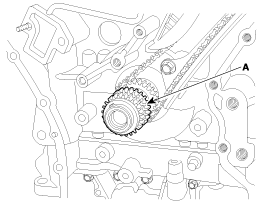
Remove the crankshaft sprocket (A) (O/P & RH camshaft drive).
Install a set pin after compressing the LH timing chain tensioner.
Remove the LH timing chain auto tensioner (A) and LH timing chain tensioner arm (B).
Remove the LH timing chain guide (A) and LH timing chain (B).

Remove the crankshaft sprocket (A). (LH camshaft drive).
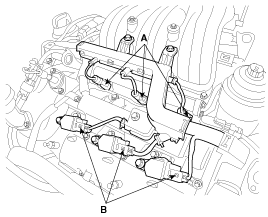
Remove the tensioner adapter assembly (A).
Check the camshaft sprocket and crankshaft sprocket for abnormal wear, cracks, or damage. Replace as necessary.
Inspect the tensioner arm and chain guide for abnormal wear, cracks, or damage. Replace as necessary.
Check that the tensioner piston moves smoothly when the ratchet pawl is released with thin rod.
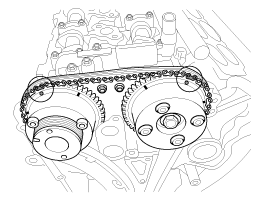
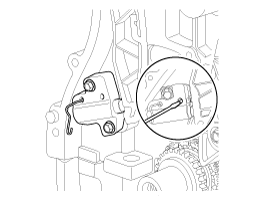
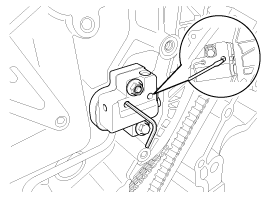
The key (A) of crankshaft should be aligned with the timing mark (B) of timing chain cover. As a result of this, the piston of No.1 cylinder is placed at the top dead center on compression stroke.

Install the tensioner adapter assembly (A).
Install the crankshaft sprocket (A). (LH camshaft drive).
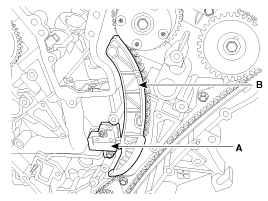
Install the LH timing chain (B) and the LH timing chain guide (A).
Tightening torque :
19.6 ~ 24.5N.m (2.0 ~ 2.5kgf.m, 14.5 ~ 18.1lb-ft)
To install the timing chain with no slack between each shaft (cam, crank), perform the following procedure.
Crankshaft sprocket → Timing chain guide → Exhaust camshaft sprocket → Intake camshaft sprocket.
The timing mark of each sprockets should be matched with timing mark (color link) of timing chain at during installation.
Install the LH timing chain tensioner arm (B) and the LH timing auto tensioner (A).
Tightening torque
A : 9.8 ~ 11.8N.m (1.0 ~ 1.2kgf.m, 7.2 ~ 8.7lb-ft)
B : 18.6 ~ 21.6N.m (1.9 ~ 2.2kgf.m, 13.7 ~ 15.9lb-ft)
Install the crankshaft sprocket (A) (O/P & RH camshaft drive).
Install the oil pump chain sprocket (A) and oil pump chain (B).
Tightening torque :
18.6 ~ 21.6N.m (1.9 ~ 2.2kgf.m, 13.7 ~ 15.9lb-ft)
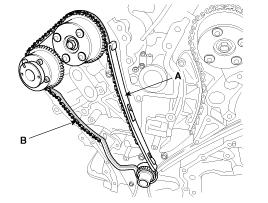
Install the RH timing chain (B) and the RH timing chain guide (A).
Tightening torque :
A : 19.6 ~ 24.5N.m (2.0 ~ 2.5kgf.m, 14.5 ~ 18.1lb-ft)
To install the timing chain with no slack between each shaft (cam, crank), perform the following procedure.
Crankshaft sprocket →Timing chain guide → Intake camshaft sprocket → Exhaust camshaft sprocket.
The timing mark of each sprockets should be matched with timing mark (color link) of timing chain at during installation.
Install the RH timing chain tensioner arm (B) and the RH timing auto tensioner (A).
Tightening torque
A : 9.8 ~ 11.8N.m (1.0 ~ 1.2kgf.m, 7.2 ~ 8.7lb-ft)
B : 18.6 ~ 21.6N.m (1.9 ~ 2.2kgf.m, 13.7 ~ 15.9lb-ft)
Install the oil pump chain guide (A).
Tightening torque :
9.8 ~ 11.8N.m (1.0 ~ 1.2kgf.m, 7.2 ~ 8.7lb-ft)
Install the oil pump chain tensioner assembly (A).
Tightening torque :
9.8 ~ 11.8N.m (1.0 ~ 1.2kgf.m, 7.2 ~ 8.7lb-ft)
Pull out the pins of hydraulic tensioner (LH & RH).
Install the oil pump chain cover (A).
Tightening torque :
9.8 ~ 11.8N.m (1.0 ~ 1.2kgf.m, 7.2 ~ 8.7lb-ft)
After rotating the crankshaft 2 revolutions in regular direction (clockwise viewed from front), confirm the timing mark.
Always turn the crankshaft clockwise.
Turning the crankshaft counter clockwise before building up oil pressure in the hydraulic timing chain tensioner may result in the chain disengaging from the sprocket teeth.
Install the timing chain cover.
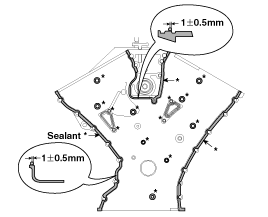
The sealant locations on chain cover and on counter parts (cylinder head, cylinder block, and lower oil pan) must be free of engine oil and etc.
Before assembling the timing chain cover, the liquid sealant TB 1217H should be applied on the gap between cylinder head and cylinder block.
The part must be assembled within 5 minutes after sealant was applied.
Bead width : 2.5mm(0.1in.)
After applying liquid sealant TB1217H on timing chain cover. The part must be assembled within 5 minutes after sealant was applied.
Sealant should be applied in a continuous bead in each of the areas indicated below.
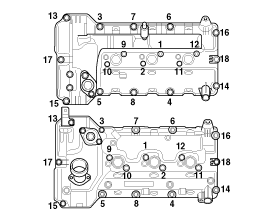
Install the new gasket (A) to the timing chain cover.
During timing cover installation, care not to take off applied sealant on the timing cover by contact with other parts.
The dowel pins on the cylinder block and holes on the timing chain cover should be used as a reference in order to assemble the timing chain cover correctly.
Tightening torque
B(17) :
18.62 ~ 21.56N.m (1.9 ~ 2.2kgf.m, 13.74 ~ 15.91lb-ft)
C(4) :
9.80 ~ 11.76N.m (1.0 ~ 1.2kgf.m, 7.23 ~ 8.68lb-ft)
D(2) :
58.80 ~ 68.80N.m (6.0 ~ 7.0kgf.m, 43.40 ~ 50.63lb-ft)
F(2) :
24.50 ~ 26.46N.m (2.5 ~ 2.7kgf.m, 18.08 ~ 19.53lb-ft)
G(4) :
21.56 ~ 23.52N.m (2.2 ~ 2.4kgf.m, 15.91 ~ 17.36lb-ft)
H(1) :
9.80 ~ 11.76N.m (1.0 ~ 1.2kgf.m, 7.23 ~ 8.68lb-ft)
I(1) :
9.80 ~ 11.76N.m (1.0 ~ 1.2kgf.m, 7.23 ~ 8.68lb-ft)
J(1) :
9.80 ~ 11.76N.m (1.0 ~ 1.2kgf.m, 7.23 ~ 8.68lb-ft)
K(4) :
9.80 ~ 11.76N.m (1.0 ~ 1.2kgf.m, 7.23 ~ 8.68lb-ft)
L(1):
21.56 ~ 26.46N.m (2.2 ~ 2.7kgf.m, 15.91 ~ 19.53lb-ft)
- New bolt
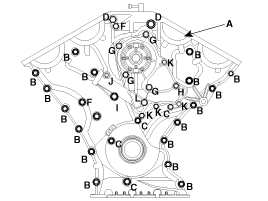
The firing and/or blow out test should not be performed within 30 minutes after the timing chain cover was assembled.
Install the water vent hose (A) to the timing chain cover.
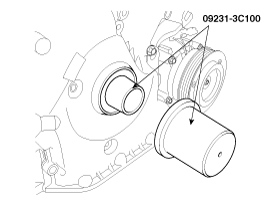
Using SST(09231-3C100), install timing chain cover oil seal.
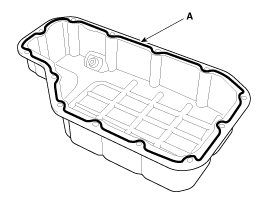
Install the lower oil pan (A).
Using a gasket scraper, remove all the old packing material from the gasket surfaces.
Before assembling the oil pan, the liquid sealant TB 1217H should be applied on oil pan. The part must be assembled within 5 minutes after the sealant was applied.
Bead width : 2.5mm(0.1in.)
Clean the sealing face before assembling two parts.
Remove harmful foreign matters on the sealing face before applying sealant.
When applying sealant gasket, sealant must not be protruded into the inside of oil pan.
To prevent leakage of oil, apply sealant gasket to the inner threads of the bolt holes.
Install the oil pan (A).
Uniformly tighten the bolts in several passes.
Tightening torque :
9.8 ~ 11.8N.m (1.0 ~ 1.2kgf.m, 7.2 ~ 8.7lb-ft)
Install the crankshaft pulley (A).
Tightening torque :
284.4 ~304.0N.m (29.0~31.0kgf.m, 209.8~224.2lb-ft)
Use the SST(09231-2J200, 09231-2J210) to install the crankshaft pulley bolt.
Install the water pump pulley (A).
Tightening torque :
7.8 ~ 9.8N.m (0.8 ~ 1.0kgf.m, 5.8 ~ 7.2lb-ft)
Install the drive belt auto tensioner (A).
Tightening torque
Bolt (B) :
81.4 ~ 85.3N.m (8.3 ~ 8.7kgf.m, 60.0 ~ 62.9lb-ft)
Bolt (C) :
17.7 ~ 21.6N.m (1.8 ~ 2.2kgf.m, 13.0 ~ 15.9lb-ft)
Install the drive belt idler (A).
Tightening torque :
52.9 ~ 57.9N.m (5.4 ~ 5.9kgf.m, 39.1 ~ 42.7lb-ft)
Install the drive belt (A).
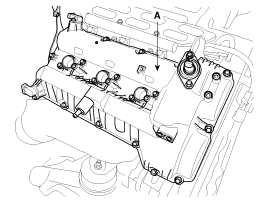
Install the LH/RH cylinder head cover.
The hardening sealant located on the upper area between timing chain cover and cylinder head should be removed before assembling cylinder head cover.
After applying sealant (TB1217H), it should be assembled within 5 minutes.
Bead width : 2.5mm (0.1in.)
The firing and/or blow out test should not be performed within 30 minutes after the cylinder head cover was assembled.
Install the cylinder head cover bolts as following method.
Tightening torque :
9.8 ~ 11.8N.m (1.0 ~ 1.2kgf.m, 7.2 ~ 8.7lb-ft)
Do not reuse cylinder head cover gasket.
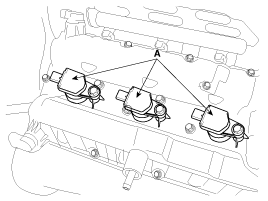
Install the LH/RH ignition coils (A).
Connect the RH ignition coil connector (A) and the injector connector (B).
Install the coolant pipe (A).
Tightening torque :
9.8 ~ 11.8N.m (1.0 ~ 1.2kgf.m, 7.2 ~ 8.7lb-ft)
Install the surge tank (A).
Tightening torque :
9.8 ~ 11.8N.m (1.0 ~ 1.2kgf.m, 7.2 ~ 8.7lb-ft)
Connect the throttle body coolant hoses (A), breather hose (B) and tighten the surge tank stay bolts (C).
Tightening torque :
27.5 ~ 31.4N.m (2.8 ~ 3.2kgf.m, 20.3 ~ 23.1lb-ft)
Connect the engine wiring connectors.
Connect the water temperature sensor connector (A) and oil temperature sensor connector (B).
Connect the VIS solenoid valve connector (A), PCSV connector (B), RH oxygen sensor connector (C) and the RH exhaust camshaft CMP sensor connector (D).
Connect the LH intake camshaft CMP sensor connector (A), RH intake camshaft CMP sensor connector (B) and condenser connector (C).
Connect the oil pressure switch connector (A) ,LH exhaust camshaft CMP sensor connector (B) and LH oxygen sensor connector (C).
Connect the LH injector connector (A) and LH ignition coil connector (B).
Connect the LH knock sensor connector (A), LH/RH intake OCV connector (B) and LH exhaust OCV connector (C).
Connect the MAP sensor connector (A), ETC connector (B), RH exhaust OCV connector (C), RH injector connector (D) and RH ignition coil connector (E).
Connect the power steering oil pressure switch connector (A) and RH knock sensor connector (B).
Install the cooling fan assembly (B) and connect the fan connector (A).
Tightening torque :
8.8 ~ 13.7N.m (0.9 ~ 1.4kgf.m, 6.5 ~ 10.1lb-ft)
Connect the purge control solenoid valve (PCSV) hose (A) and the brake booster vacuum hose (B).
Install the radiator upper hose (A) and lower hose (B).
Install the air cleaner assembly (C), and connect the AFS connector (A), breather hose (B).
Tightening torque :
7.8 ~ 9.8N.m (0.8 ~ 1.0kgf.m, 5.8 ~ 7.2lb-ft)
Install the radiator grill upper guard (A).
Install the engine cover (A).
Connect the battery negative cable(A).
Refill engine oil.
Clean the battery posts and cable terminals with sandpaper. Assemble and then apply grease to prevent corrosion.
Inspect for fuel leakage.
After assembling the fuel line, turn on the ignition switch (do not operate the starter) so that the fuel pump runs for approximately two seconds and fuel line pressurizes.
Repeat this operation two or three times, and then check for fuel leakage at any point in the fuel lines.
Refill radiator and reservoir tank with engine coolant.
Bleed air from the cooling system.
Start engine and let it run until it warms up. (Until the radiator fan operates 3 or 4 times.)
Turn Off the engine. Check the level in the radiator, add coolant if needed. This will allow trapped air to be removed from the cooling system.
Put radiator cap on tightly, then run the engine again and check for leaks.
