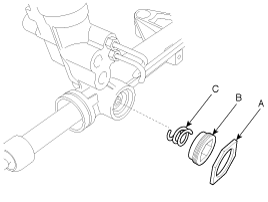
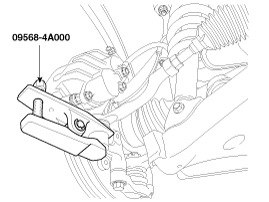
Drain the power steering fluid.
Remove the both front wheels.
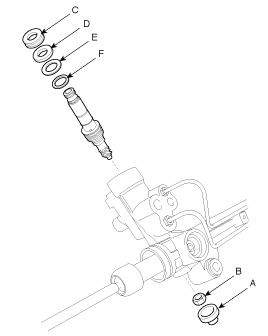
Remove the tie rod end ball joint (C) from the knuckle by using the SST (09568-4A000).
Remove the split pin (A).
Remove the castle nut (B).
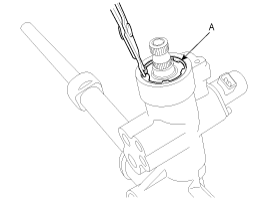
Use the SST (09568-4A000).
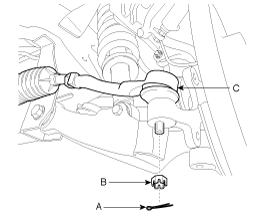
Tightening torque :
58.8~78.4N.m (6.0~8.0Kgf.m, 43.3~57.8lb.ft)
When using SST, be sure not to damage the dust cover of lower arm ball joint.
Keep SST tied to the car because there is a risk of injury by dropping the SST during removing the lower arm ball joint.
The peripheral parts may be damaged when removing the lower arm ball joint with a general tool such as lever, so be sure to use SST.
Loosen the tube bracket bolts and then disconnect the pressure (B) and return tube (A).
Remove the steering gear box (A) by loosening the bolts and nuts.
Installation is the reverse of the removal.
Fill the reservoir with the power steering fluid and then bleed the power steering system.
Inspect the front wheel alignment and adjust it if necessary.
Loosen the lock nut (A) and then unscrew the tie-rod end (B) and lock nut from the tie-rod.
Remove the bellows clip (A) and band (B) and then pull the bellows (C) away from the end of the tie-rod.
Remove the feed tubes (A) from the steering gear box.
Unscrew the tie-rod (A) from the rack bar (B).
Remove the lock nut (A), yoke plug (B) and then pull out the yoke spring (C).
Tightening torque:
Lock nut (A) : 49.0 ~ 58.8 N.m (5.0 ~ 6.0 kgf.m, 36.2 ~ 43.4 lb-ft)
When installing the yoke spring, plug and lock nut, follow the instructions below.
Temporarily tighten the the yoke plug to 6.9 ~ 11.8 N.m (70 ~ 120 kgf.cm, 5.1 ~ 8.7 lb-ft).
Tighten the yoke plug to 4.9 N.m (50 kgf.cm, 3.6 lb-ft) again and then loosen it by 35°
Tighten the yoke plug lock nut to 49.0 ~ 58.8 N.m (5.0 ~ 6.0 kgf.m, 36.2 ~ 43.4 lb-ft).
Remove the snap ring (A).
Remove the pinion plug (A) and lock nut (B).
Tightening torque:
Lock nut (B) : 39.2 ~ 49.0 N.m (4.0 ~ 5.0 kgf.m, 28.9 ~ 36.2 lb-ft)
Remove the valve assembly (C), oil seal (D), bearing (E) and snap ring (F).
Do not allow dust, dirt, or foreign materials to contact the disassembled parts and inside of the valve assembly housing.
Unscrew the rack bush and pull the rack bar out of the rack housing.
Reassembly is the reverse of the disassembly.
Rack bar
Check the rack gear for damage.
Check the rack bar for bend and deformation.
Valve assembly
Check the valve assembly for wear, burr, and damage.