3.
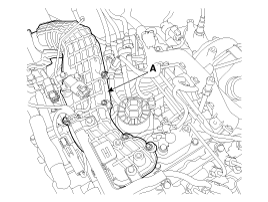
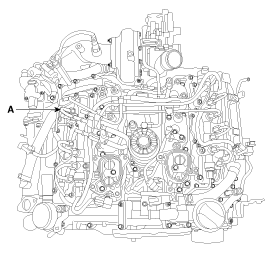
Remove the inlet upper manifold assembly (A) (Refer to "Intake and Exhaust system" in EM group).
As the Piezo-Injector operates under maximum DC 200V, there may be a risk of an electric shock caused by shorted control line etc. So when repairing the injector or its wiring, disconnect the battery negative (-) terminal from the battery and wait for about 30 seconds.
Common Rail Fuel Injection System operates with extremely high pressure (approximately 1,600bar), so never perform any work on injection system with engine running or within 30 seconds after the engine stops.
Keep cleanly the parts and the working area.
Pay attention to a foreign substance.
Just before installing injector, tube or hose, remove the protect-cap attached on them.
Do not remove injector except for special case.
When installing Injector
Wash the contact area of the injector and replace the O-ring with a new one.
Spread oil on the injector O-ring.
To protect damage caused by shock, vertically insert the injector into the cylinder head.
When installing High Pressure Fuel Pipe
Do not use again the used high pressure fuel pipe.
Install the flange nut correctly.
Turn ignition switch OFF and disconnect the negative (-) battery cable.
Remove the radiator upper shroud and the cooling fan (Remove the "Cooling system" in EM group).
Remove the inlet upper manifold assembly (A) (Refer to "Intake and Exhaust system" in EM group).
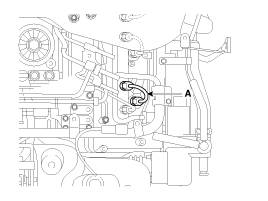
Disconnect the fuel pressure regulator valve (A), fuel temperature sensor connector (B), oil pressure switch connector (C).
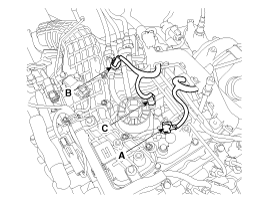
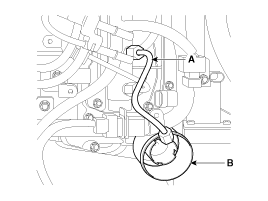
Disconnect the fuel inlet tube quick-connector (A) and the fuel return tube quick-connector (B).
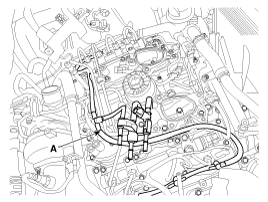
Remove the fuel feed & return line (A).
Remove the inlet lower manifold assembly (Refer to "Intake and Exhaust system" in EM group).
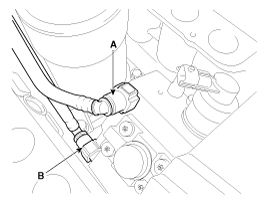
Remove the glow plug wiring (A) and the high pressure fuel pipe (B).

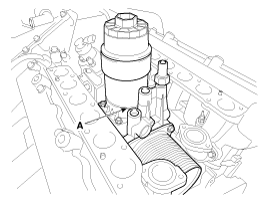
Remove the engine oil filter (A).
Install the fixing crankshaft pulley holder (A) [SST No: 09231-2J100] on the crankshaft pulley.
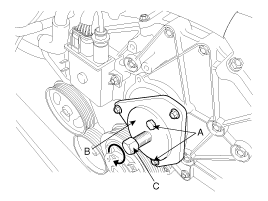
Unscrew the three high pressure fuel pump mounting bolts (A).
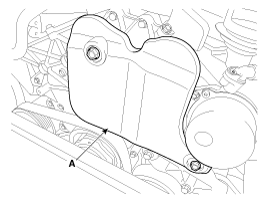
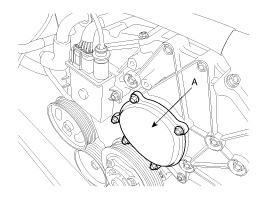
Remove the cover (A).
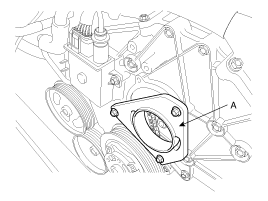
Remove the service cover (A).
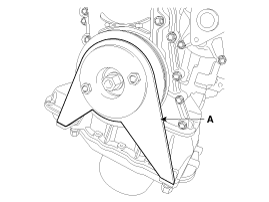
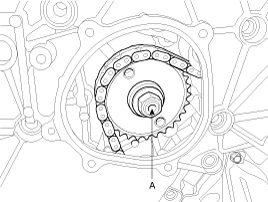
Remove the sprocket tightening nut (A).
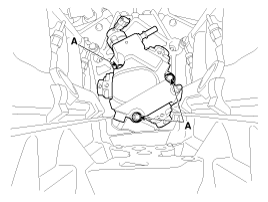
Install the fixing plate (A) [SST No.: 09331-3A000] on the timing case.
Install the supporter (B) [SST No.: 09331-3A000] on the sprocket with the bolts (A) [SST No.: 09331-3A000].
Push the pump shaft from the sprocket with rotating the main bolt (C) [SST No.: 09331-3A000] clockwise, and then remove the high pressure fuel pump from the engine.
Installation is reverse of removal.
When installing the high pressure fuel pipe, apply the specified tightening torques with the special service tool [SST No.: 09314-3A000].
High pressure fuel pump installation bolts:
19.6 ~ 26.5 N.m (2.0 ~ 2.7 kgf.m, 14.5 ~ 19.5 lb-ft)
High pressure fuel pipe installation nut:
24.5 ~ 28.4 N.m (2.5 ~ 2.9 kgf.m, 18.1 ~ 21.0 lb-ft)
In case of bad start after reinstalling (replacing) the injector, the high pressure fuel pump or common rail, bleed air in high pressure fuel circuit.
After replacing the part, install the others except the injector #5 side high pressure fuel pipe (A).
Install the high pressure fuel pipe (A:31426-3A000) to the injecter #5 side on the common rail, and place the cup (B) at the end of the pipe.
Check to bleed fuel out at the pipe after cranking the engine several times and then, remove the high pressure fuel pipe tightened temporarily.
Install new high pressure fuel pipe (A) to the injecter #5 side with specified torque.
Check the high pressure fuel system for leakage after start the engine.
